Pest and disease scouting in the app
Get to the field. At each stop: open, count, close.
Move forward with the arrows at the bottom or by swiping sideways. Tap a screenshot to enlarge it.
Before you go
Get your phone ready.
- Install the app "Pragueiro - upCampo" from your phone's app store.
- Log in with the username and password the team gave you. It is the same login as the web portal.
- The first time, with internet, let the app download the farm's data. It may take a few minutes. When it finishes, the farm name appears in the menu and the fields appear in Scouting (IPM).
- Turn on location (GPS) on your phone and leave it on. Each point stores where you were; without GPS, the point won't open.
Step 0 · Get to the field
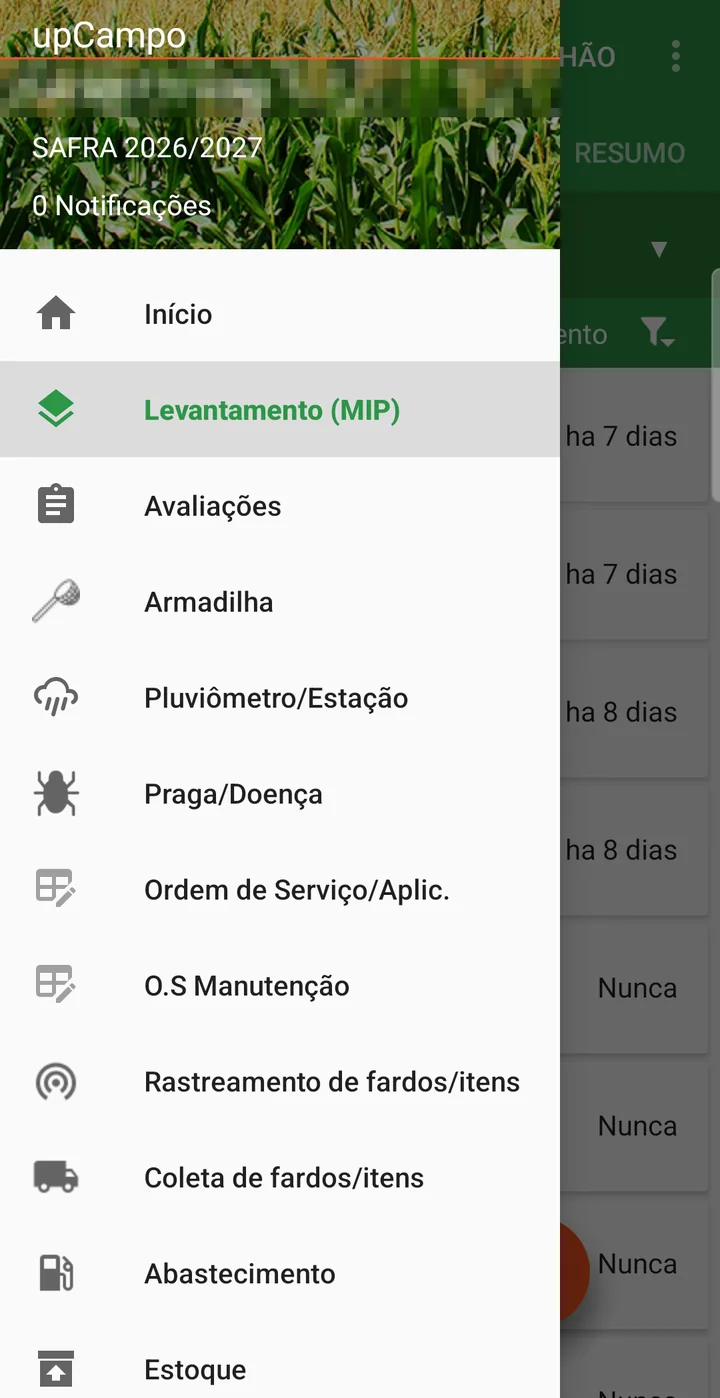
Open Scouting (IPM).
- Tap ☰, in the top left corner. The menu opens.
- Tap Scouting (IPM).
- Or, on the Home screen (the one that opens after login), tap the big Scouting (IPM) button.
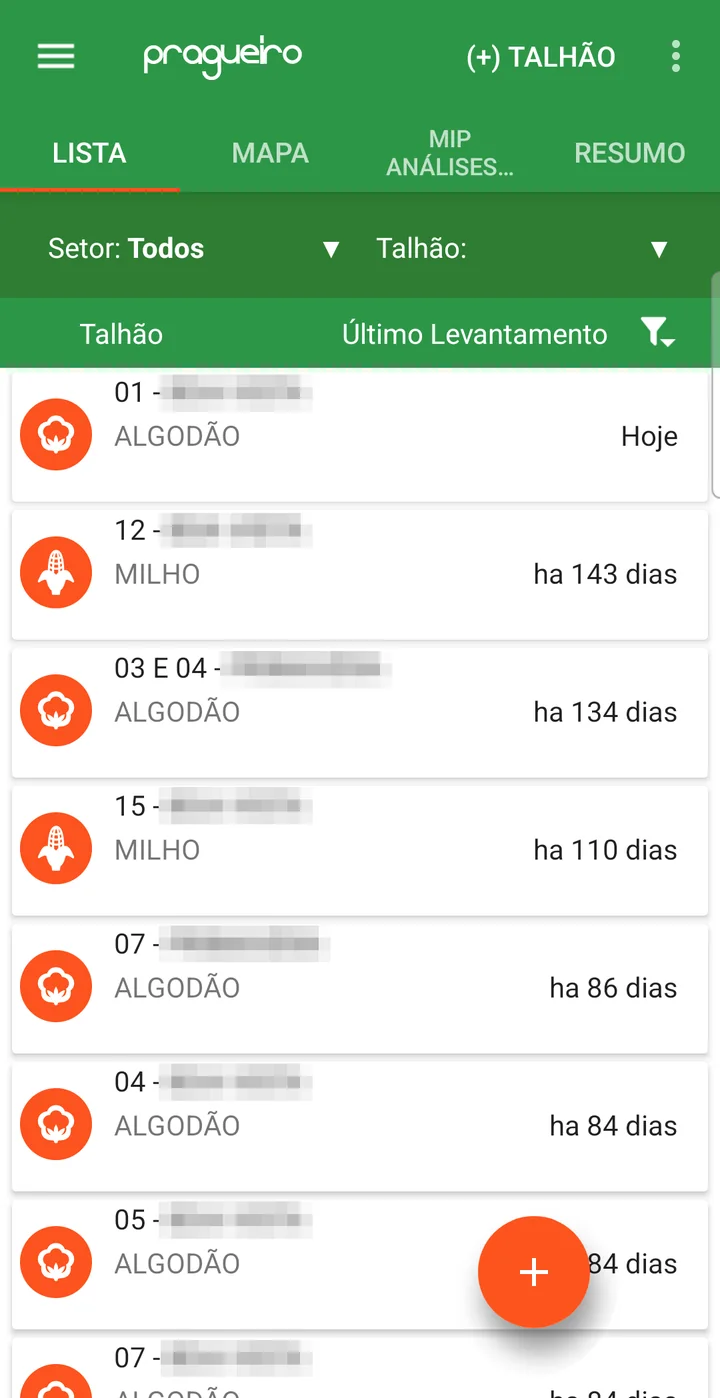
- LIST — the season's fields, one below the other.
- MAP — the same fields, drawn on the map.
- IPM MGMT. ANALYSIS and SUMMARY — to look up what has already been done (at the end of this guide).
- (+) FIELD, at the top — don't use it: it is for registering fields.
Step 0 · Get to the field
Find the field in the list.
- Sector and Field, at the top — filters to shorten the list. Tap and choose.
- On each row: the field name, the crop planted and the Last Scouting.
- Last Scouting tells you when the field was visited: Today, 7 days ago, Never. It helps you see what is overdue.
Found it? Tap the field.
Step 0 · Get to the field
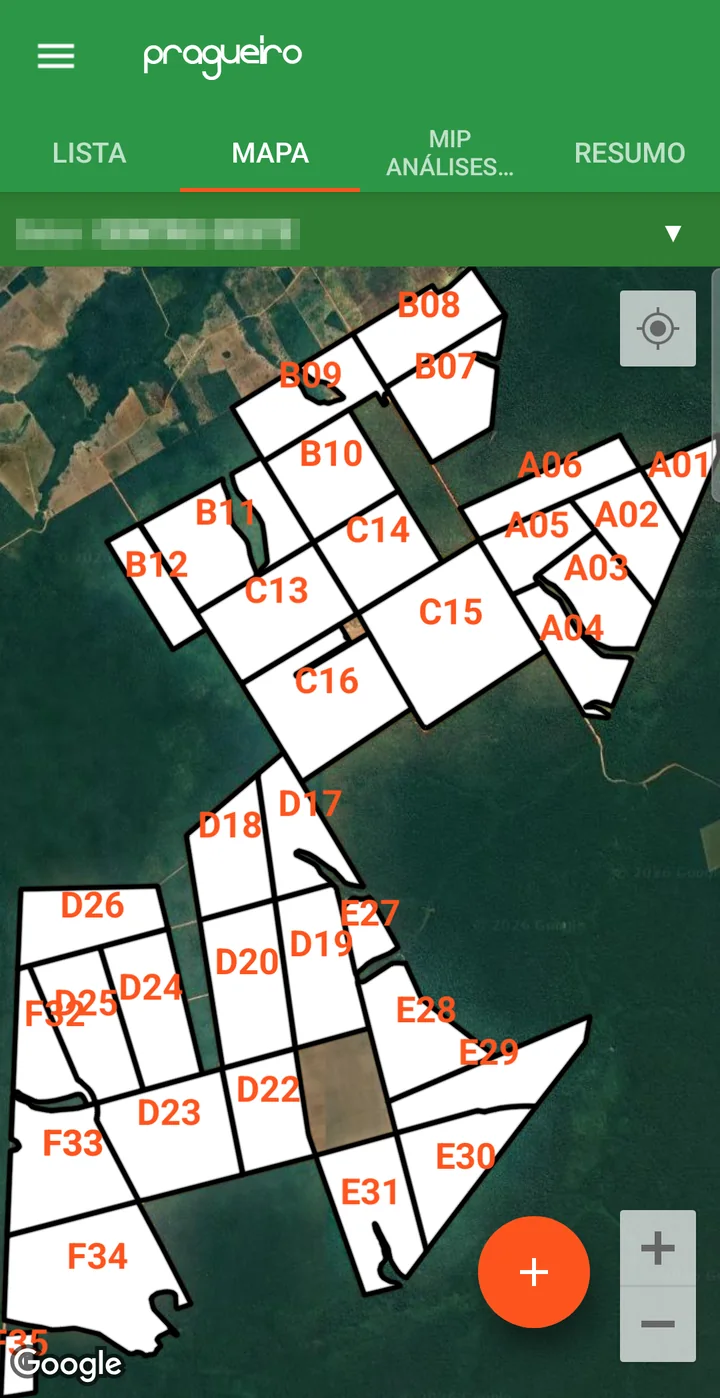
Or find it on the map.
- Tap the MAP tab. The fields appear over the satellite image, with the name in the middle, and you appear on the map.
- If the farm has areas far from each other, tap Sector and choose yours: the map zooms in.
- Tap inside the field you are in. Its history opens, just like from the list.
Step 0 · Get to the field
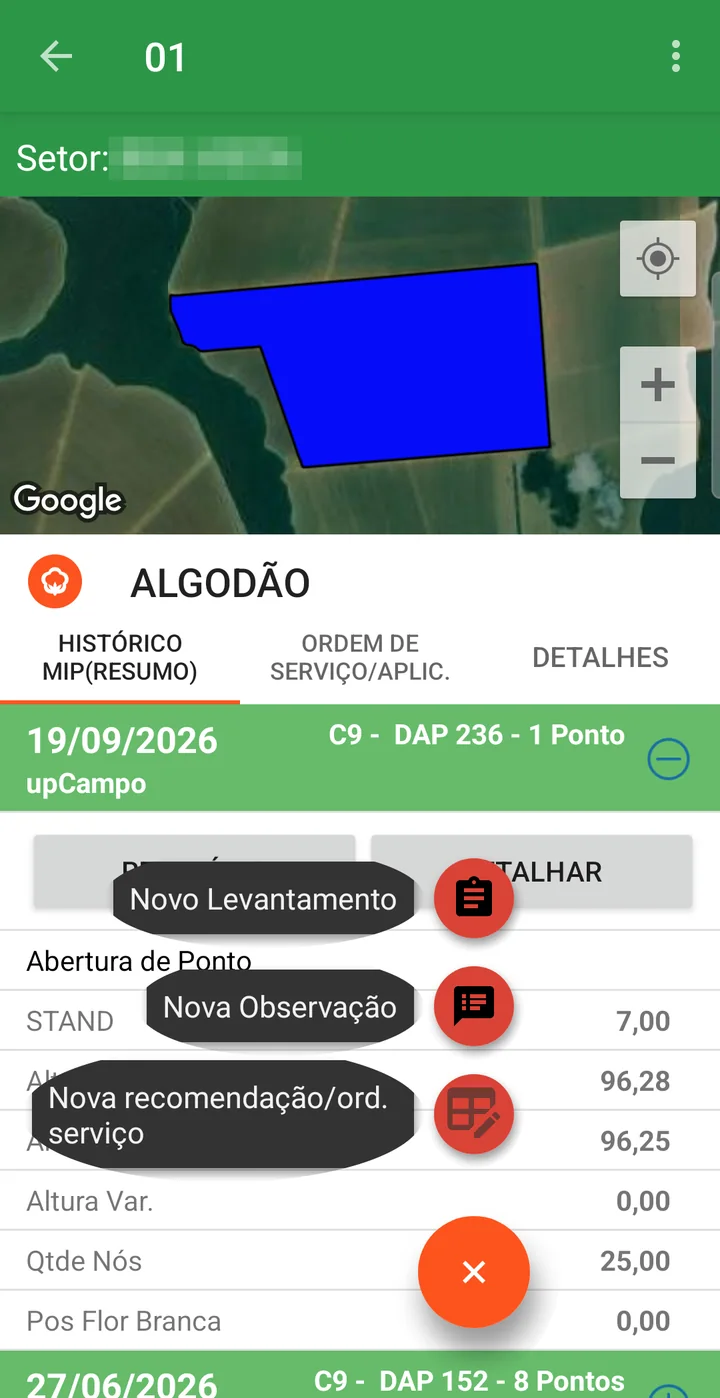
Start the New Scouting.
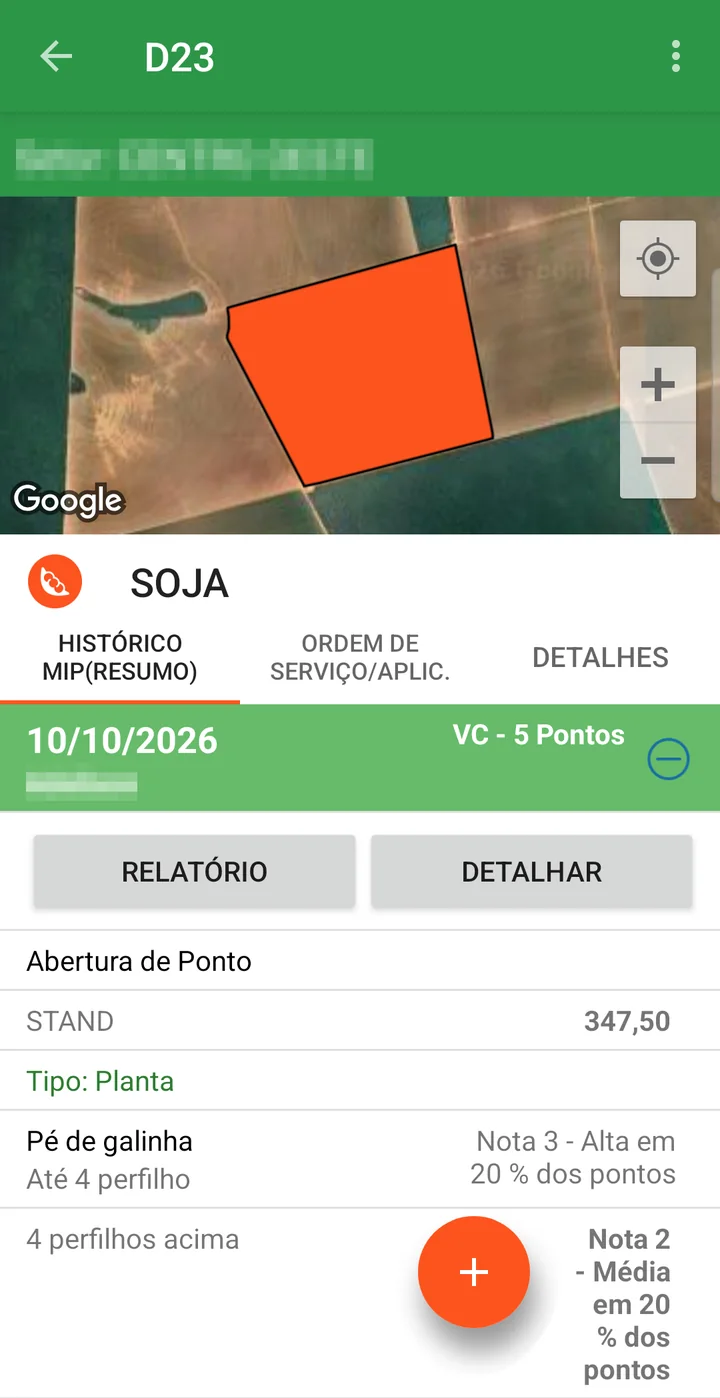
When you tap the field, its screen opens: the field map at the top and, below, the scoutings already done (you don't need to touch them now).
- Tap the orange + button, at the bottom right.
- Three options open. Tap New Scouting.
Step 1 · Open the point
Stop in the field and open the point.
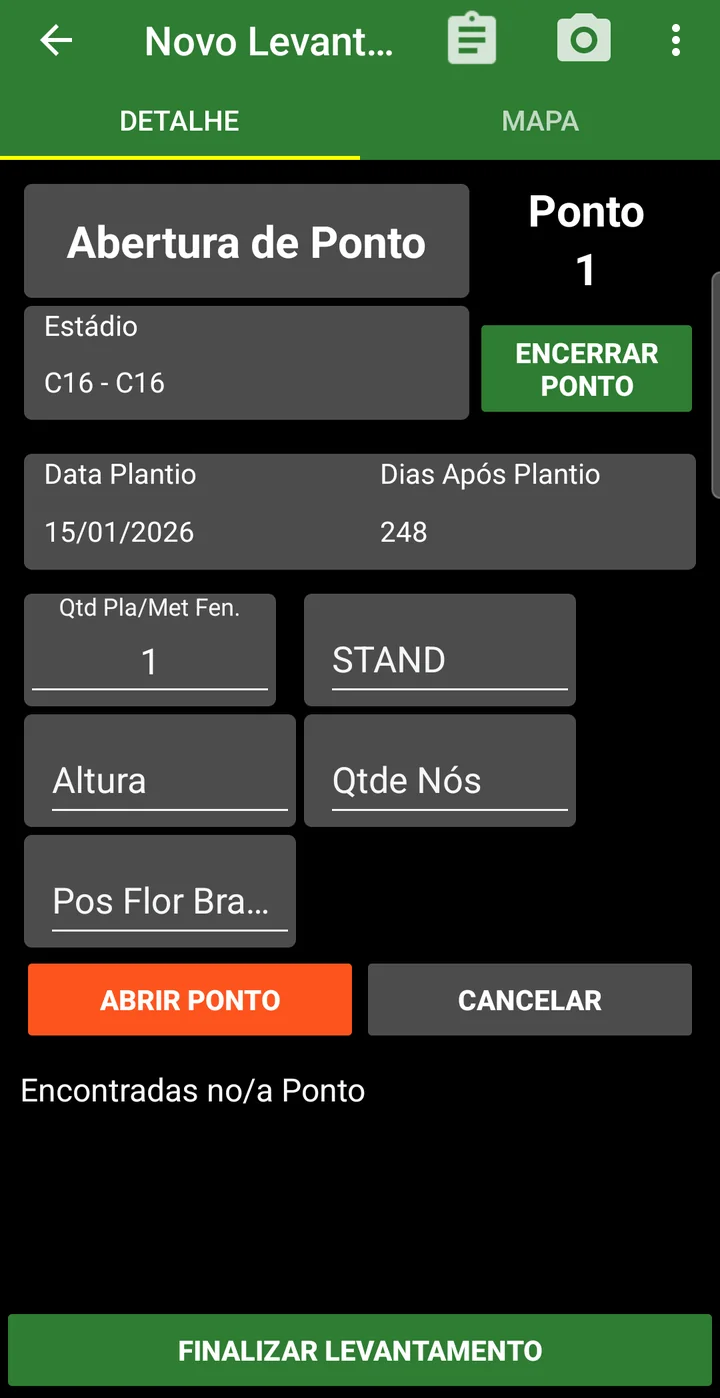
Walk to the first stop. The New Scouting screen is already on the Point Opening block.
- Stage — tap and choose the crop's phase.
- Point — the number of this stop (it starts at 1, the app counts by itself).
- Planting Date and Days After Planting — already filled in.
- The plant measurements — STAND, height, nodes… Fill in the ones that appear; each farm asks for its own.
- OPEN POINT — saves the opening. CANCEL clears the screen.
Step 1 · Open the point
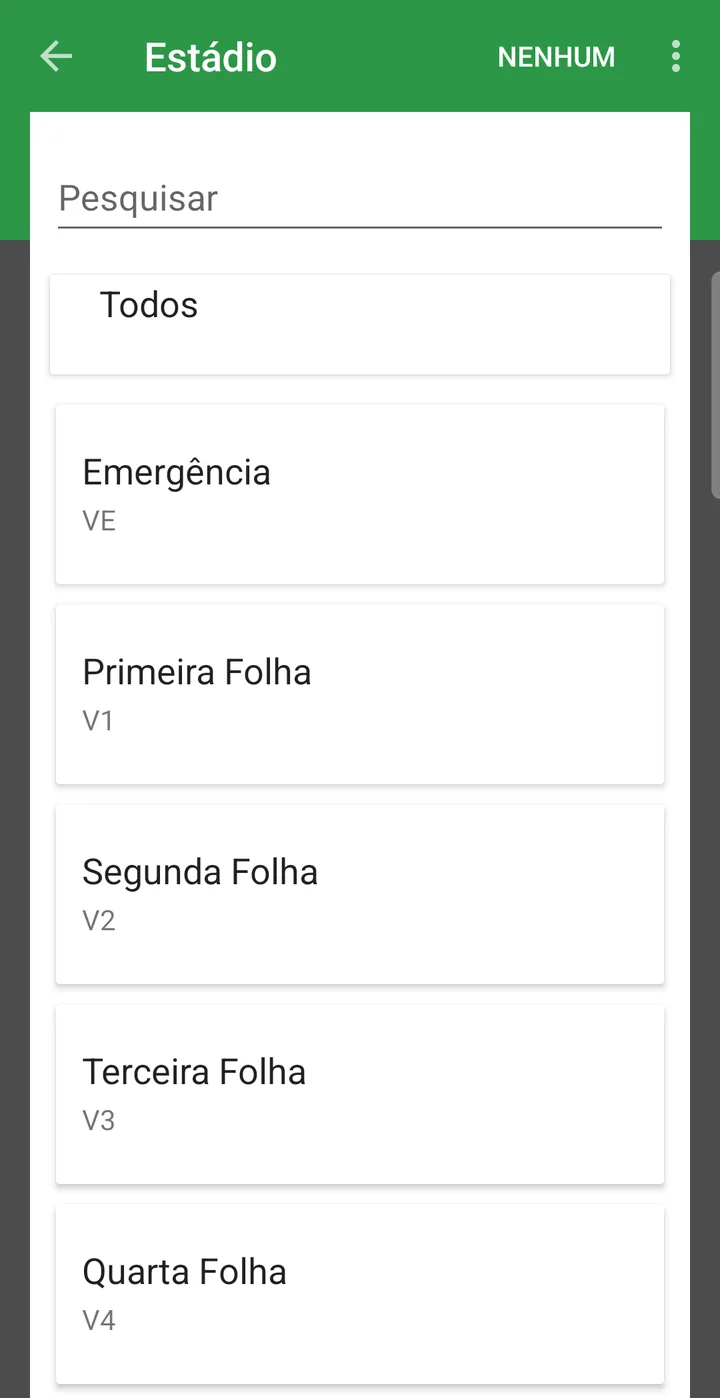
Choose the stage.
When you tap Stage, the list of the crop's phases opens, each with its code (VE, V1, V2…).
- Look for the phase the crop is in — scroll the list or type in Search.
- Tap it. The screen goes back to the opening with the stage filled in.
Step 1 · Open the point
Where you are and where you've already stopped.
At the top of the screen there are two tabs: DETAIL (where you are now) and MAP. Tap MAP to see the field:
- the field outline and your position;
- a red pin on each point done today — check that your stops are spread across the area;
- the Distance to edge, at the top: don't place the point right at the border;
- in the ⋮ menu, Show previous scouting points: the points from the last scouting, in yellow.
To go back, tap DETAIL.
Step 2 · Count
Choose the counting Type.
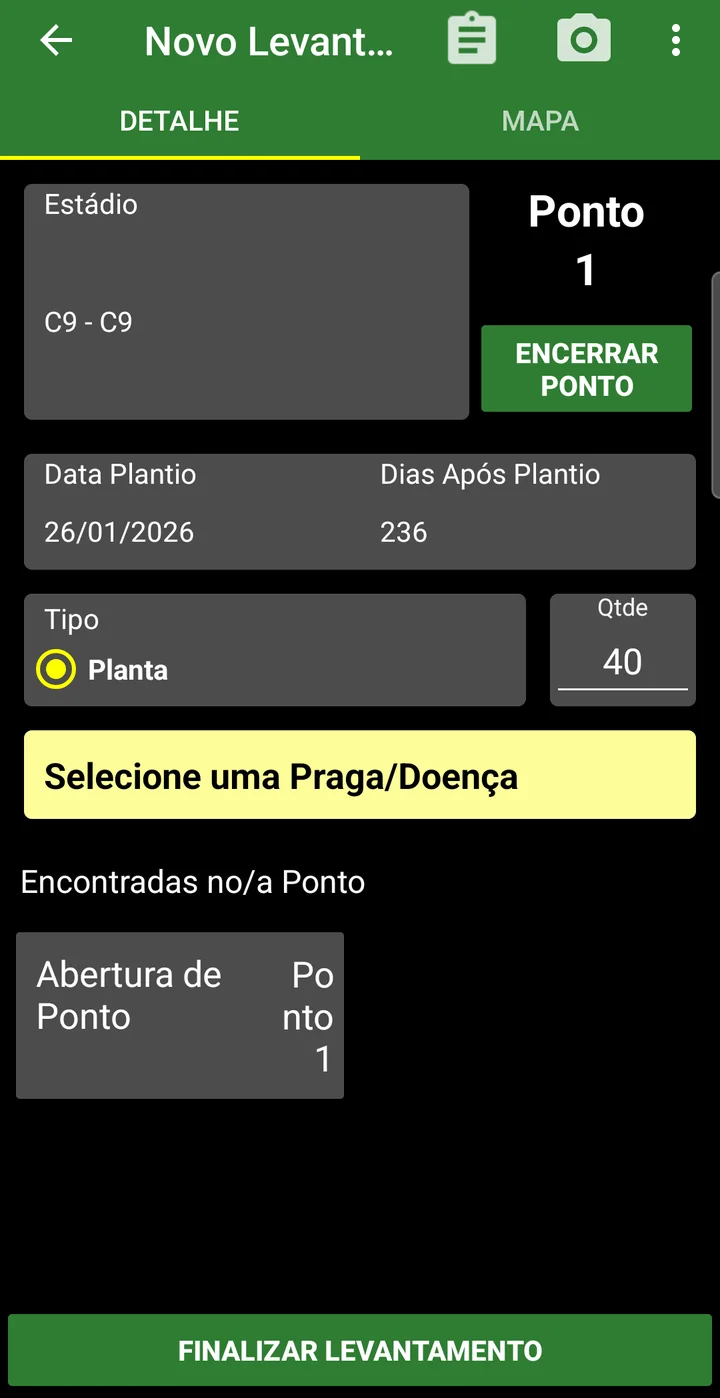
After OPEN POINT, the same screen changes: the Type and the Select a Pest/Disease field appear. The type says how you counted.
| Type | How it is counted |
|---|---|
| Plant | Examine the plants at the point, one by one. Enter in Qty how many you assessed. |
| Beat cloth | Cloth between two rows, shake the plants, count what fell. No quantity is asked. |
| Meter | Count what is in the meters of row. Enter in Qty how many meters you assessed. |
Step 2 · Count
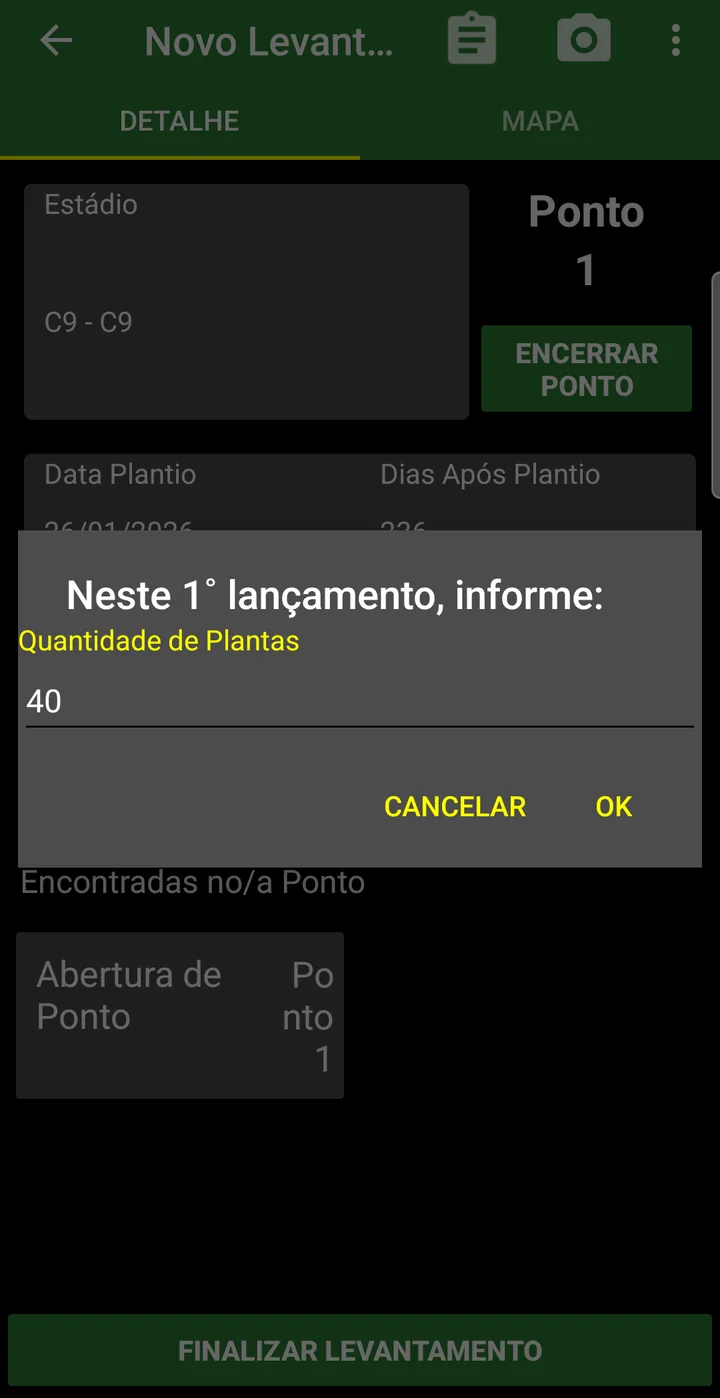
Tap Select a Pest/Disease.
- Tap the Select a Pest/Disease field.
- On the point's first pest, the app asks for the quantity assessed (for example, Number of Plants). Check the number and tap OK.
- The list of pests opens (next screen).
That question appears only once per point.
Step 2 · Count
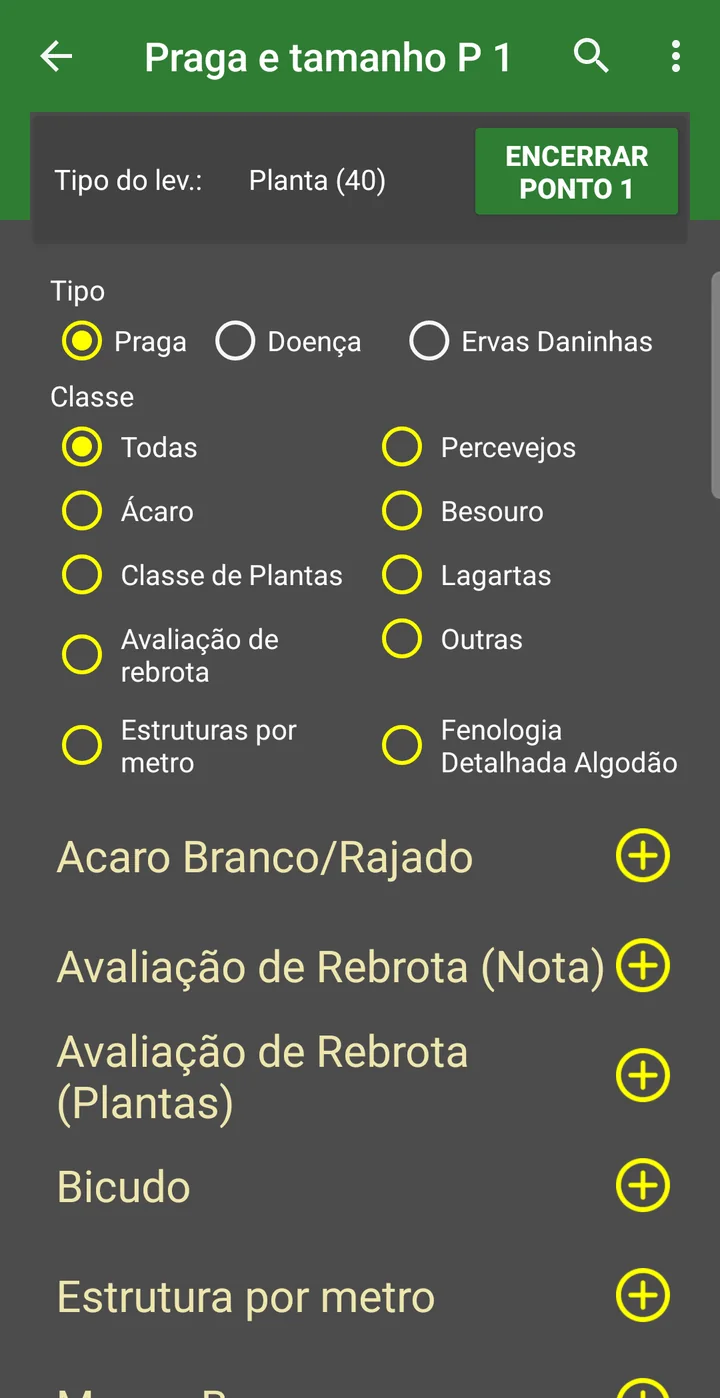
Find the pest in the list.
- Scouting type — the type and quantity you chose (e.g.: Plant (40)).
- CLOSE POINT 1 — for when you finish this stop (step 3).
- Type — Pest, Disease or Weeds. Each one is a separate list.
- Class — groups (Caterpillars, Stink bugs…). Leave it on All to see everything.
- The magnifying glass, at the top — searches by name.
- The list of pests, each with a + next to it.
Can't find it? Check the Type and leave the Class on All.
Step 2 · Count
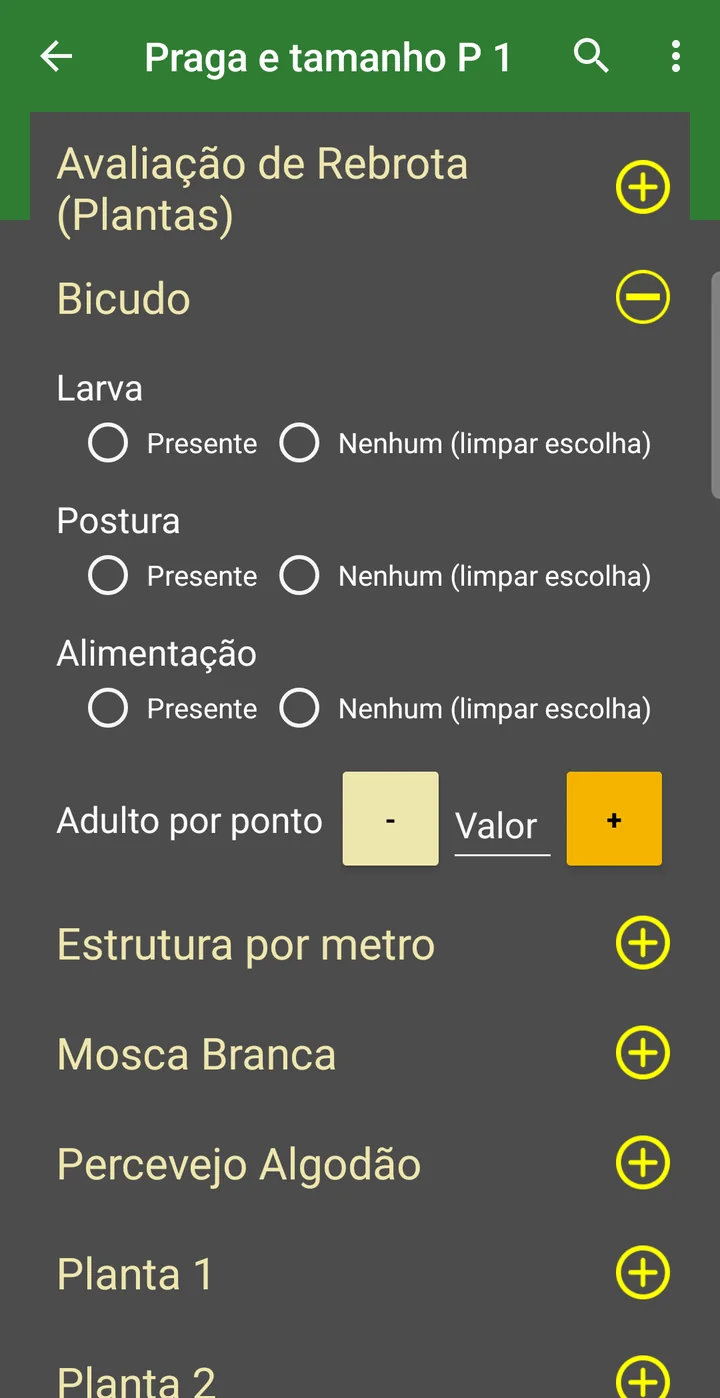
Fill it in and tap Save.
- Tap the pest's name (or the +). It opens and shows the fields.
- Fill in what you found (see the table).
- The Save button appears on the pest itself. Tap it. The app replies Saved successfully!
- Repeat for each pest you found at this point.
| If you see… | Do this |
|---|---|
| Value with − and + | Count: one tap on + per individual, or type the number. |
| Options (Present, Low, Medium, High…) | Choose the one that describes what you saw. None (clear selection) undoes it. |
| One row per size (Larva, Adult…) | Fill in only the sizes you found. |
Step 2 · Count
Diseases and weeds: same path.
- At the top of the list, change the Type to Disease (or Weeds).
- Open the disease and fill in the score or the option that appears.
- Save.
Each disease is assessed the way the farm set it up: if a number appears, count; if options appear, choose.
Step 2 · Count
Check what was saved.
Go back to the point screen with the ← arrow, at the top.
- Found at Point — the list of what has already been saved at this point: the Point Opening and each pest, with its value.
- If the pest you counted isn't there, it wasn't saved: go back and tap Save.
To record another pest, tap Select a Pest/Disease again.
Step 3 · Close
Done with this stop? Close the point.
- Tap CLOSE POINT (it shows the number: CLOSE POINT 1). It is at the top of the point screen and of the pest list.
- The app asks if you are sure. Tap Yes.
- The screen clears and already shows point 2. Walk to the next stop and go back to step 1.
Step 3 · Finish
Done with the field? Finish Scouting.
- On the point screen, tap FINISH SCOUTING, at the bottom. (With the keyboard open it disappears: close the keyboard.)
- The app closes the last point and returns to the field.
- When you get signal, the phone sends everything by itself.
Look it up later
The field history.
- Tap the field (in the LIST or on the MAP).
- On the IPM HISTORY(SUMMARY) tab, each scouting has a green bar with the date, who did it, the stage and how many points.
- Tap the bar to open or close the summary for that date. Only the most recent comes open.
- REPORT — generates that day's report.
- DRILL DOWN — opens the scouting point by point (next screen).
- Below, each pest with the field result (e.g.: Score 3 - High in 20 % of points).
Look it up later
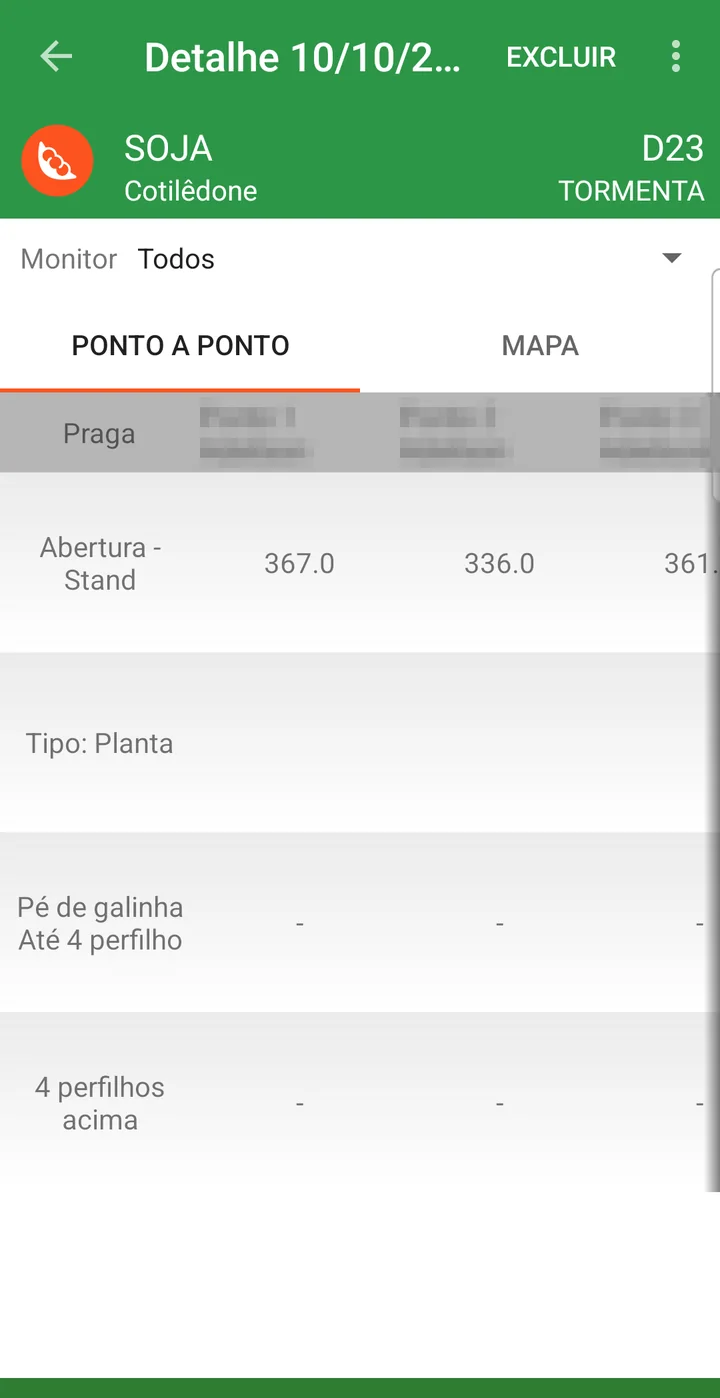
Each point: Point by Point.
DRILL DOWN opens with two tabs. The first, POINT BY POINT, is a table:
- one column per point (Point 1, Point 2…), with who did it;
- one row per pest and for the opening (the Stand, for example);
- the dash - means that pest did not show up at that point.
If two technicians scouted the field on the same day, the Monitor filter separates each one's points.
Look it up later
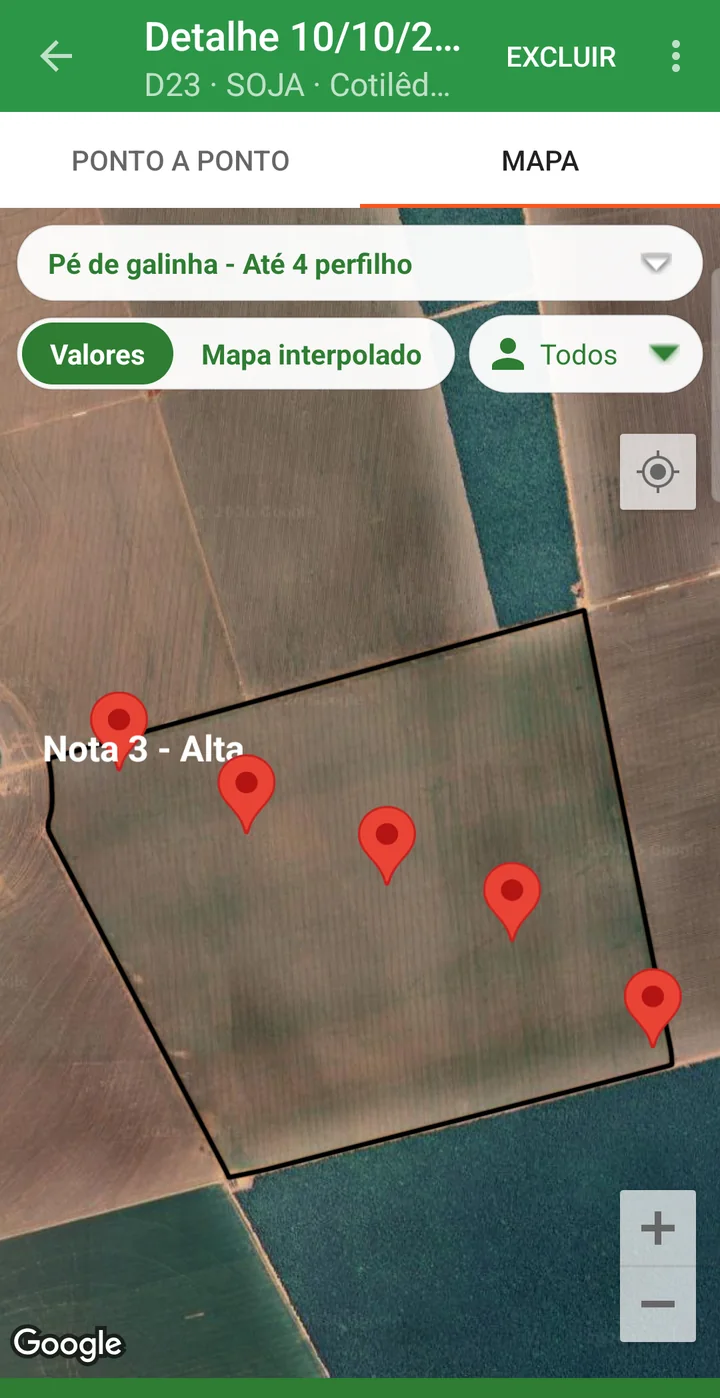
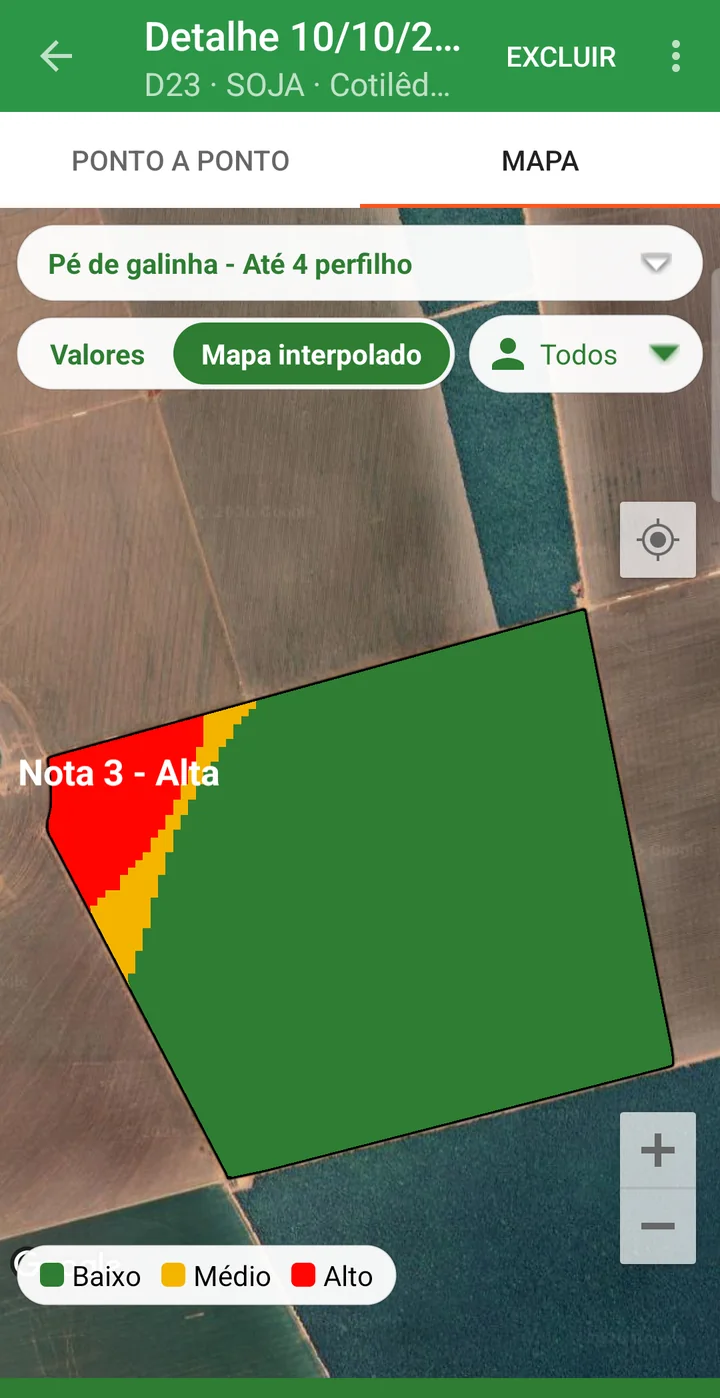
The points on the map: MAP.
- In DRILL DOWN, tap the MAP tab: the field and a pin on each point.
- Tap Select a Pest/Size here and choose the pest.
- With Values, the map shows each point's result.
- With Interpolated map, the field is painted in Low (green), Medium (yellow) and High (red) — that is where you see the hotspot.
Look it up later
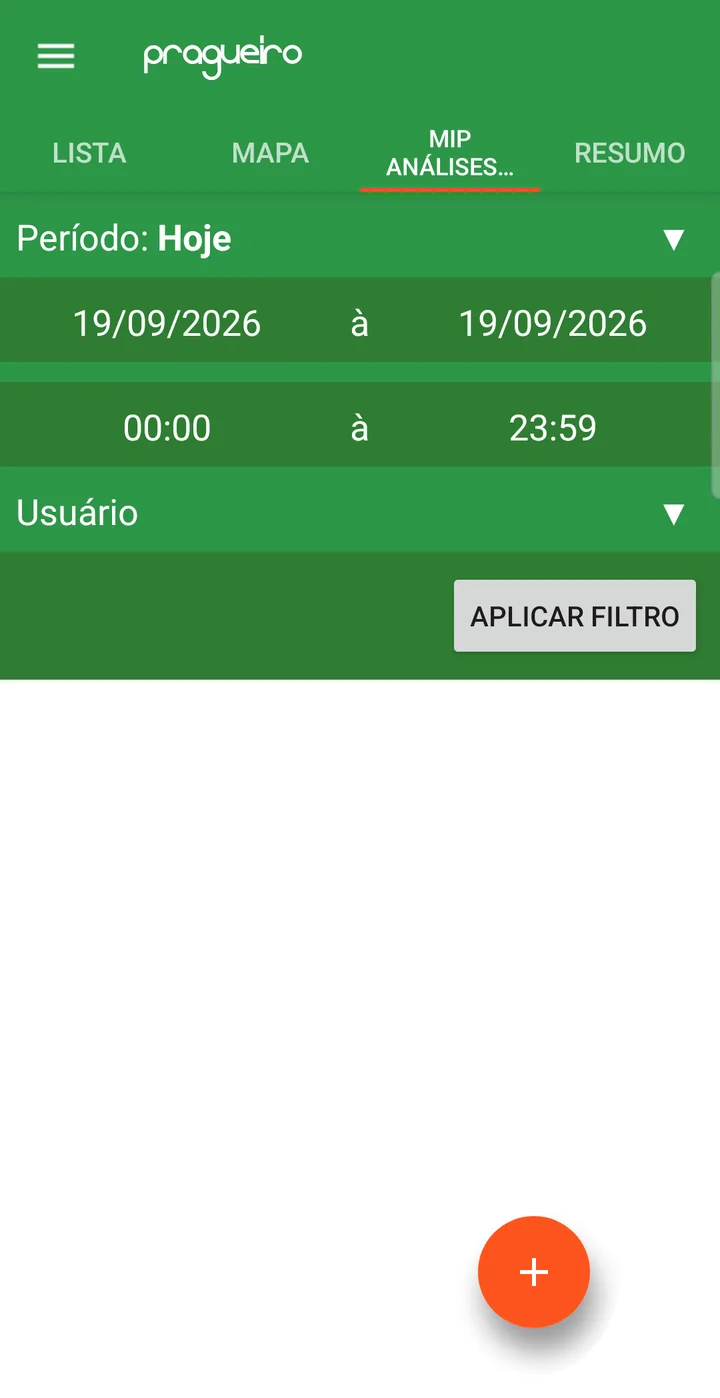
Several fields at once.
- In Scouting (IPM), IPM MGMT. ANALYSIS tab: choose the Period (and the User, if you like) and tap APPLY FILTER. The scoutings appear, with field, date and points.
- SUMMARY tab: the field-by-pest table for the same filter, with the Type (All, Pest, Disease, Weeds). Tap a value to see the detail.
Made a mistake?
How to fix it.
Quick quiz
Got it? 6 questions.
Tap the answer. The explanation appears right below.
0 of 6
1. I marked 3 caterpillars with the + and went back. Was it saved?
The + only changes the screen. One pest, one Save — and the app warns you if you try to leave with unsaved items.
2. I found rust. It doesn't show up in the list. What do I check first?
Diseases only appear with the Disease Type selected. Then check the Class (All) and the magnifying glass.
3. I stopped at a point and found no pests. What do I do?
A clean point goes into the field average. Without it, the result comes out higher than reality.
4. The app says "Location not found".
The point stores where you were. Without GPS it won't open — internet is not needed.
5. What's the difference between CLOSE POINT and Finish Scouting?
Close at each stop and move on to the next one. At the end of the field, Finish Scouting.
6. I want to see where the caterpillar hotspot was in last week's scouting. Where do I look?
The MAP tab of the menu shows the fields, not the points. A scouting's points are in DRILL DOWN — with the Interpolated map in Low, Medium and High.
The cheat sheet
From the menu to the end of the field, always the same.
- Scouting (IPM) → field → + → New Scouting
- Stage and measurements → OPEN POINT
- Counting Type (Plant, Beat cloth, Meter) → in the list, Pest, Disease or Weeds
- Fill it in → Save. One pest, one Save.
- CLOSE POINT → Yes → next stop (close it even with no pests)
- End of the field → Finish Scouting
To review later: field → date → DRILL DOWN. Want the full step by step, in text? How to scout for pests and diseases in the app.
The screenshots are from real farms, with names blurred. Questions: talk to the upCampo team.