🛠 How to scout for pests and diseases in the app
Scouting is the record, made on the phone, of what the technician found while walking a field. In upCampo it lives in the app's Scouting (IPM) menu: at each stop the technician opens a point, enters the crop stage and counts each pest, disease or weed found, tapping Save on each one. All the points in that field on that day make up one scouting, which the agronomist reads on the web portal and the technician can look up later on the phone.
This article is the path for whoever is in the field: getting to the screen, seeing the farm map, scouting point by point and looking up what was done. What each number means and how the web portal compares it with the action threshold is in the Quick Guide - Pest Monitoring.
- Get to Scouting (IPM) and choose the field — from the list or from the farm map.
- Open the point at the stop: stage, plant measurements and OPEN POINT.
- Count what you found: pest, disease or weed, with Save on each one.
- Close the point and walk to the next stop.
- Finish the scouting at the end of the field and let the phone sync.
- Look it up later: field history, point by point and the map of the points.
Before you start
- The app installed — Google Play (Android) or App Store (iPhone).
- The login is the same as the web portal. The administrator creates the user and grants access to the farm, in Users.
- The first update done with internet. After the first login, the app downloads the farm's data. When it finishes, the fields show up in Scouting (IPM). If they don't, the field's Season Planting is almost always missing.
- Location (GPS) turned on. The point stores the coordinate of the stop, and the app won't open a point without it.
In the field, you don't need internet. What you record is stored on the phone and uploads by itself when the signal comes back.
1. Get to Scouting (IPM)
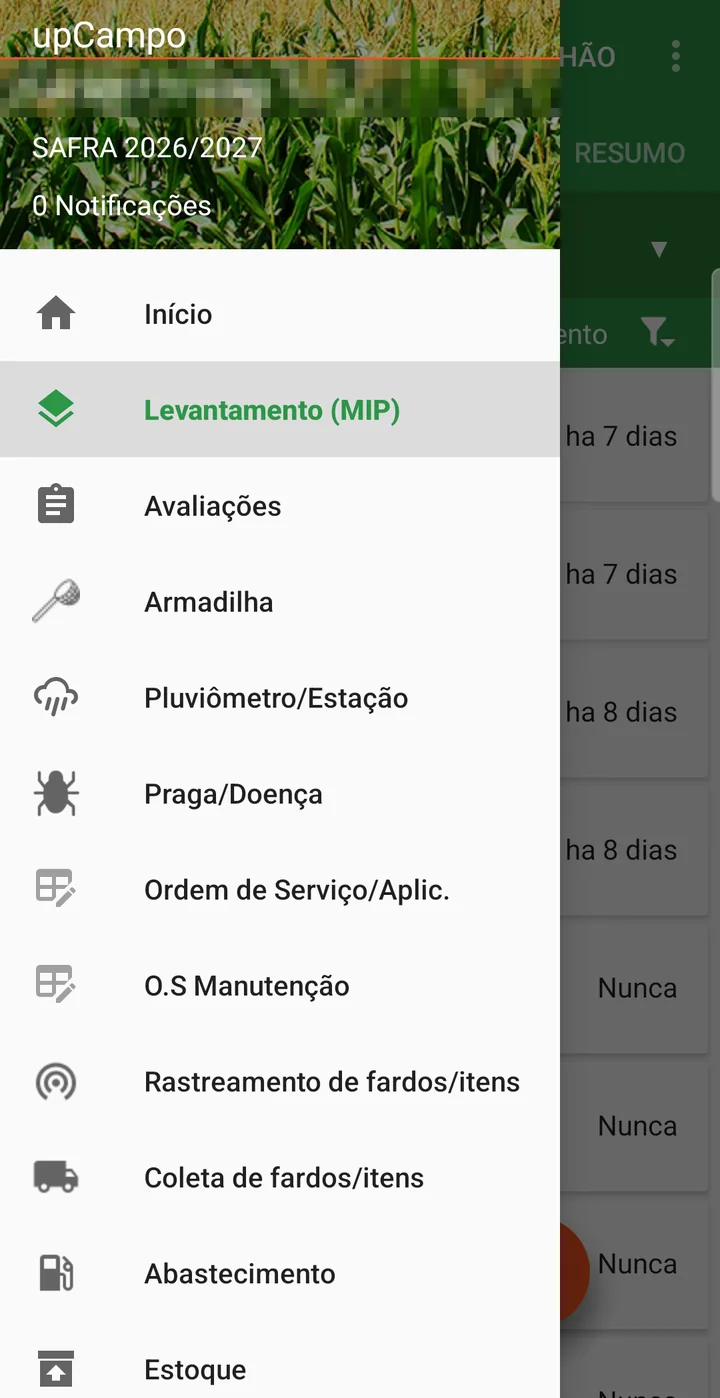
App: ☰ > Scouting (IPM)
There are two ways to the same screen:
- From the Home screen, which opens after login: the big Scouting (IPM) button, in the first row.
- From the side menu: tap ☰, in the top corner, and then Scouting (IPM).
The screen has four tabs: LIST and MAP, to choose the field, and IPM MGMT. ANALYSIS and SUMMARY, to look up what has already been done (step 9).
2. The farm map
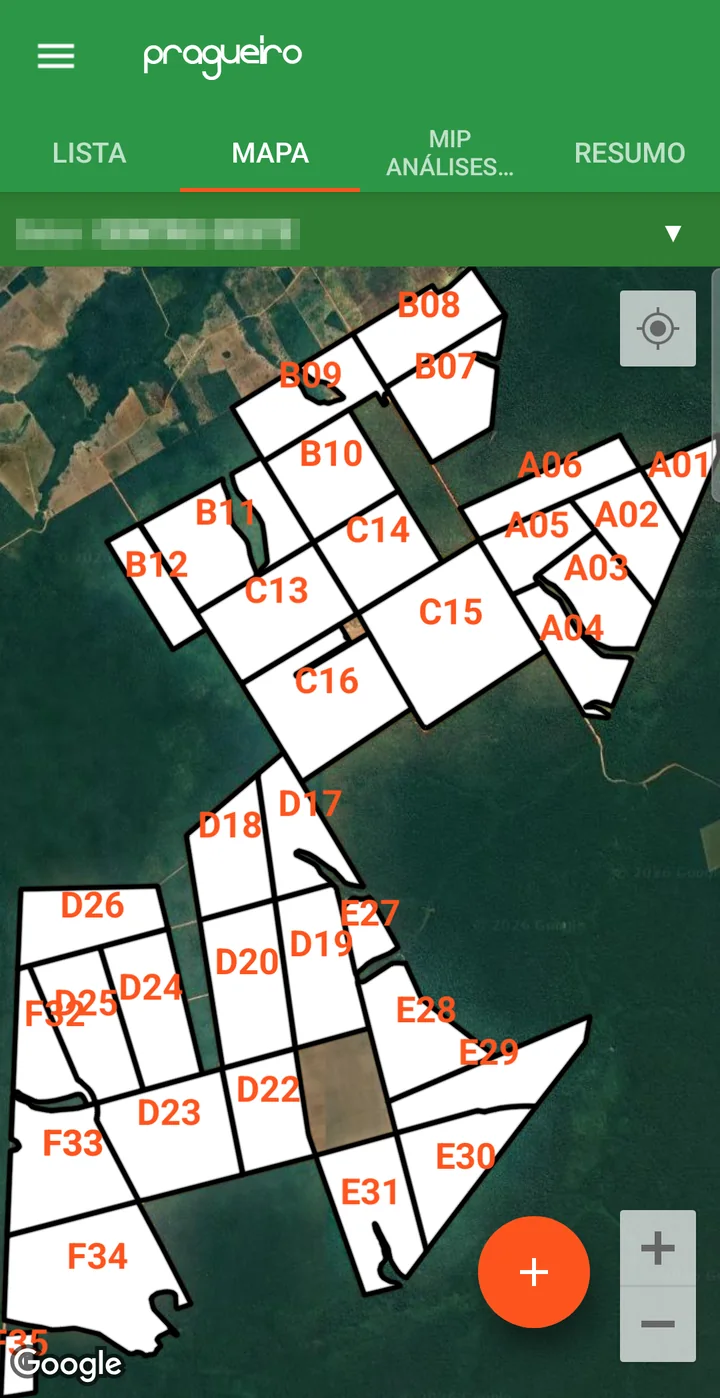
App: Scouting (IPM) > MAP
The MAP tab shows the farm's fields over the satellite image, each with its name in the center, plus your position on the map. The Sector filter, at the top, shows only part of the farm — on a farm with distant areas, it is what zooms the map to the area you are in. When varieties have a color in their record, each field appears in its variety's color and the Legend button shows which color is which, with the hectares; with no color, the field stays white.
Tapping inside a field opens its history — the same one that opens from the list. It is the fastest way to find the field you are in.
3. Choose the field and open the scouting
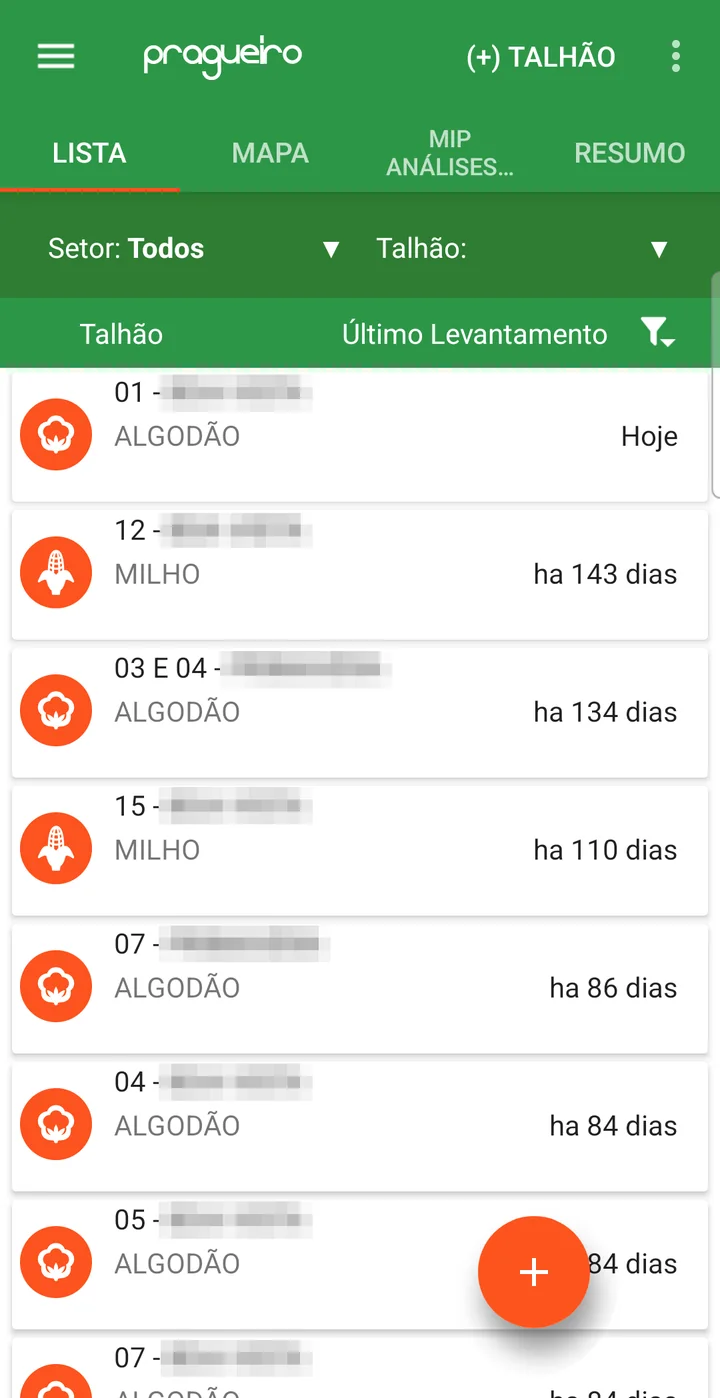
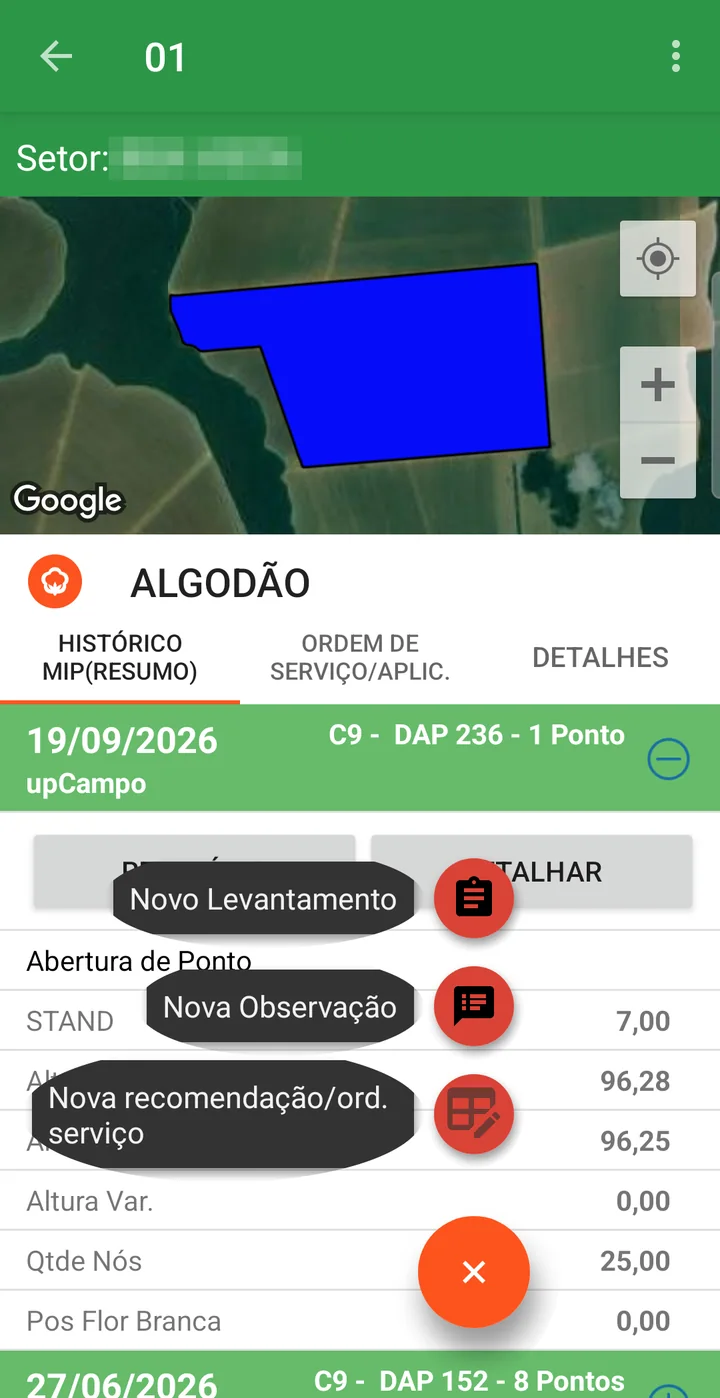
On the LIST tab, each field appears with its crop and how long ago it was last scouted — it helps you see what is overdue. Use the Sector and Field filters to find yours and tap it (or tap the field on the map). The field history opens. Tap the orange + button and then New Scouting.
4. Open the point
App: Scouting (IPM) > field > New Scouting
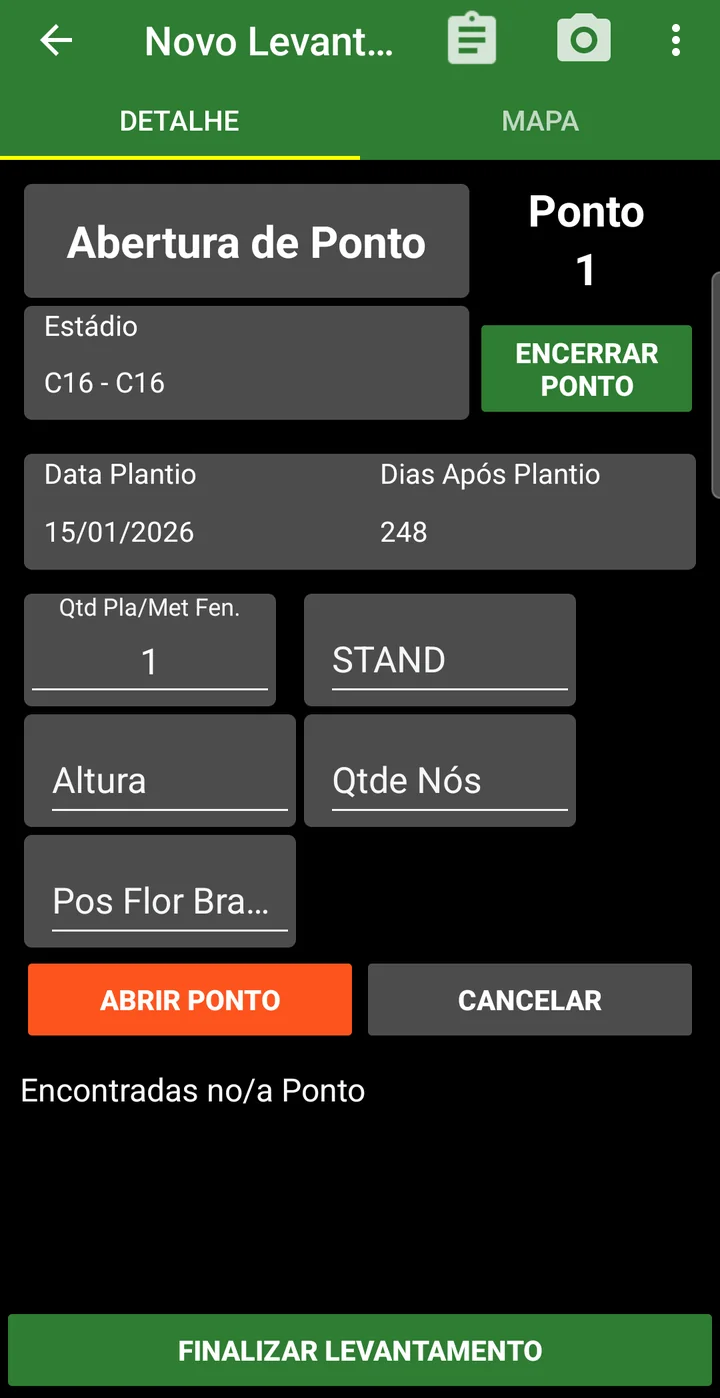
Each stop in the field is a point. The point opens in the Point Opening block, on the DETAIL tab:
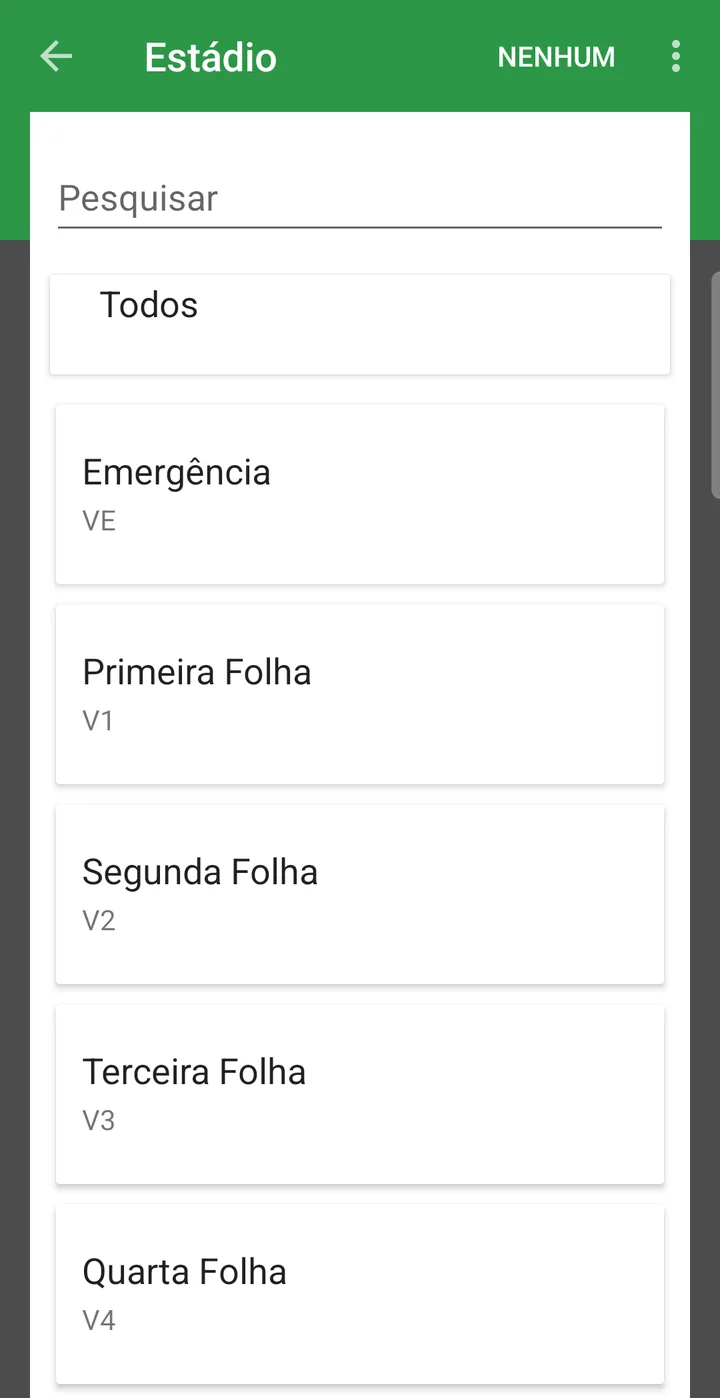
- Tap Stage and choose what phase the crop is in (V4, R5…). The stage decides which action threshold range applies to what you count afterwards.
- Fill in the plant measurements that appear — stand, height, number of nodes. Which ones appear depends on the crop and the farm's settings.
- Tap OPEN POINT.
The screen already shows the Planting Date and the Days After Planting, which come from the planting record.
Where you are and where you've already stopped: the MAP tab
Next to the DETAIL tab is the MAP tab, which shows the field during the scouting:
- the field outline and your position;
- a red pin on each point already done today, with the point number — this is how you see whether your stops are well spread across the area;
- the Distance to edge, at the top, with a red line from your position to the nearest edge — it helps you avoid placing a point right at the field border;
- from the ⋮ menu, Show previous scouting points adds the points from the field's last scouting in yellow, so you can go back near them or cover what was left out.
5. Count the pests
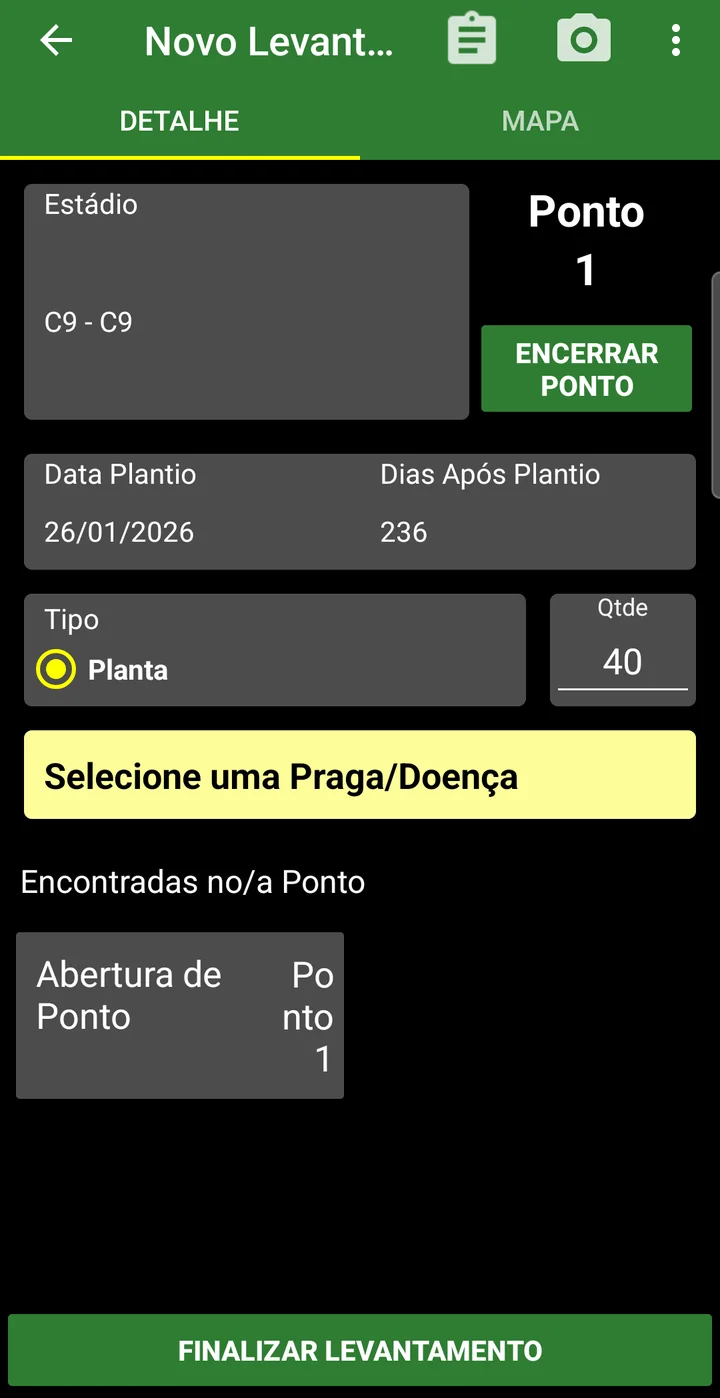
With the point open, the screen shows the Type — the counting method used at that stop — and the Select a Pest/Disease field. Choose the Type before counting:
| Type | How it is counted |
|---|---|
| Plant | A number of plants at the point are examined, one by one. Enter how many plants you assessed in the Qty field. |
| Beat cloth | The cloth is laid between two rows, the plants are shaken and whatever falls is counted. No quantity is asked. |
| Meter | What is found in linear meters of row is counted. Enter how many meters you assessed in the Qty field. |
Which of these types appear, and which one comes preselected, is set by the farm in the Crop record. The type gives meaning to the number: five caterpillars on a beat cloth is not the same information as five caterpillars on a hundred plants examined.
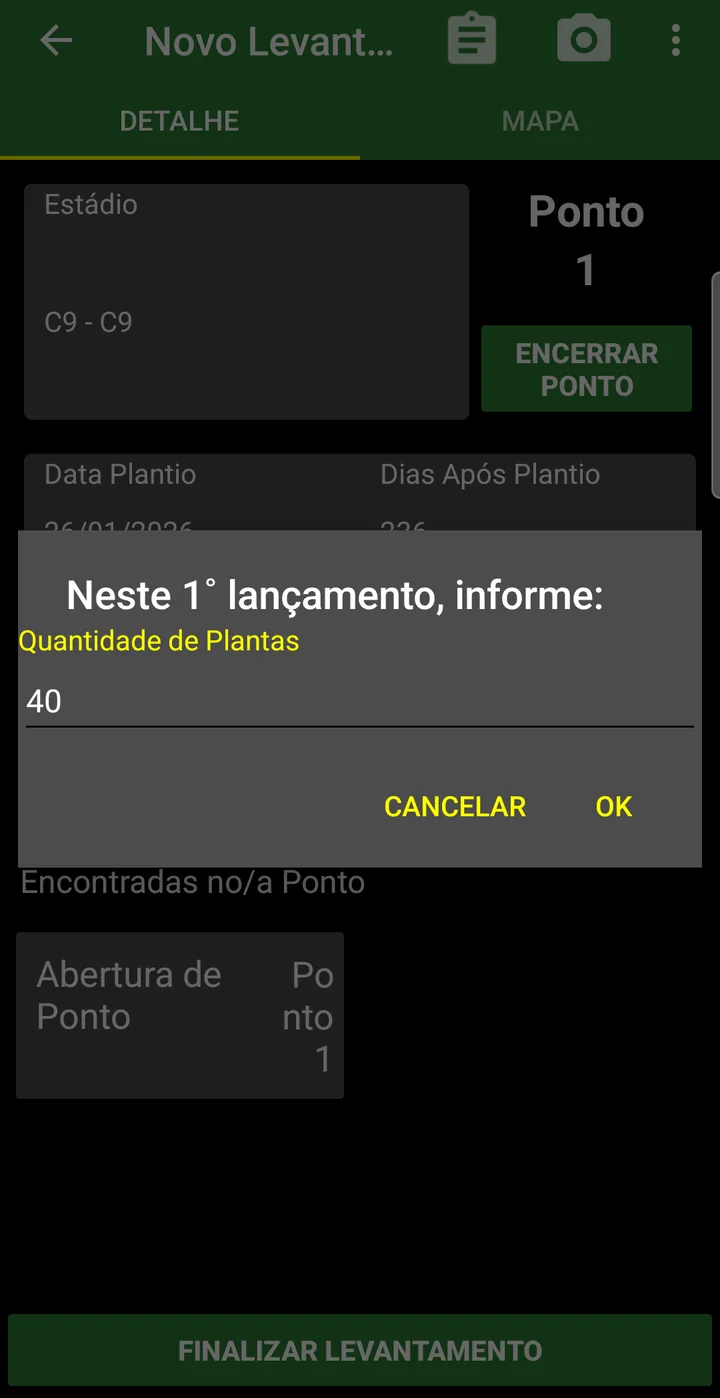
Then tap Select a Pest/Disease. On the point's first pest, the app asks you to confirm the quantity assessed; check it and tap OK.
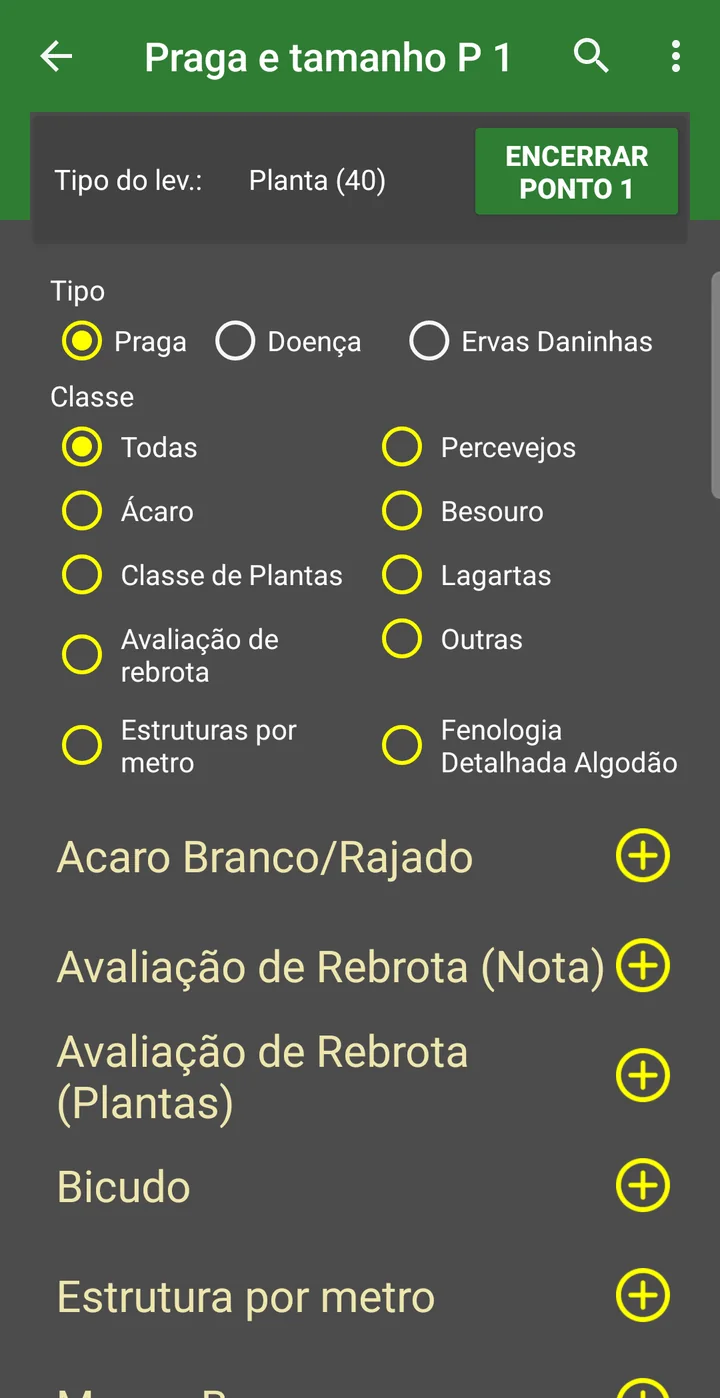
The Pest and size screen opens, with the list of pests. To find the one you found:
- Type — Pest, Disease or Weeds. The app remembers the last one you used.
- Class — Caterpillars, Stink bugs, Mites… All shows the whole list for that type.
- The magnifying glass, at the top, searches by pest name.
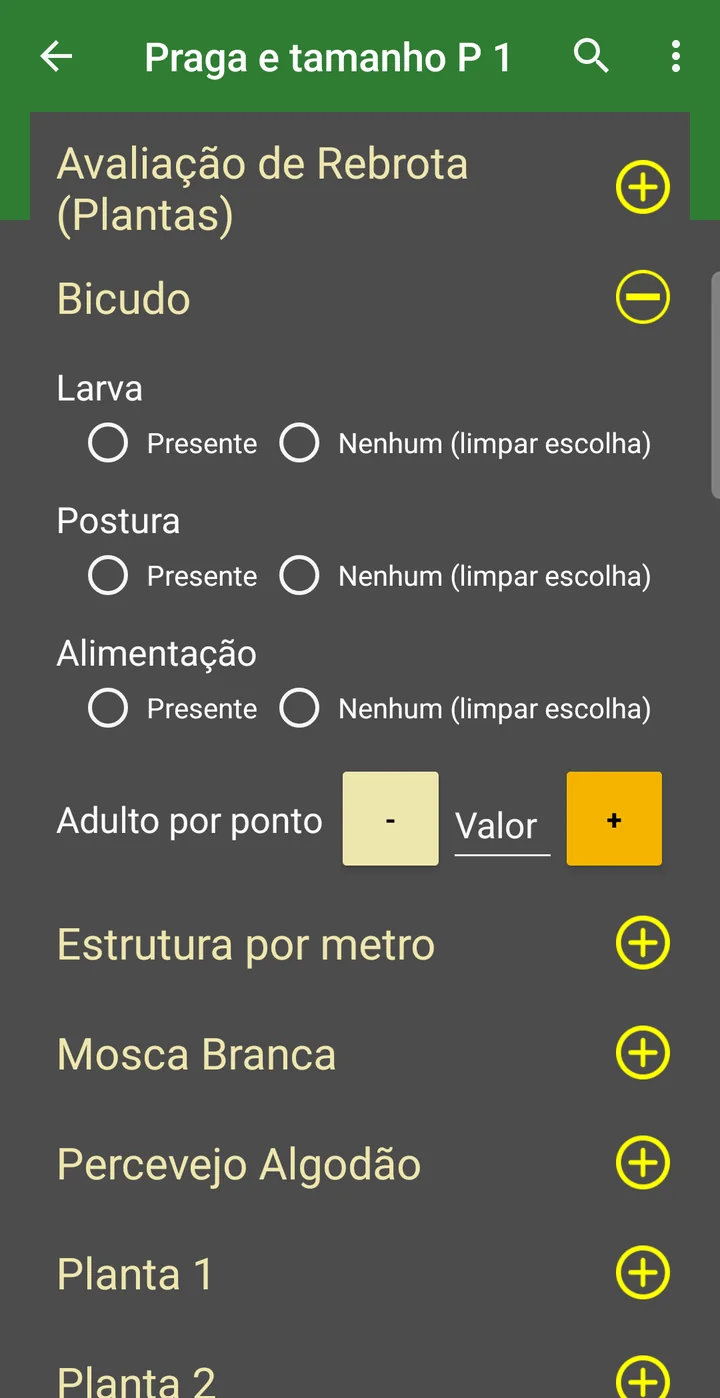
Tap the pest name (or the + next to it) to open its fields and fill them in according to what appears:
| What appears | How to record |
|---|---|
| A Value field with − and + | How many individuals you counted. Tap + once per individual or type the number. |
| Preset options (Present, Low, Medium, High…) | Choose the one that describes what you saw. None (clear selection) undoes it. |
| One row per size (Larva, Adult, small, large…) | Fill in each size you found. The ones that didn't appear stay blank. |
Which fields each pest has is defined in its record, in Basic > Pest.
After filling it in, tap Save, on the pest itself. The app confirms with Saved successfully!. Repeat for each pest found at the point. What was saved appears in the Found at Point list, on the point screen.
6. Diseases and weeds
It is the same path as step 5, changing only the Type at the top of the list: Disease for rust, target spot, ramularia and the like; Weeds for invasive plants. Diseases are usually assessed by score or by preset options (for example Low, Medium, High), but each one's record decides: if a number field appears, count; if options appear, choose.
And the same rule applies: Save on each one.
Photo: on the point screen, the camera icon at the top (Take Photo) records what you are seeing — a lesion, a caterpillar, a patch. The photo is attached to the point, and it can only be taken after the point has some record. A point with a photo shows the With photo(s) shortcut.
7. Close the point
Counted everything you found at that stop? Tap CLOSE POINT (the button carries the point number: CLOSE POINT 1) and confirm with Yes. The app closes that stop and gets the next point ready. Walk to the next stop and repeat steps 4 to 7.
- Didn't find any pest, disease or weed? Close it the same way. A point with the opening done (stage and measurements) is already a record: that is how the system knows you passed there and found nothing — and that point counts in the field averages.
- What can't be closed is a point without the opening. If you didn't tap OPEN POINT, the app warns that the point has no record: do the opening first.
8. Finish the scouting
At the end of the field, tap Finish Scouting, at the bottom of the point screen. The app closes the point that was open and returns to the field. (With the keyboard open the button disappears: close the keyboard.)
Then, with signal, the phone sends everything by itself. While there is anything to upload, the Scouting (IPM) list shows the notice There are items pending sync. Click here to send to the server., with the pending count; tapping it forces the upload. When the notice disappears, it has been uploaded.
Going back to the scouting on the same day
Stopped for lunch, finished another field, closed the app? To go back to the scouting on the same day, just open the scouting again: tap the field, the + and New Scouting. The app continues from the point after the last one closed, and all the day's points go into the same scouting — nothing is lost and no new one is started.
The next day, it resets: the app starts a new scouting, from point 1, with that day's date. Yesterday's stays in the field history.
9. Look up the scouting later
The field history
Tap the field (in the list or on the map). The IPM HISTORY(SUMMARY) tab shows the scoutings, newest to oldest. Each one has a header with the date, who did it, the stage, the days after planting and how many points. Only the most recent comes open: tap the header of a date to open or close its summary, with each pest's value. Each date has two buttons:
- REPORT — generates the report for that day's scouting.
- DRILL DOWN — opens the scouting point by point (below).
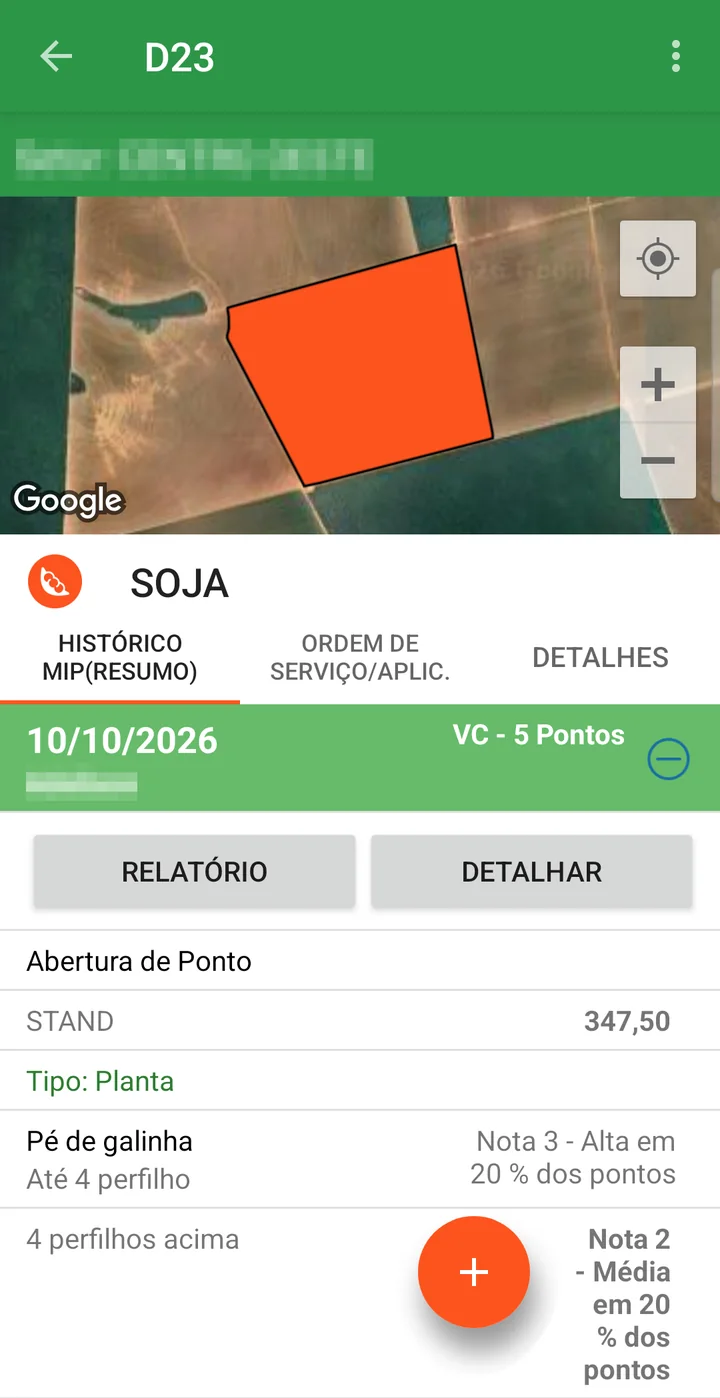
Next to it are the WORK ORDER/APPL. tab, with the season's work orders for that field, and the DETAILS tab, with the planting data and the last scouting.
The points on the map: DRILL DOWN
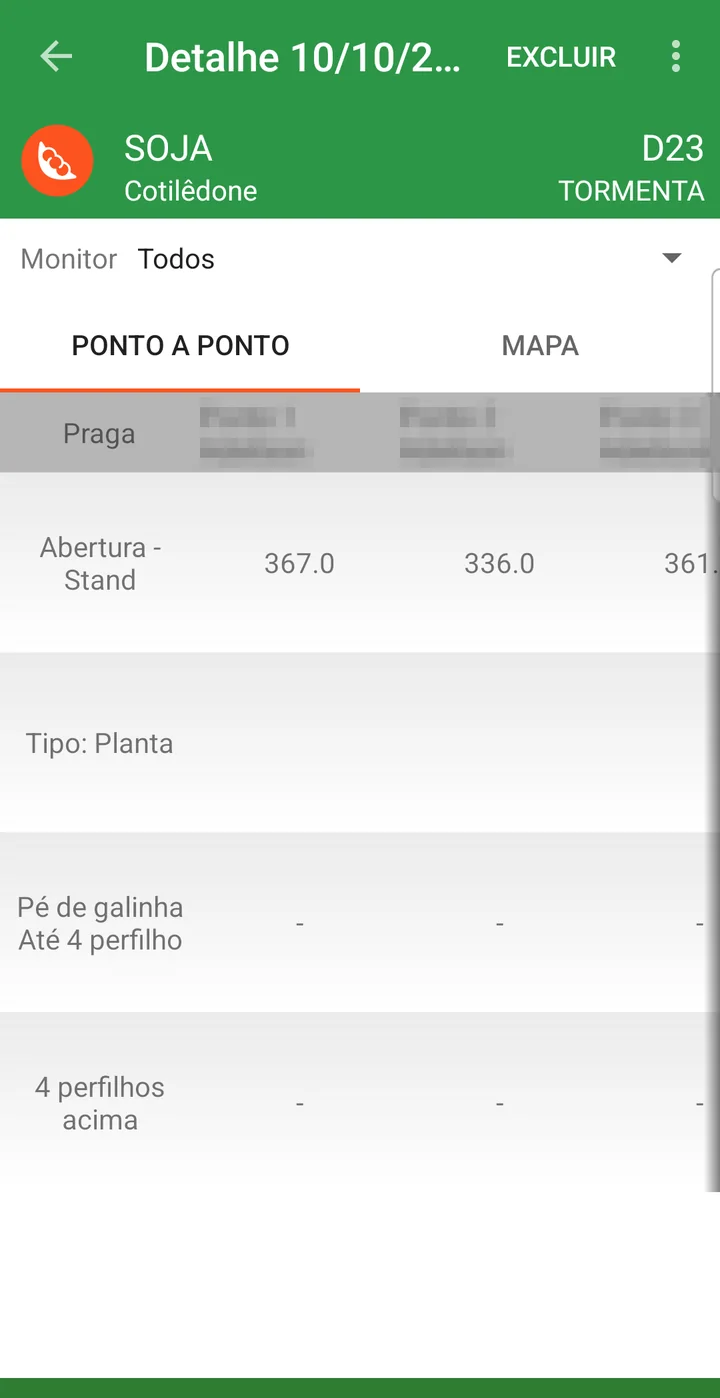
DRILL DOWN opens the day's Detail screen, with two tabs:
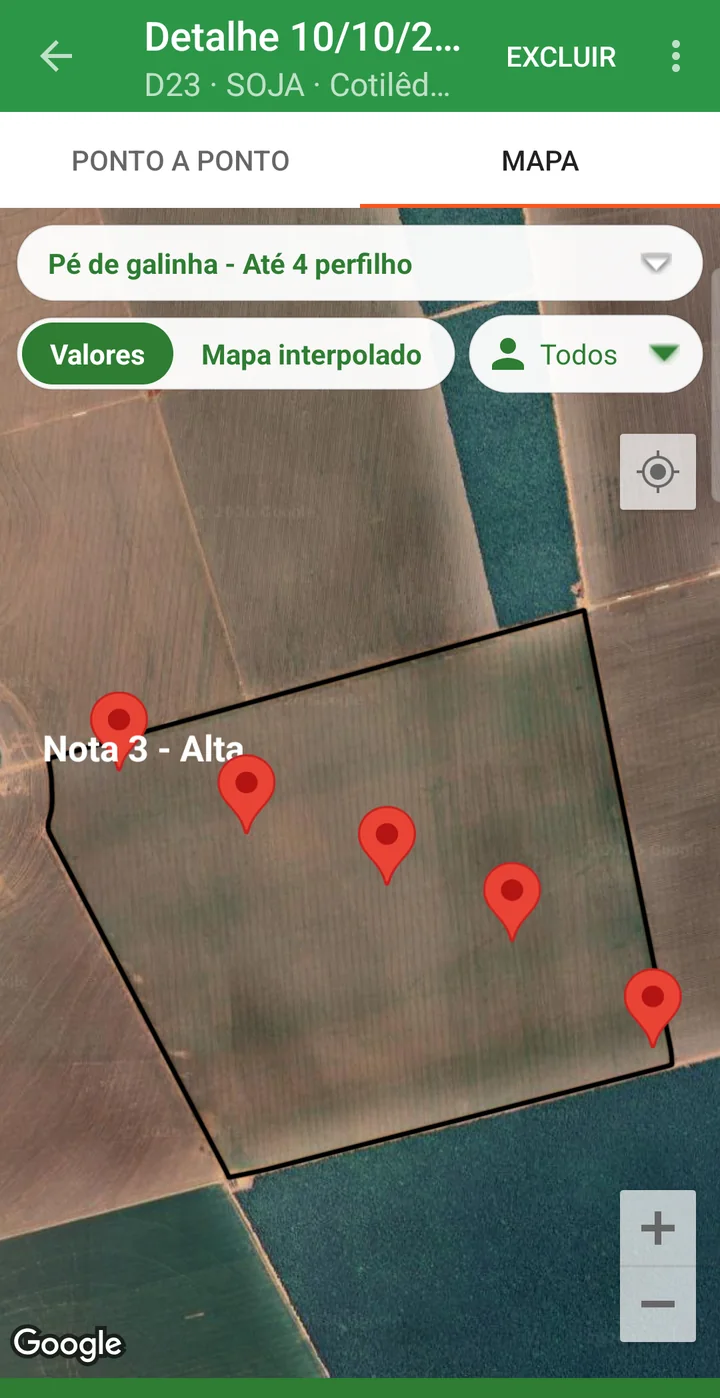
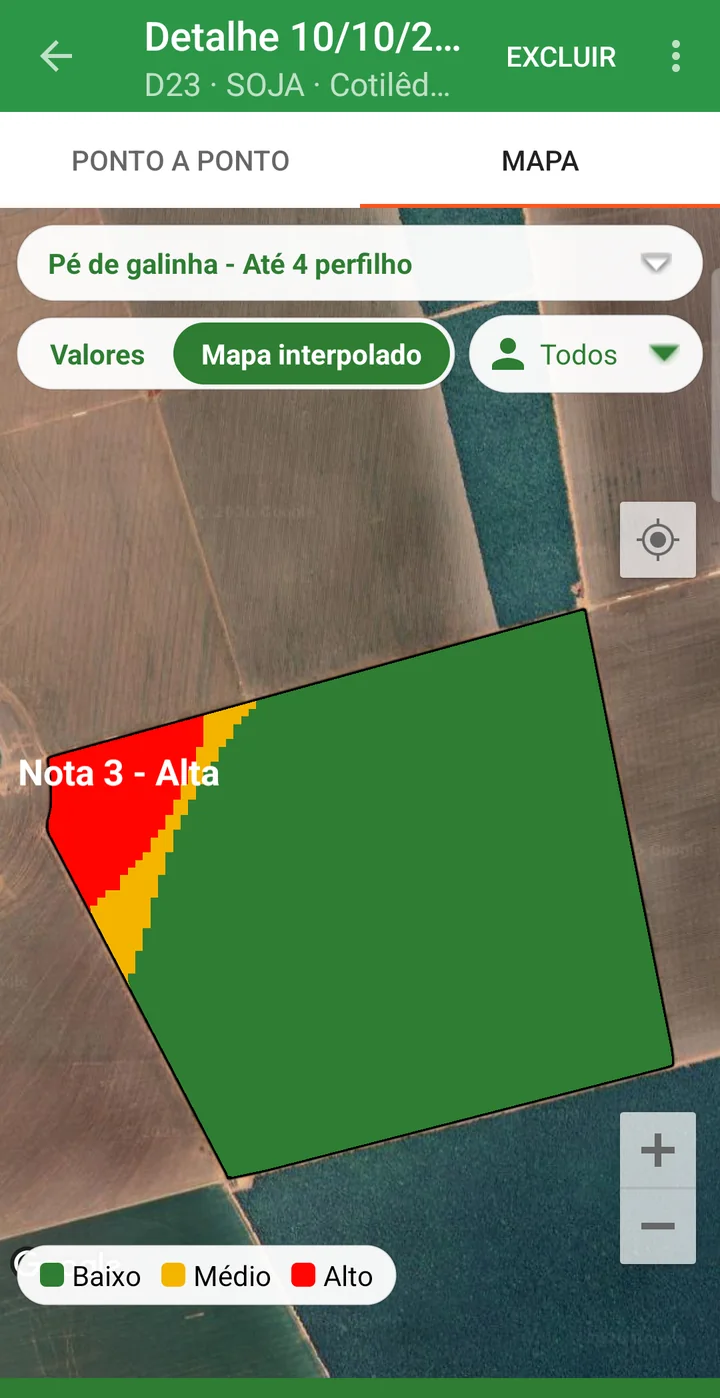
- Point by Point — the table of each point with what was counted there.
- Map — the field outline and a pin on each point, with its number and who did it. In Select a Pest/Size here, choose a pest: with Values, the map shows each point's value; with Interpolated map, it paints the field in patches of Low (green), Medium (yellow) and High (red) — that is how you see where the hotspot is. When two technicians scouted the field on the same day, the Monitor selector separates each one's points.
All fields at once: IPM MGMT. ANALYSIS and SUMMARY
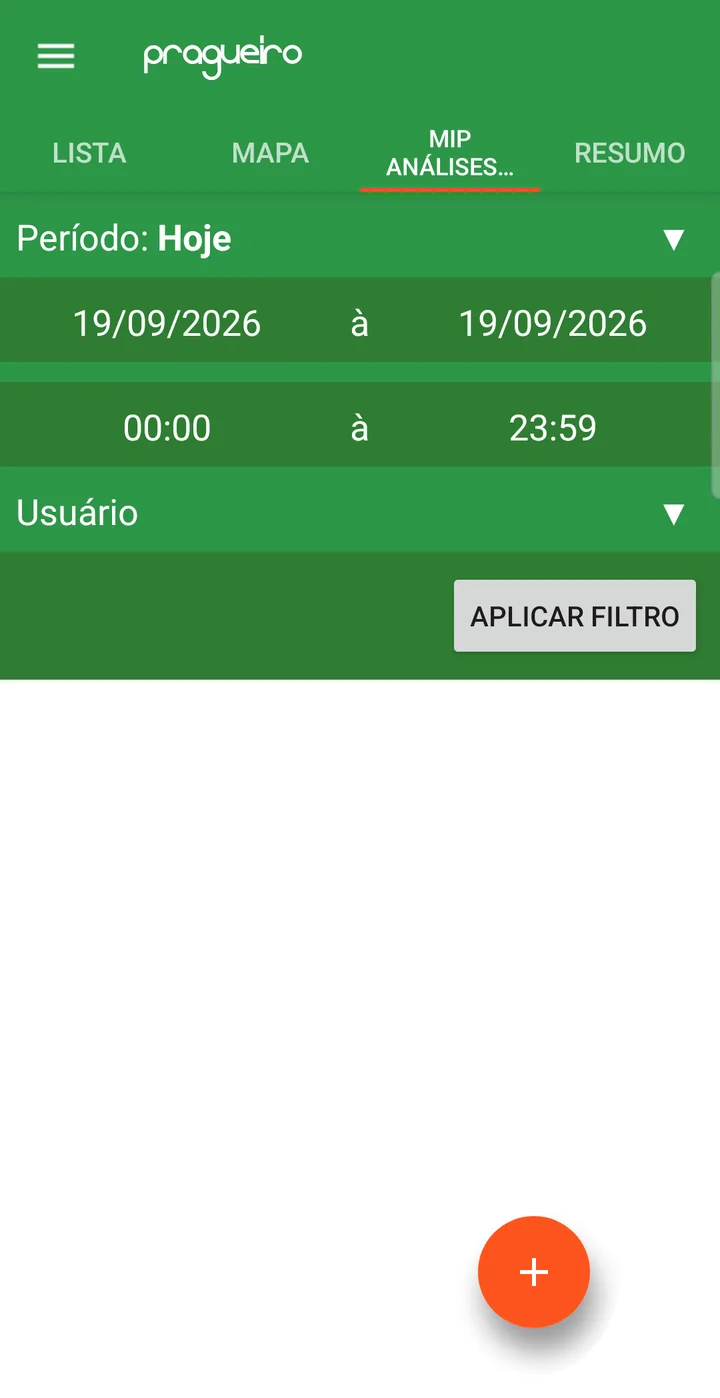
In Scouting (IPM), the IPM MGMT. ANALYSIS tab lists the scoutings for a period (choose the Period or the dates, the User if you like, and tap APPLY FILTER), with field, date, number of points and who did it. The SUMMARY tab builds, with that same filter, a table of field by pest, with the Type filter (All, Pest, Disease, Weeds); tapping a value opens the pest's detail. It is how the technician sees, on the phone, a snapshot of the day across several fields.
On the web portal, the same scouting appears in the scouting panel of the Home Screen, with the action threshold color, and on the Scouting screen.
Correcting a wrong entry
- Still on the pest list: set the value back to zero (or choose None (clear selection)) and tap Save. The entry is removed from the point.
- On the point screen: tap the item in Found at Point. It goes back to the form: correct it and tap Save. To delete it, with the item selected, use the ⋮ menu and Delete.
- After it has uploaded: the agronomist checks and corrects it on the web portal, on the Scouting screen.
- Each stop is recorded with stage, coordinate, time and who did it.
- The technician sees on the map where they've already stopped and looks up any past scouting on the phone, point by point.
- The agronomist sees the scouting on the web portal minutes after the phone gets signal, with the action threshold color.
❓ Frequently asked questions
How do I mark pests and diseases in the app?
Through scouting: in the upCampo app, go to Scouting (IPM), tap the field, the + and New Scouting. At each stop, open the point with the stage, choose the pest or disease from the list (changing the Type to Disease when needed), fill in the count and tap Save. Close the point and move on to the next one.
I counted the pest in the app, but it doesn't show up at the point. What happened?
You didn't tap Save. In the upCampo app, tapping + or choosing an option only changes the screen; the entry goes into the point when you tap Save, on the pest itself. If you went back without saving, the app warned that there were unsaved items and they were not stored — enter them again and save.
I can't find the pest or disease in the app's list. Why?
First check the Type at the top of the list: diseases only appear with Disease selected, and weeds with Weeds. Then the Class (leave it on All) and the magnifying glass, which filters by the text you type. If it still doesn't appear, the pest isn't registered for that field's crop — ask whoever handles the records on the farm to add it in Basic > Pest.
How do I see on the map where I've already made points today?
During the scouting, open the MAP tab, next to DETAIL: each of the day's points appears as a red pin, along with your position and the distance to the edge. From the ⋮ menu, Show previous scouting points shows the field's last scouting points in yellow.
How do I see the points from an old scouting?
In the upCampo app, tap the field, open the date in IPM HISTORY(SUMMARY) and tap DRILL DOWN. The Point by Point tab shows what was counted at each point, and the Map tab shows the points on the field — choosing a pest, you can see each point's value or the interpolated map in Low, Medium and High.
I closed the app in the middle of the field. Did I lose the scouting?
No. On the same day, just open the scouting again — field, + and New Scouting: the upCampo app continues from the point after the last one closed, and everything goes into the same scouting. Only the next day does it start a new scouting, from point 1.
The app says "Location not found" and won't open the point. What do I do?
Turn on the phone's location (GPS) and wait a few seconds: the upCampo app only saves the point after it receives the position, because each point stores the coordinate of the stop. If location is turned off in the device settings, the app warns you and closes the screen — turn it on and open it again.
What's the difference between closing the point and finishing the scouting?
Closing the point ends one stop and moves to the next, within the same field. Finishing the scouting is for when you've finished the field: it closes the open point and returns to the list. All the field's points on that day make up a single scouting.
Do I need internet to scout in the field?
No. The upCampo app stores everything on the phone and sends it when the signal comes back. While there is anything to send, the Scouting (IPM) list shows the pending items notice; when it disappears, the data is already on the web portal. Only the first update, right after login, needs internet.
I found nothing at a point. Do I still need to record it?
Yes: open the point (stage and measurements) and close it. The opening is already a record and proves the stop was made — the point closes even without any pest, disease or weed. In upCampo, the total number of points walked is the divisor of the field averages, so skipping clean points makes the result higher than reality.
I entered the wrong pest. How do I delete it?
On the point screen, tap the item in Found at Point and use the ⋮ menu → Delete. While still on the pest list, you can also set the value to zero (or choose None (clear selection)) and tap Save. After the scouting has uploaded, the correction can also be made on the web portal, on the Scouting screen.