📘 Screen: Field
The Field screen is where you register the plots or subdivisions of the farm. These records are fundamental to all crop management in the system, because they are the smallest unit for planning and carrying out activities.
📍 Location in the system
Menu: Crops > Field
🔧 The field list
The list shows Code, Name/Description, Sector, Area, Has map? and Active, each column with its own search box. The Has map? column tells you at a glance which fields already have their boundary registered — it's how you find out what still needs to be mapped.
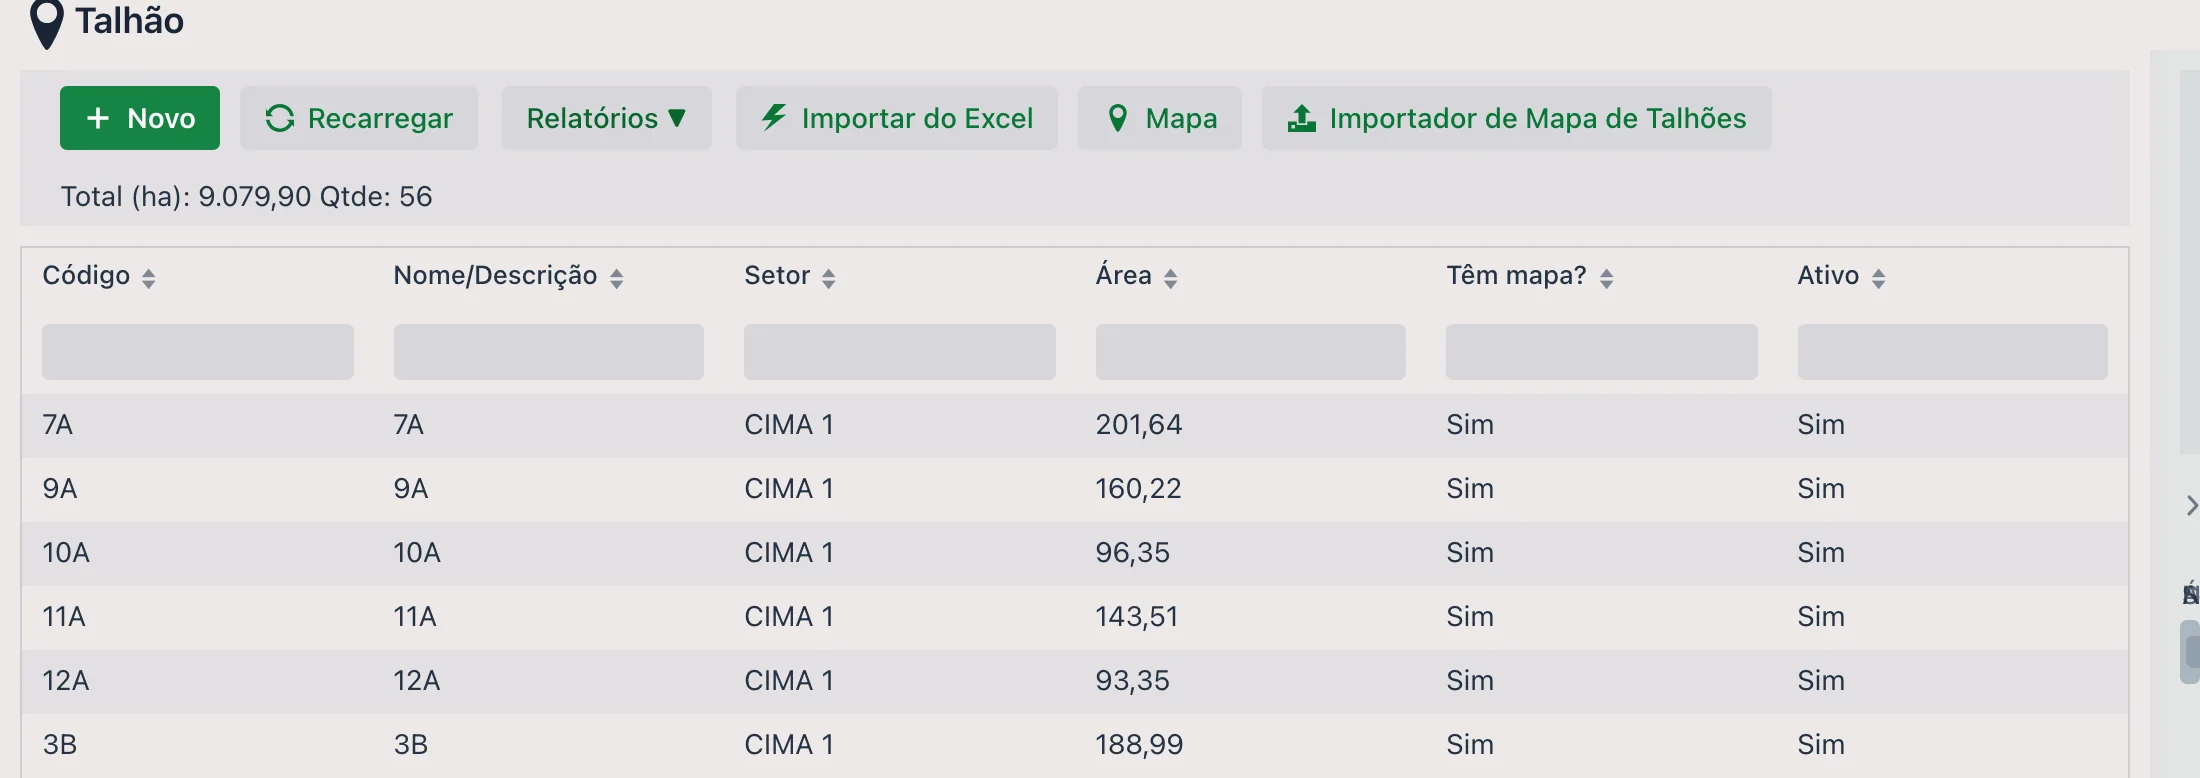
Next to the buttons is the Total (ha) and Qty totalizer, which adds up what is being displayed: filter by sector and the total becomes that sector's total.
- Reports ▼: opens the reports linked to the Field screen
- Import from Excel: bulk registration from a spreadsheet (see below)
- Map: opens the Farm map window with the fields that have a registered boundary, drawn on the map. There are two options at the top — Show sector and Show hectares — that write that information on each field, and a Grid for pest map button
🧩 Registering one field
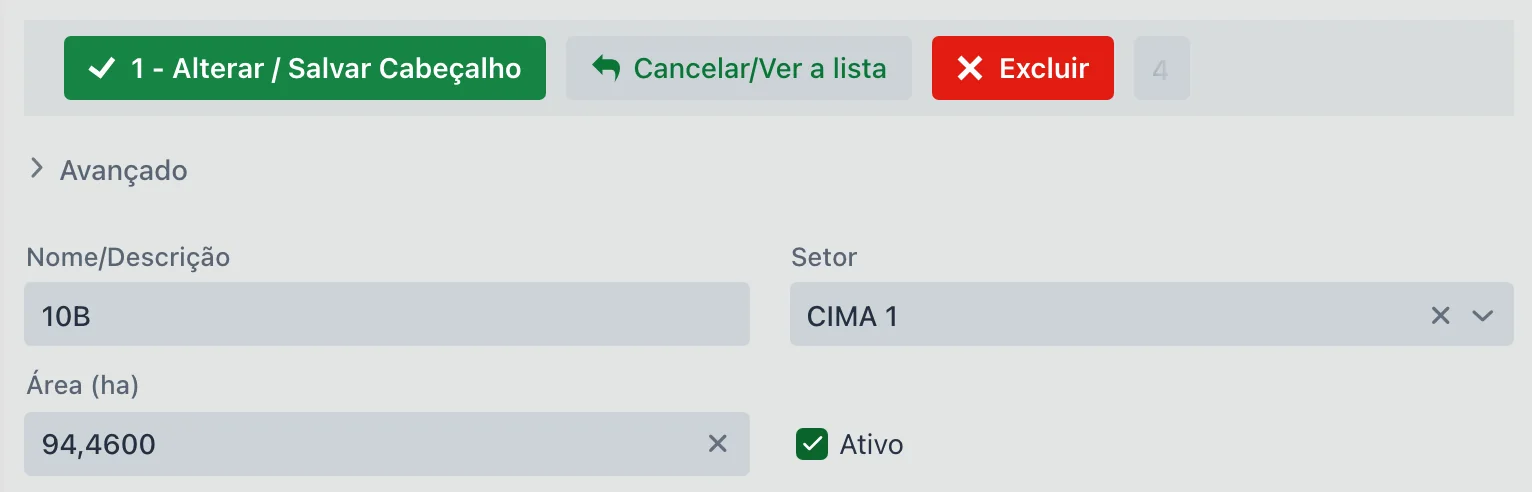
To register a new field, click New. The form has four main fields:
| Field | Description |
|---|---|
| Name/Description | Name of the field, its main identifier (e.g., 04 - CIMA 2). |
| Sector | Used to group fields (e.g., Cima 2, Cima 3, São Jerônimo Farm). It's also common to use the sector to separate farms when records (inventory, fleet, etc.) are shared. You can type a new sector directly into the box. |
| Area (ha) | Total hectares of the field (not to be confused with the area planted in each season). |
| Active | Defines whether the field is visible in the planting options. |
| Reference/Integration ID | The field's code in the external system. It only appears when the company is set up to use an integration. |
⚙️ "Advanced" section
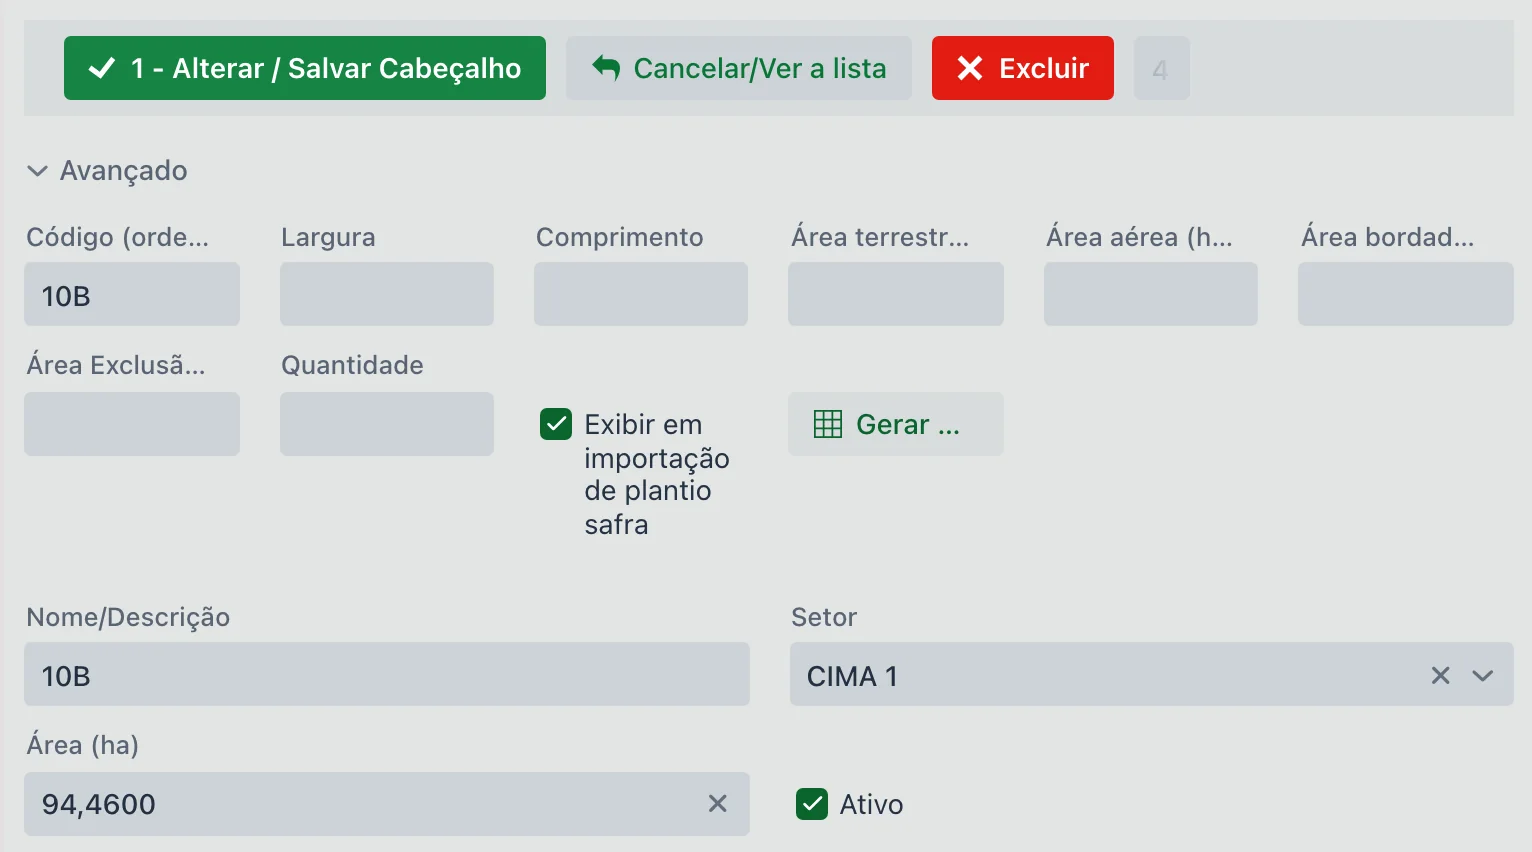
A section that opens and closes, above the main fields. Nothing here is required — these are refinements to area and planning:
| Field | Description |
|---|---|
| Code (order) | Numeric, used to sort the field in lists and reports. |
| Width and Length | Dimensions of the field. |
| Ground area (ha) | Part of the area that can only be worked with ground machinery. |
| Aerial area (ha) | Part that receives aerial application. |
| Border area (ha) | Border (headland) area of the field. |
| Exclusion area (ha) | Area left out of the calculation — farm road, reserve, buildings inside the field. |
| Quantity | Quantity associated with the field (used in perennial crops, by number of plants). |
| Show in season planting import | When checked, the field appears in the quick field import of the Season Planting. It comes checked by default. |
| Generate grid for interpolated map | Schedules the generation of the point grid used in interpolated maps. You choose the grid size in meters — the smaller it is, the longer it takes. It only works once the field is saved and has coordinates. |
| Grouping | Extra grouping field. It only appears when the company is set up to show it. |
📥 Importing from Excel
You can register several fields at once using the "Import from Excel" button.
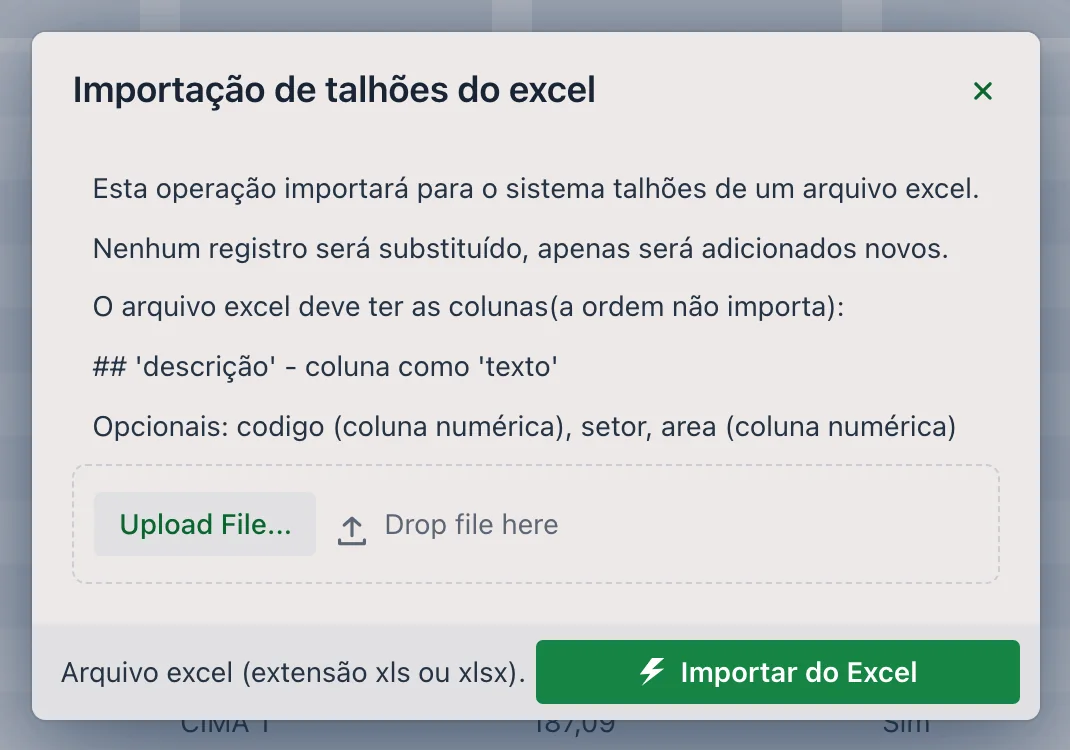
- The file must contain the columns: Code, Description, Sector, Area, Active — the order doesn't matter
- Accepted extensions:
.xlsand.xlsx - Delete empty rows from the file before importing
- A sample template can be downloaded directly from the screen
Crops > Field Map Importer): it creates the fields from a single
KML file, already with the boundary and the calculated area.
🗺️ "Coordinates" tab
This is where the field gets its boundary on the map. First choose the file Type — the field is required and defaults to KML:
- KML (
.kml) — the Google Earth format - Shapefile — upload the
.shp,.shxand.dbffiles together (the.prjis also accepted), or a single.zipcontaining all of them
Then use Upload File... to send the file. The system processes it and draws the boundary on the map — which switches between Map and Satellite — so you can check it before saving with 2 - Save Coordinates.
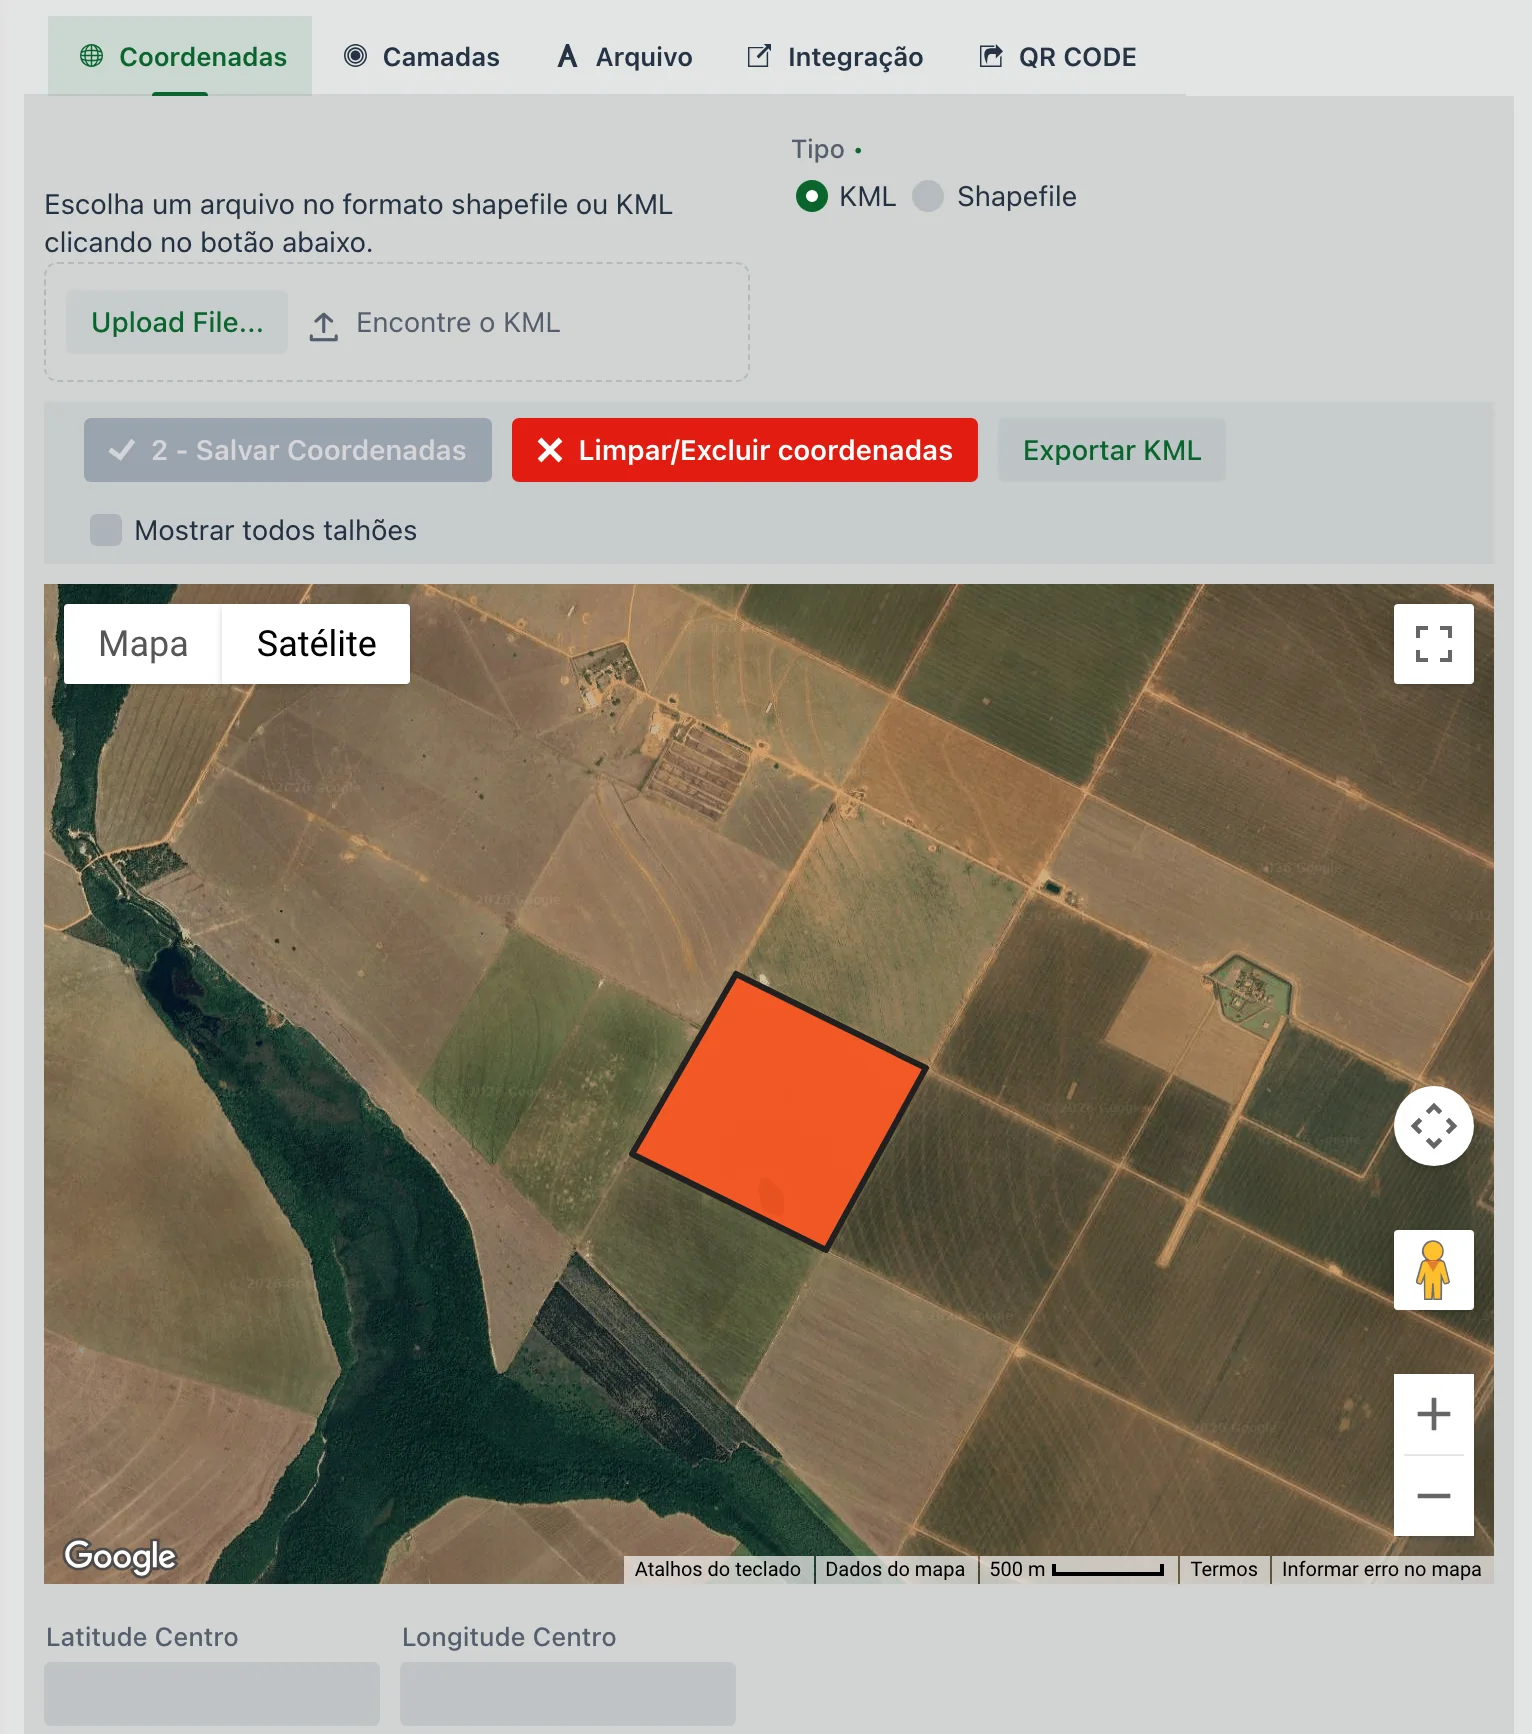
The other features on the tab:
- Clear/Delete coordinates: erases the field boundary so you can import it again
- Export KML: downloads the boundary already registered — useful for taking the farm map to another system or to Google Earth
- Show all fields: also draws the neighboring fields, so you can check whether the new boundary fits without overlapping
- Center Latitude and Center Longitude, below the map: the center point of the field
Registering the coordinates correctly is essential for the mapping and traceability features of the platform.
🗂 Other tabs
| Tab | What it's for |
|---|---|
| Layers | Map layers associated with the field, with Name/Description, Type and Active. |
| File | Attachments for the field — sketch map, environmental license, lease agreement. Each attachment has a title and description, and the Show button opens the file in another browser tab. |
| Integration | The field as it exists in the external system — see the next section. |
| QR CODE | Generates the field's QR code, with Save QR (downloads the image) and Open QR. Use it to put a sign at the entrance of the field. |
🔗 "Integration" tab: the field in the external system
This is where you tell the system that field 08 – CAMPINAS in upCampo is the same as field 08 in John Deere — or in another system the farm exchanges data with. Without this link, upCampo doesn't look in the Operations Center for what the machines did in that field.
| Field | Description |
|---|---|
| Type | Which integration — Jonh Deere or Solinftec. |
| Description and Sector | What the field is called on the other side. Helps you check that the link is right. |
| Area | The area the other system reports, to compare with the one here. |
| Integration | The field's code in the external system. This is how both sides recognize each other. |
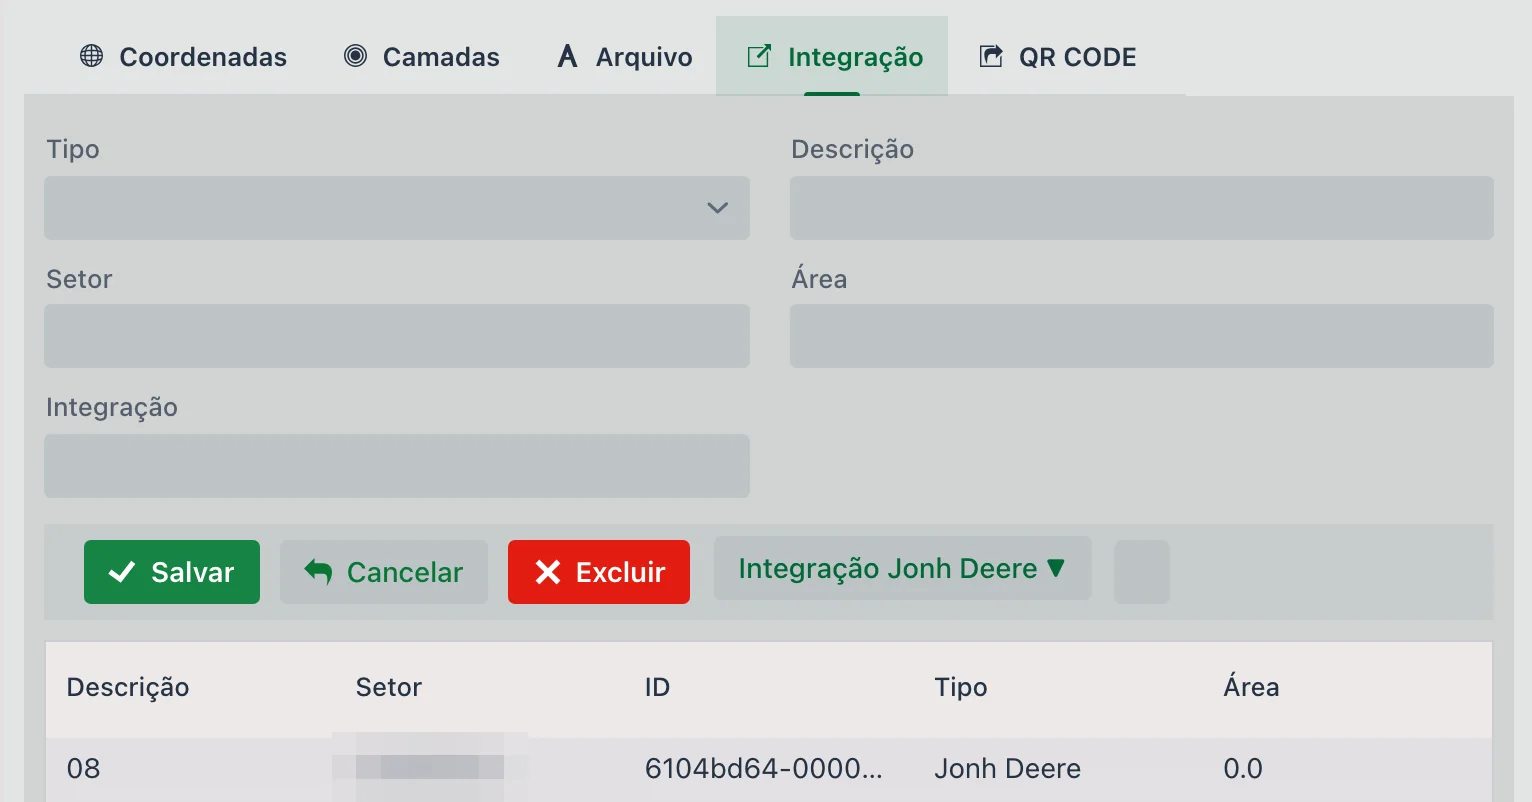
The John Deere Integration ▼ menu, next to the buttons, saves you from typing the code by hand:
| Option | What it does |
|---|---|
| Update Options | Fetches from John Deere the current list of fields in the farm's organization. |
| Select JD Field | Opens that list — name, farm, type and last change — and fills in code, description and sector when you pick one. |
| Open last JD Operation / Open All JD Operations | Open the John Deere response window with the operations John Deere returns for that field, in the technical format it sends. They're for confirming that the link responds; to interpret the content, ask the upCampo team for help. |
📊 Related reports
Fields are the basis for many reports on the platform. Some of them are:
Shows the whole planting setup with summaries by crop, variety, planted area, planting dates and expected harvest (based on the variety's cycle days).
Lists the season's fields with crop, variety, total cost, cost per hectare and average yield.
These reports help with strategic analysis and with technical and financial tracking of the season.
- You can start the Season Planting
- Operational data will be correctly organized by location
❓ Frequently asked questions
Which map formats can I import for a field?
KML (.kml) and shapefile. For shapefiles, upload the
.shp, .shx and .dbf files together — or a single .zip
with all of them. The system shows the boundary on the map so you can confirm it before saving.
I registered the field and it doesn't show up in the app. What's missing?
The field still needs to be linked to a Season Planting. Registering the field is only the first step; the planting is what makes it visible in the app.
How do I register several fields at once?
With the Import from Excel button. The spreadsheet needs the columns Code, Description, Sector, Area and Active — and delete empty rows before importing, otherwise the import fails. If instead of a spreadsheet you have the map in KML, use the Field Map Importer.
How do I know which fields still don't have a map?
Through the Has map? column in the list, which shows Yes or No for each field. You can filter by it and see at once everything that still needs a boundary.
How do I check the total registered area of the farm?
With the Total (ha) and Qty totalizer, next to the list buttons. It adds up what is being displayed — filter by sector and the total becomes that sector's total.
Can I take the map out of upCampo and use it in another system?
Yes. On the Coordinates tab, the Export KML button downloads the field's registered boundary, which can be opened in Google Earth or sent to another system.
I imported the boundary and it ended up on top of the neighboring field. How do I check?
Check Show all fields on the Coordinates tab: the map also draws the neighbors, and you can see whether the new boundary fits. To fix it, use Clear/Delete coordinates and import the right file.
What's the difference between the field area and the planted area?
The Area in the field record is the total area, in hectares, of that plot. The planted area is entered per season, on the Season Planting screen, and can be smaller.
What is the Sector field for?
To group fields, such as "North Sector" and "South Sector". It's also common to use it to separate farms when inventory and fleet records are shared.
What are the ground, aerial and border areas for?
They are refinements of the field area, in the Advanced section: how much can only be worked with ground machinery, how much receives aerial application and how much is border. There's also the Exclusion area (ha), for what shouldn't be counted — farm roads, reserve, buildings inside the field.