📘 Screen: Work Order/Activity
The work order is the document that records a field operation: in which fields it was done, with which products, with which machine, and by which employee. In upCampo, it is through the work order that the input leaves inventory and that the cost reaches the field and the season — an application with no work order entered happened in the crop, but does not exist in the system.
A work order covers everything from scheduling to execution: it opens with what you plan to do and closes with the area actually executed. That final area is what recalculates how much product went out and how much it cost — and it is where the season's cost per hectare comes from.
Before entering the first work order, the area's setups need to be ready — see the Operations Quick Guide.
📍 Location in the system
Menu: Operations > Work Order/Activity
🧩 Main function
Record each activity carried out in the crop, separating what was planned from what was executed, and linking the activity to the fields, products, equipment, and people involved.
🖥 The list
The screen opens on a list with the work orders for the period. This is where you follow the progress of the season's activities.
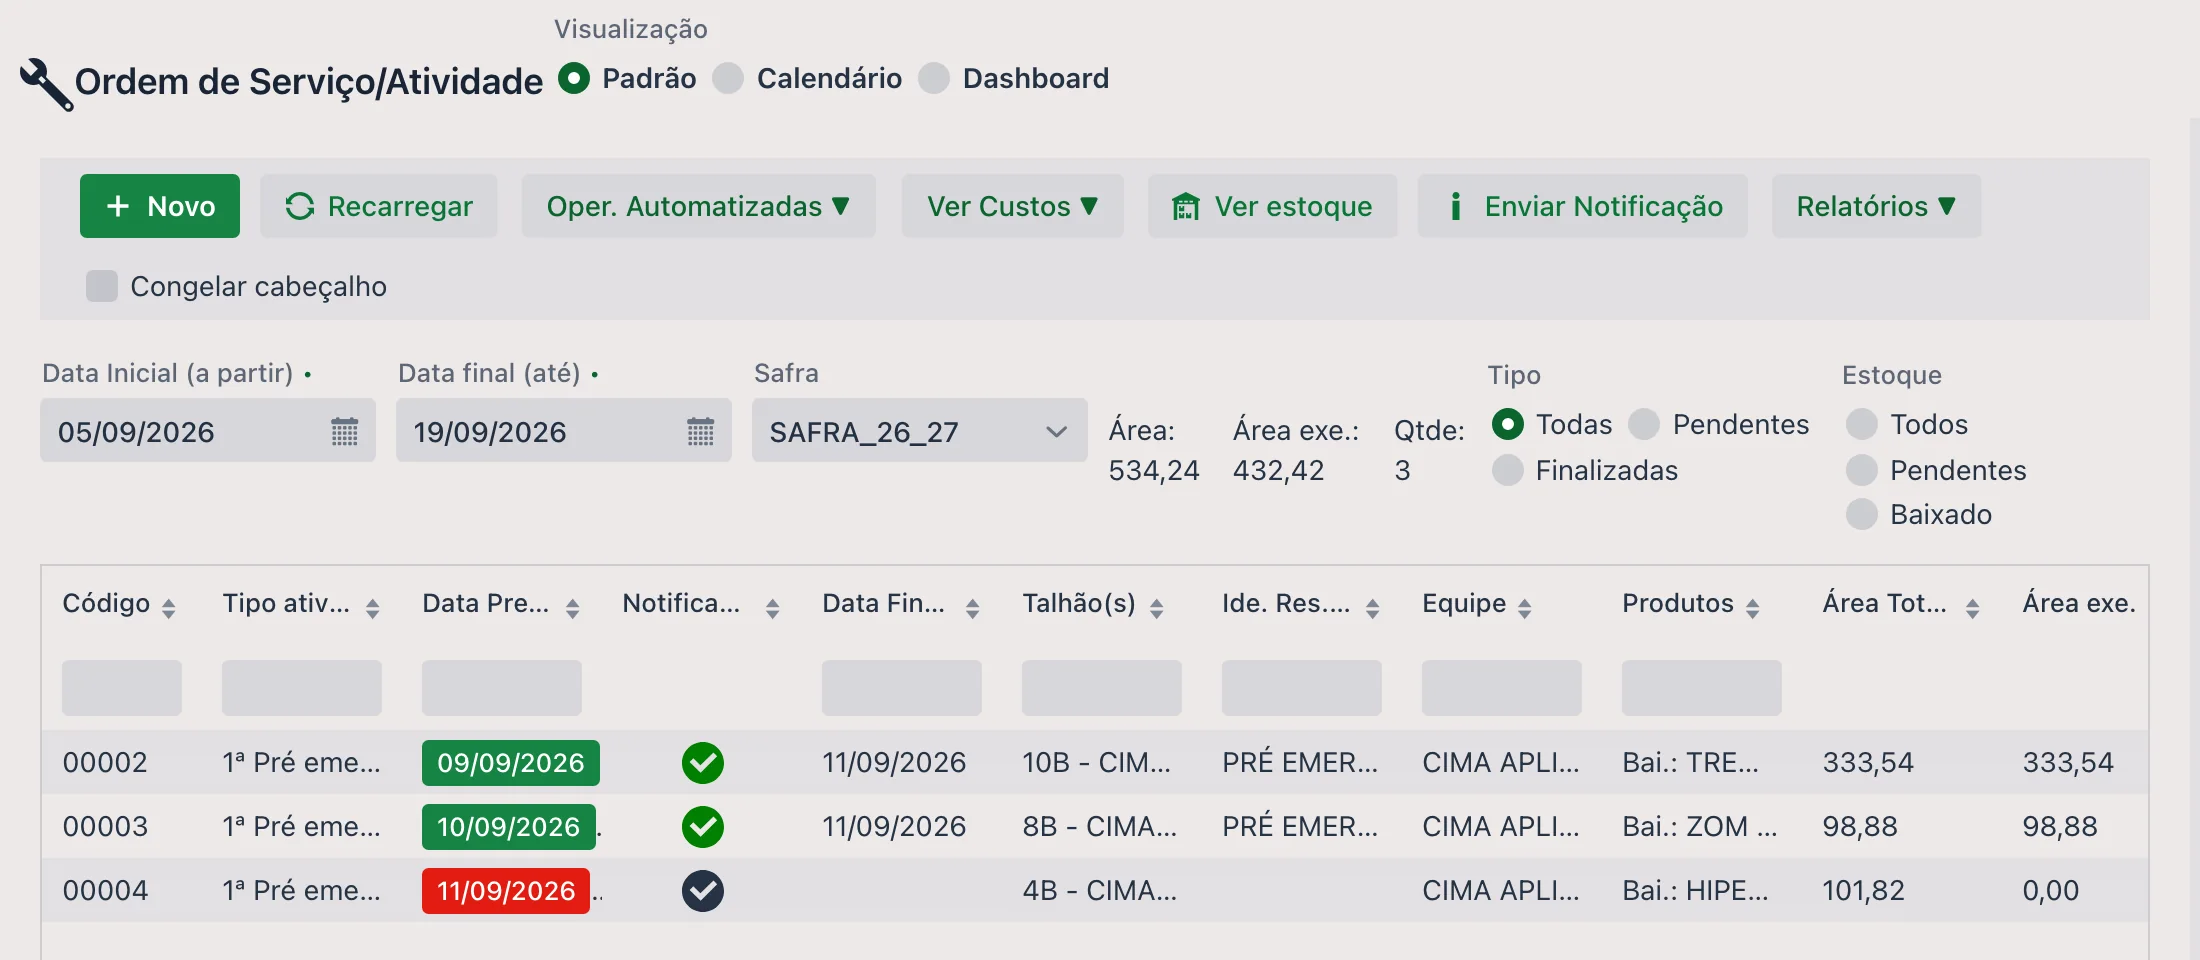
View modes
At the top there are three modes, chosen in the View field:
- Standard — the list as a grid, with all columns and filters
- Calendar — the work orders spread across the dates
- Dashboard — an indicators view
List buttons
| Button | What it does |
|---|---|
| New | Creates a work order. |
| Reload | Refreshes the list. |
| Automated Ops | Batch operations on several work orders — see below. |
| View Costs | Shows the work order's costs by field: since the product is entered for the whole work order, the amount is allocated across the fields. |
| View inventory | Shows product availability. |
| Send Notification | Sends the WhatsApp alert to the team. |
| Reports | Quick access to the area's reports. |
| Freeze header | Keeps the header fixed while scrolling the list. |
Automated operations
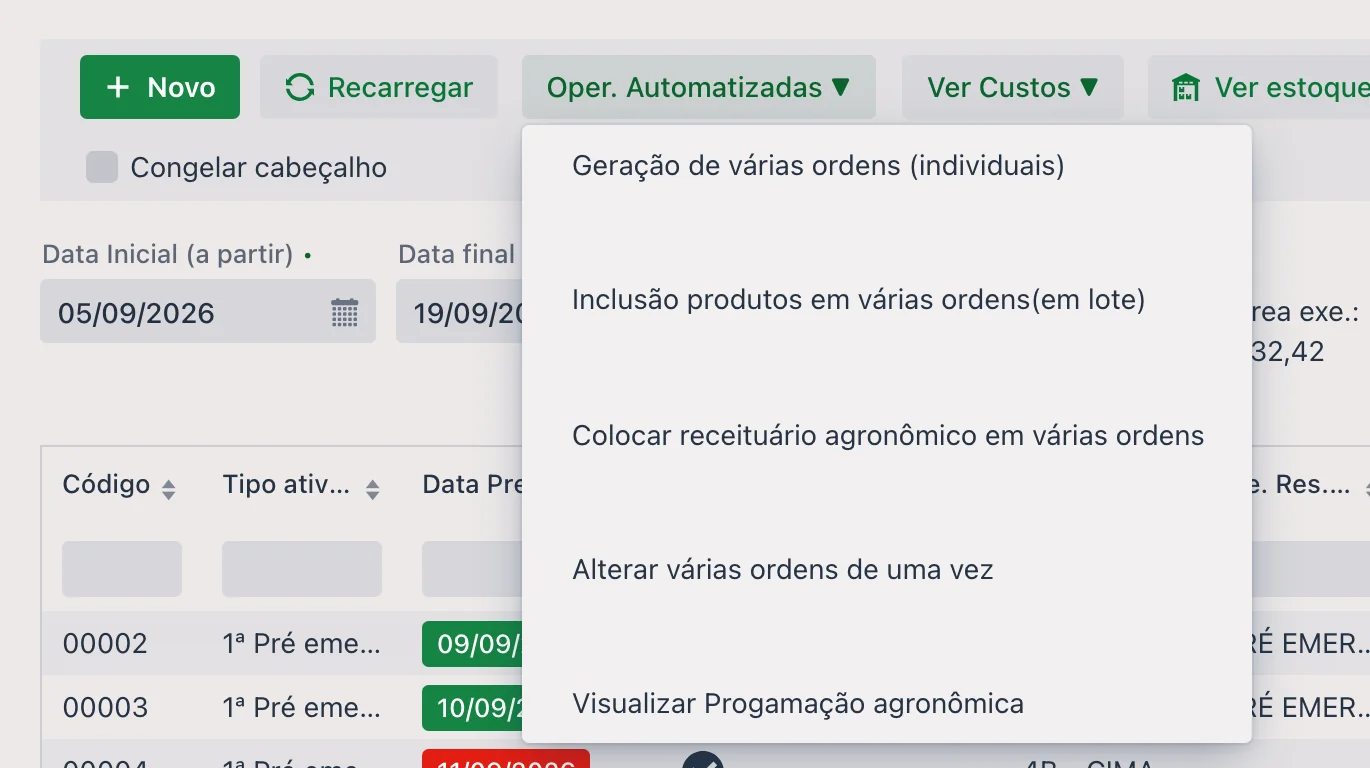
This is the menu that saves you from repeating the same work order by order:
- Generate several work orders (individual) — creates several work orders at once
- Add products to several work orders (batch) — adds the same products to a set of work orders
- Apply agronomic prescription to several work orders — links a prescription to several work orders
- Change several work orders at once — batch editing
Filters
| Filter | Description |
|---|---|
| Start Date (from) and End date (to) | Period shown. By default the screen opens with 7 days before and 7 days after today's date — that's why an old or far-future work order doesn't appear until you widen the period. |
| Season | Season of the work orders listed. |
| Status | All, Pending, or Finished. |
| Inventory | All, Pending, or Posted — separates work orders whose products have already been deducted from inventory from those that haven't. |
Next to the filters are the totals for what is being shown: Area, Executed area, and the number of work orders.
Planned Date colors
The planned date appears in color, flagging each work order's situation without opening it:
| How it appears | Meaning |
|---|---|
| 05/08/2026 | Finished |
| 07/08/2026 | Late |
| 10/08/2026 | Pending and close to the deadline (within 7 days) |
Columns
The grid shows Code, Activity type, Planned Date, Notification, Completion Date, Field(s), Short ID (Subtype), Team, Products, Total Area (ha), Exec. area, and % Executed. Short ID is the short identification, and Exec. area is the area already executed.
From the grid's options menu you can add or remove columns — for example Approval, Responsible, and Equipment, which are not shown by default. Each column also has a filter field right below its title.
🧾 The work order header
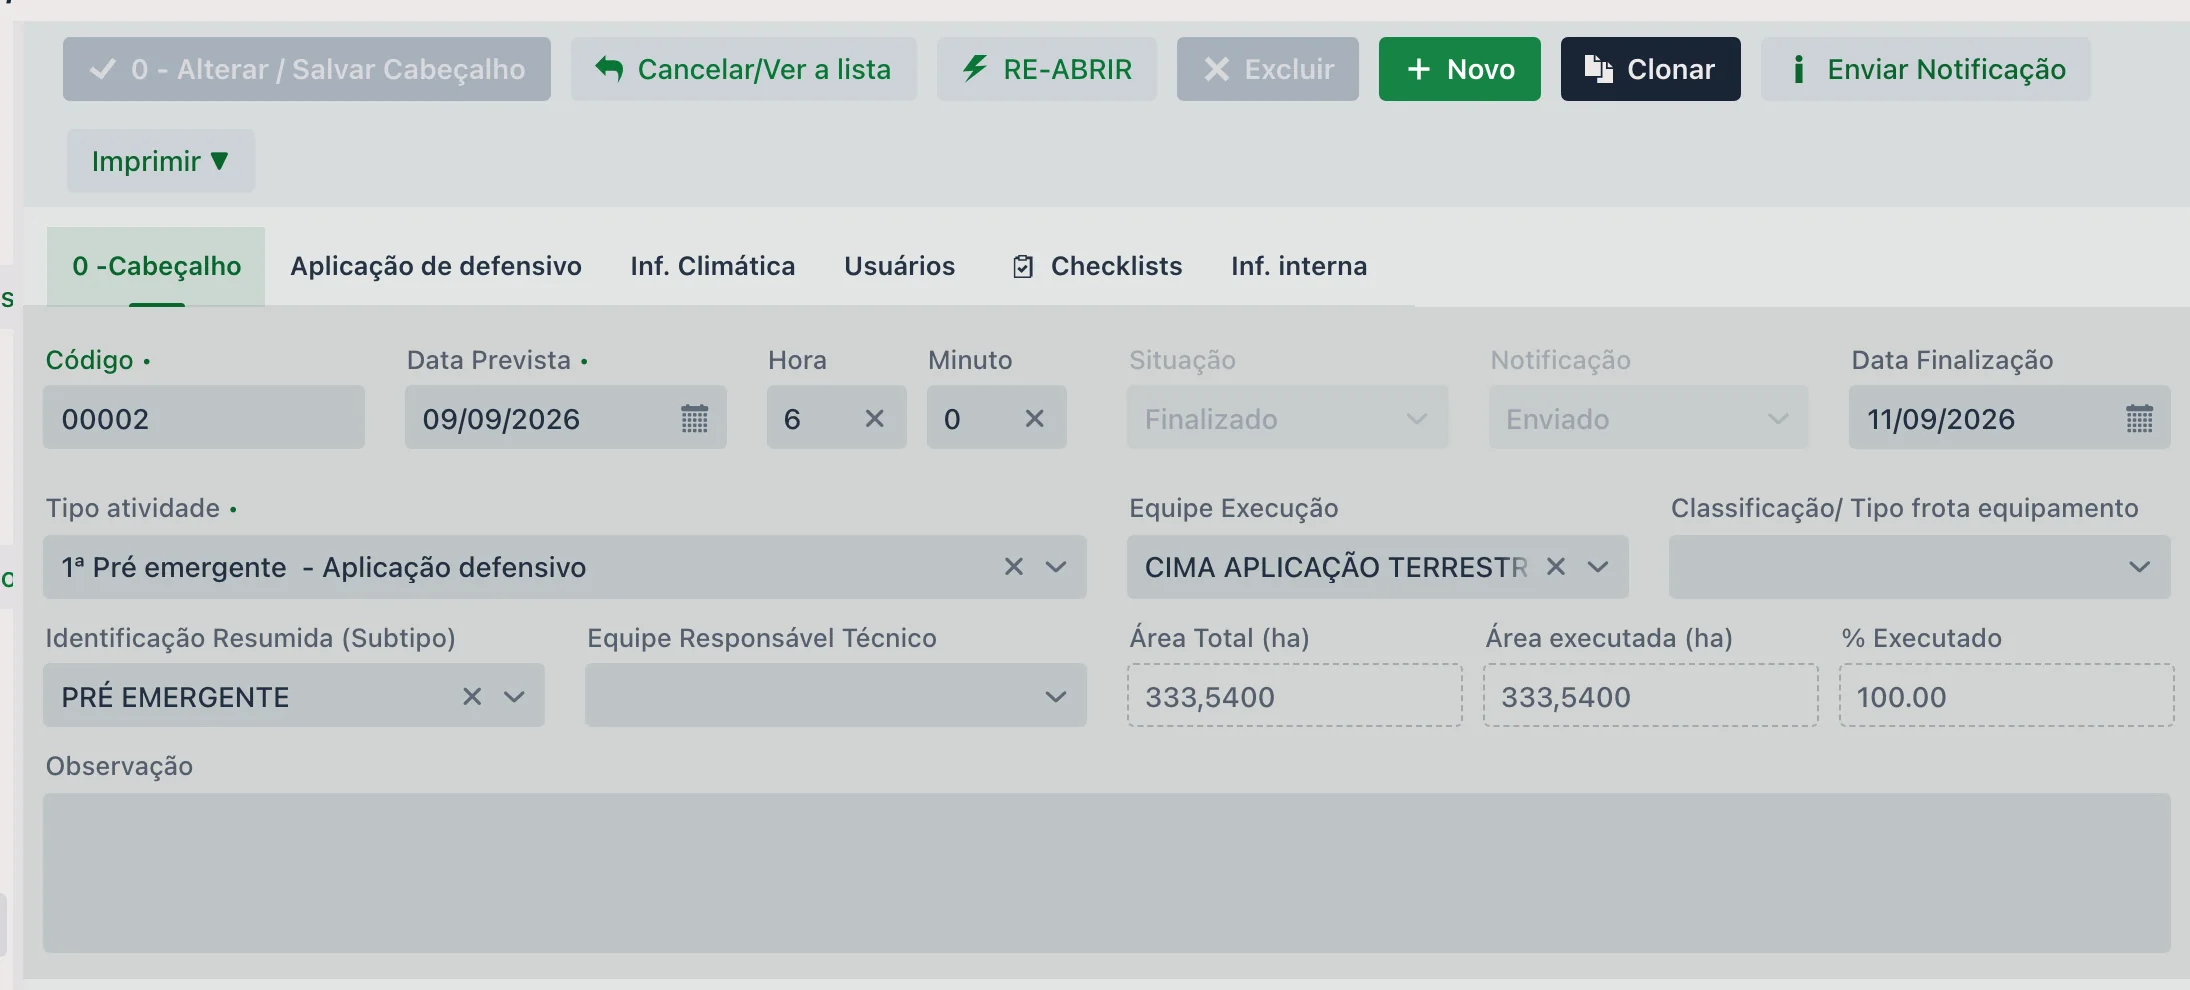
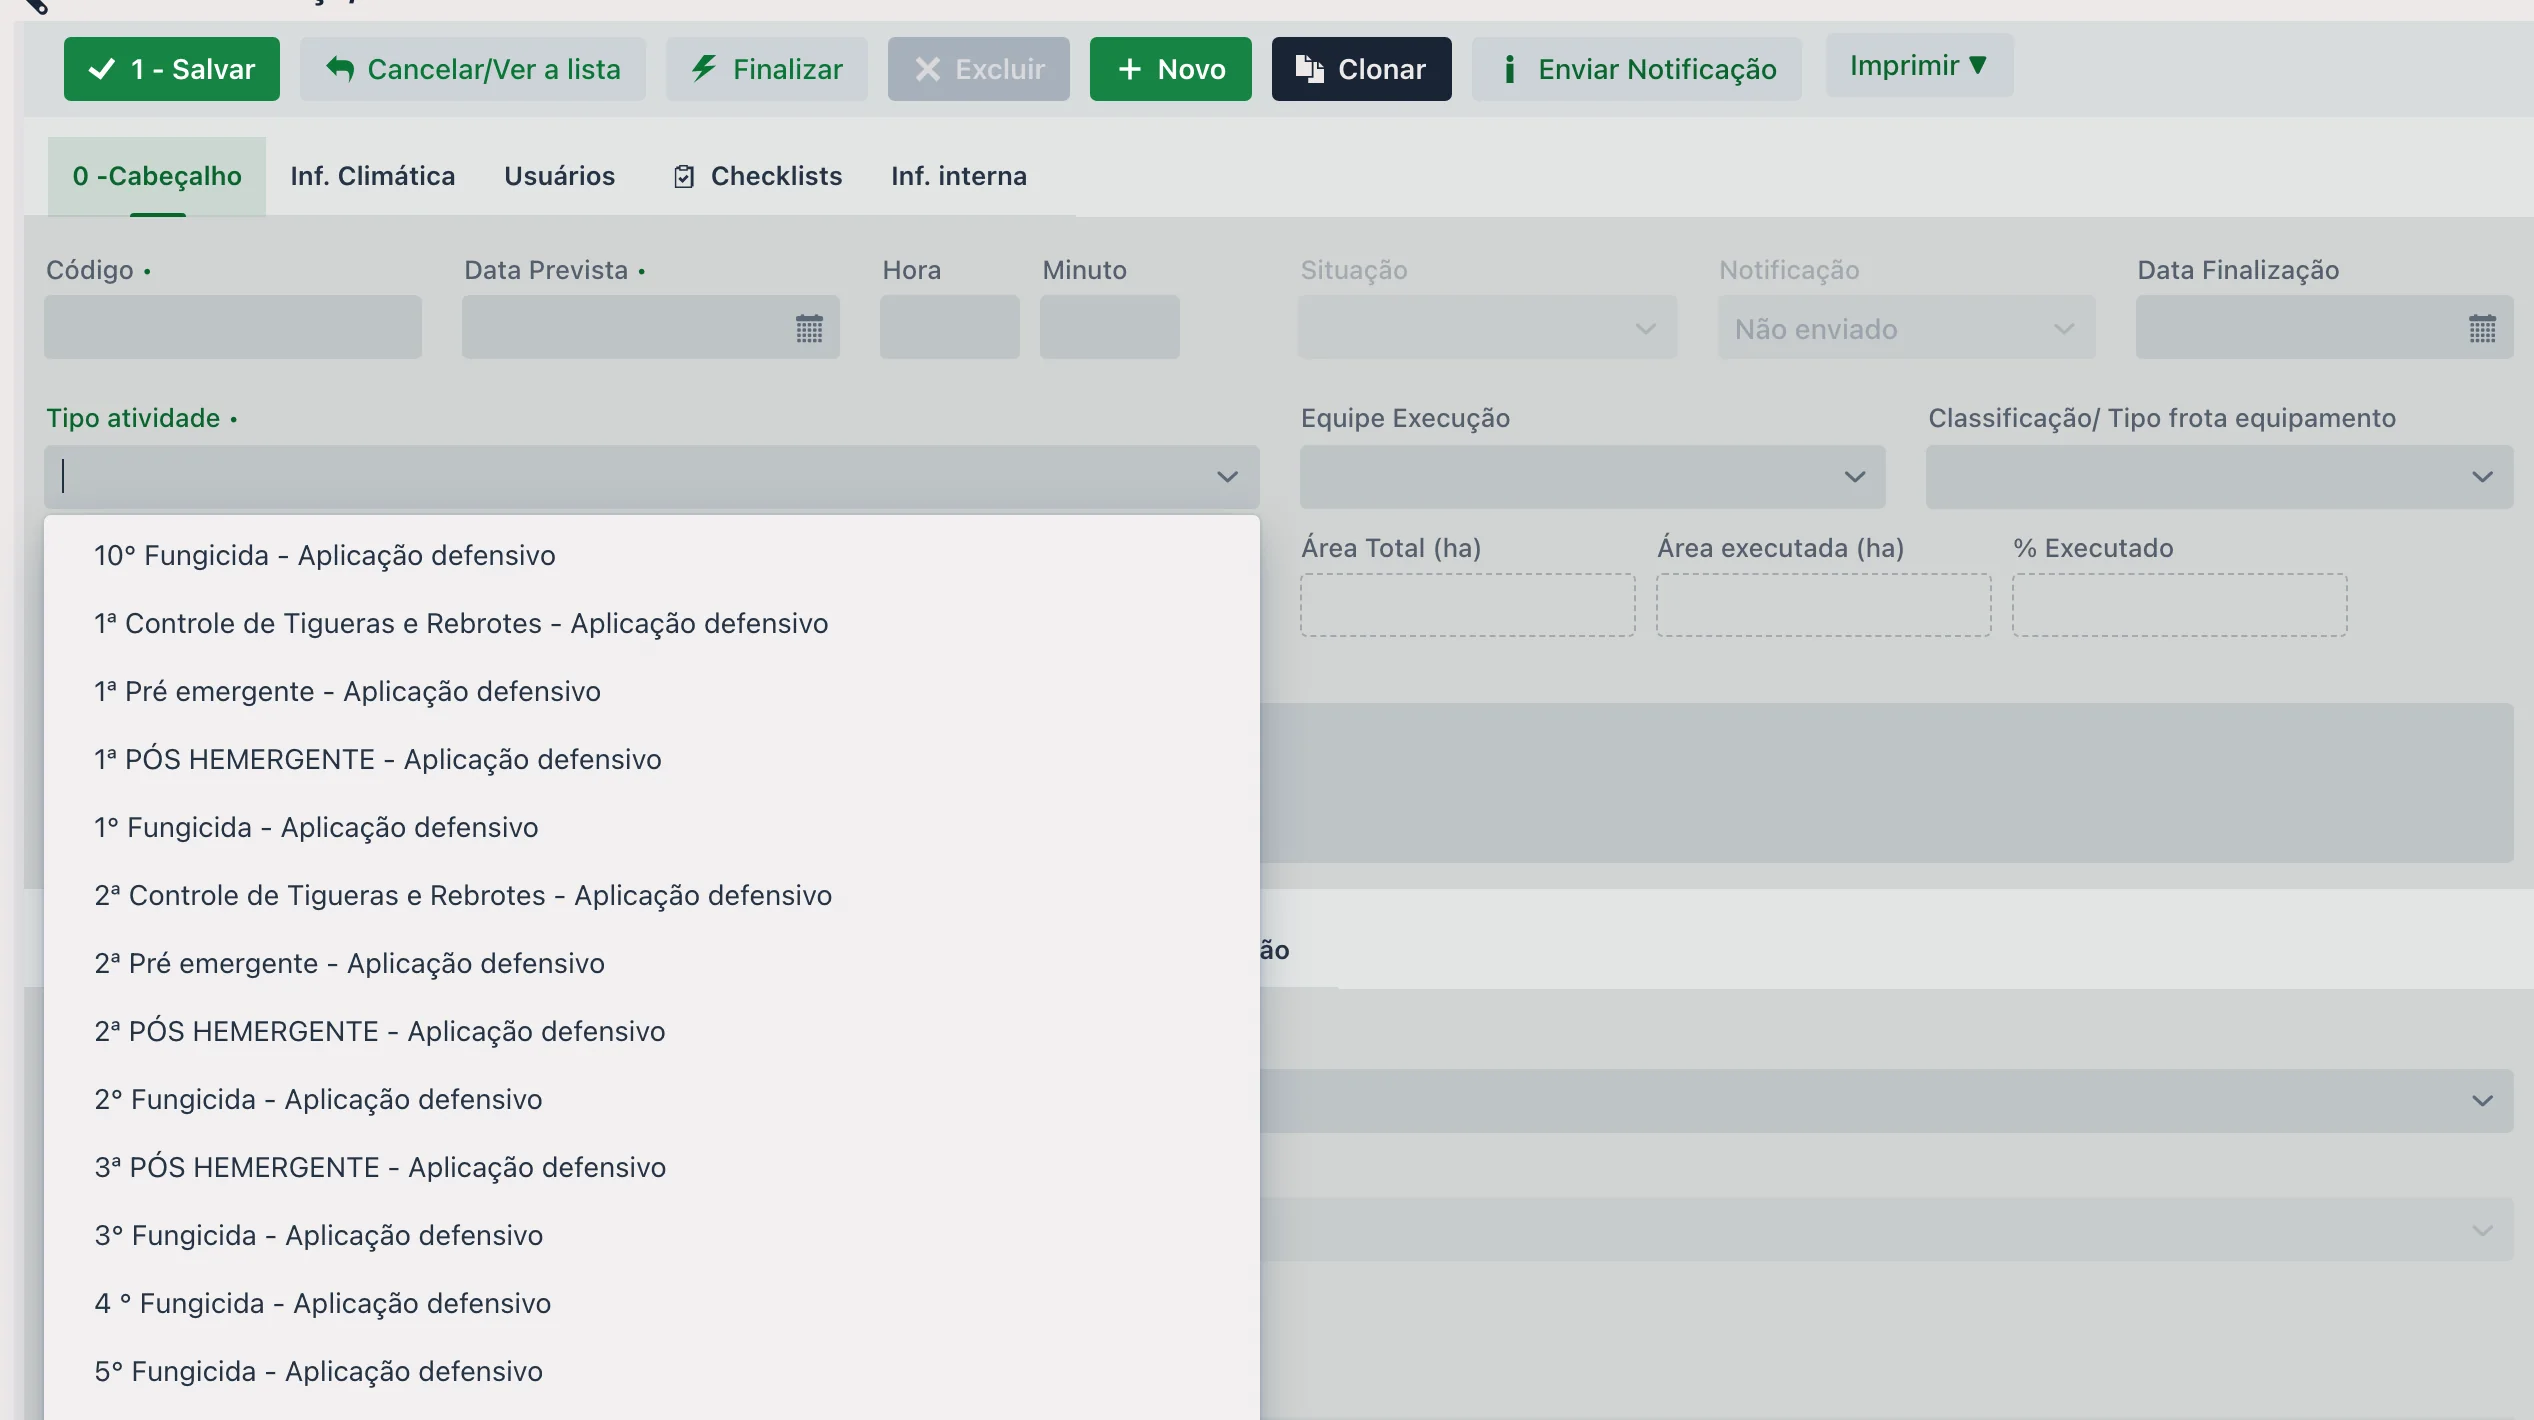
Buttons
| Button | What it does |
|---|---|
| 0 - Change / Save Header | Saves the header. |
| Cancel/View list | Goes back to the list. |
| RE-OPEN | Reopens a finished work order so it can be changed again. |
| Delete | Deletes the work order. |
| New | Creates another work order. |
| Clone | Creates a full copy of the work order — fields, products, fleet —, without bringing the inventory deduction. It is the fastest path when the same activity repeats. |
| Send Notification | Sends the WhatsApp alert to the team. |
| Opens the print reports enabled for your user. There is usually more than one template, for different situations. |
When the work order is finished, the editing buttons are disabled — you need to use RE-OPEN before editing.
Actions depend on permissions. Saving, deleting, finishing, and reopening are controlled per user. In practice, most teams allow only add and change for day-to-day operators, leaving finish and reopen to a few people — precisely because finishing locks the record. If a button appears grayed out, the most likely reason is a missing permission.
Fields
| Field | Description |
|---|---|
| Code | Work order number. |
| Planned Date, Hour, and Minute | When the activity is planned to happen. |
| Status | State of the work order: Pending, Finished, or Canceled. |
| Notification | Status of the WhatsApp alert (e.g., Not sent). |
| Completion Date | When the work order was finished. |
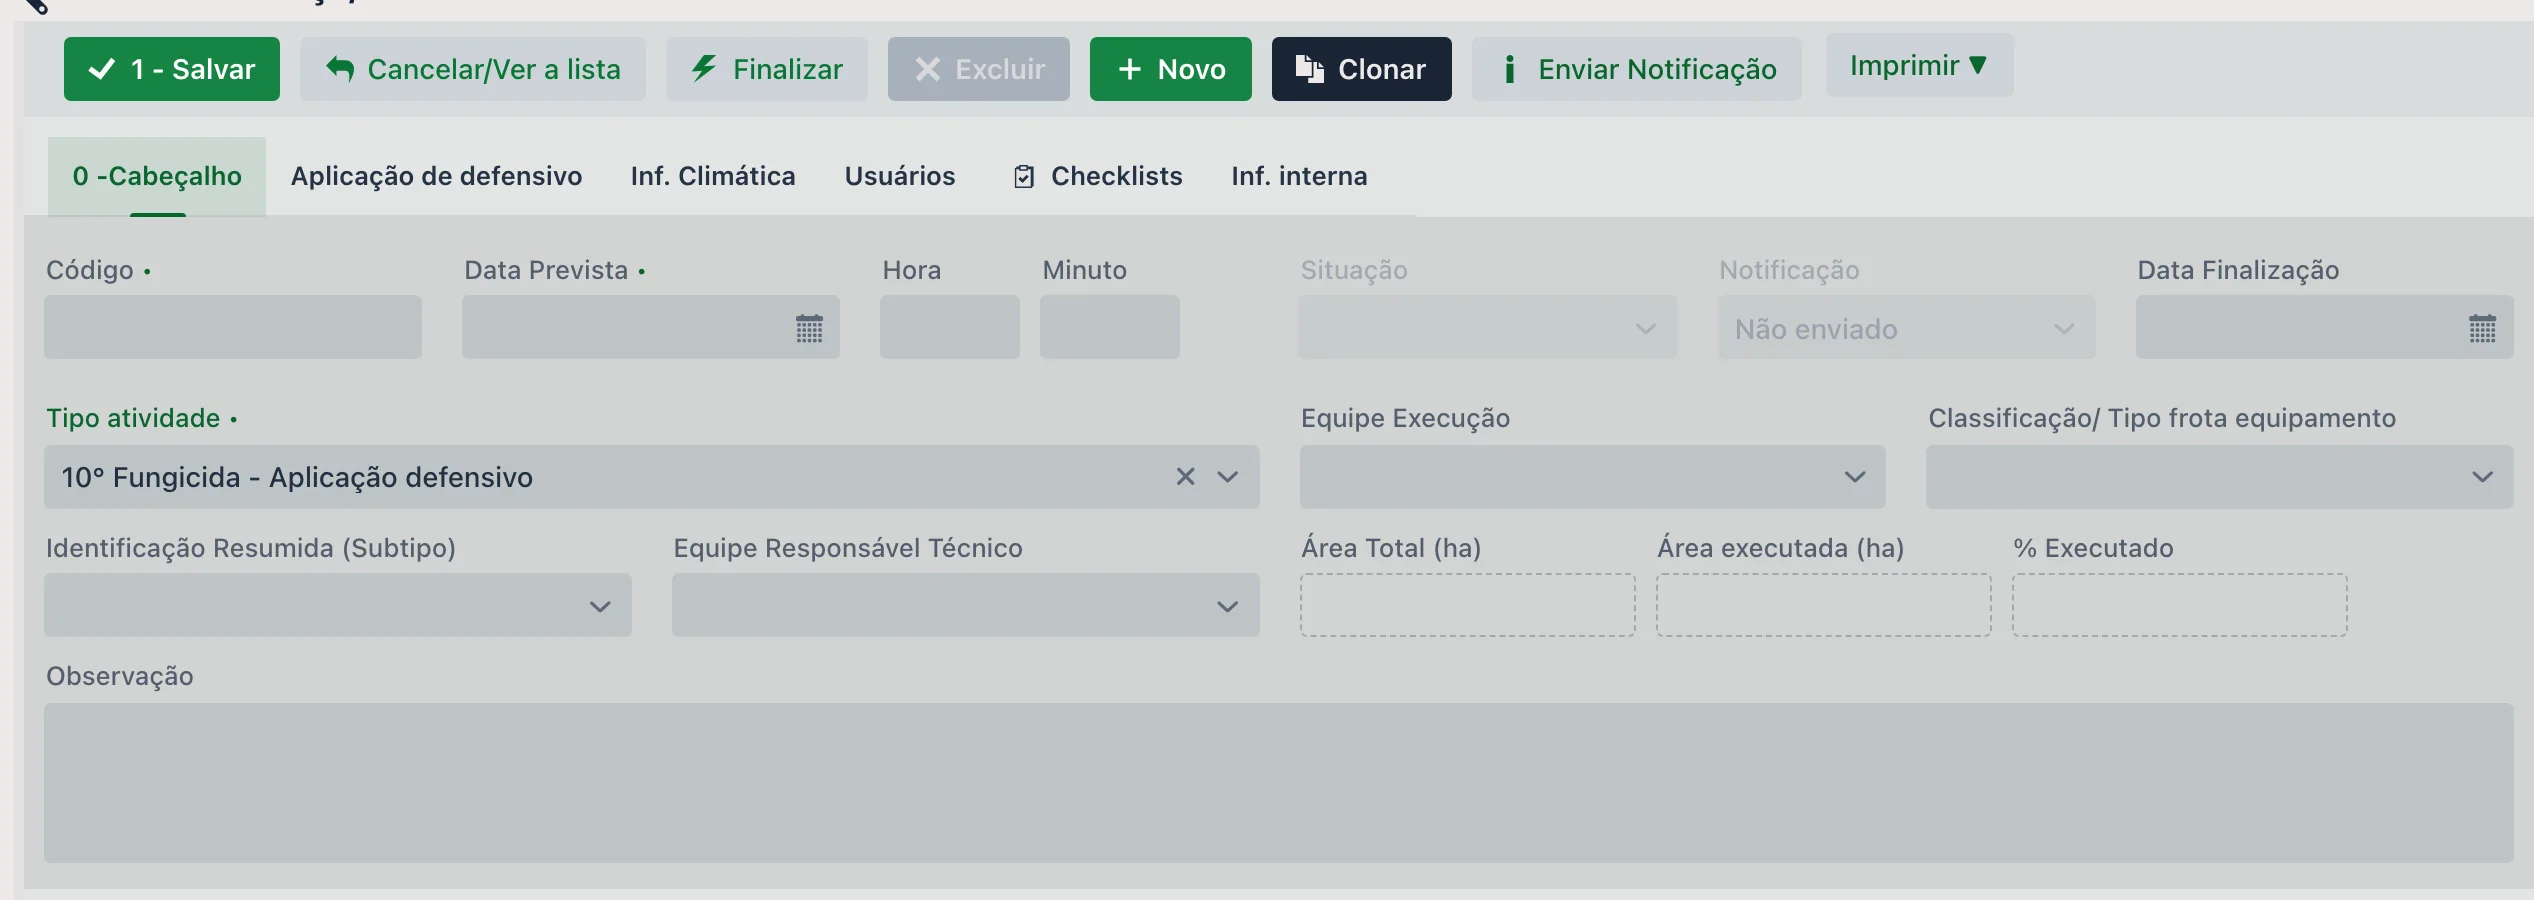
| Activity type | The activity type, which defines the work order's behavior: which fields appear, what is required, and which defaults come prefilled. |
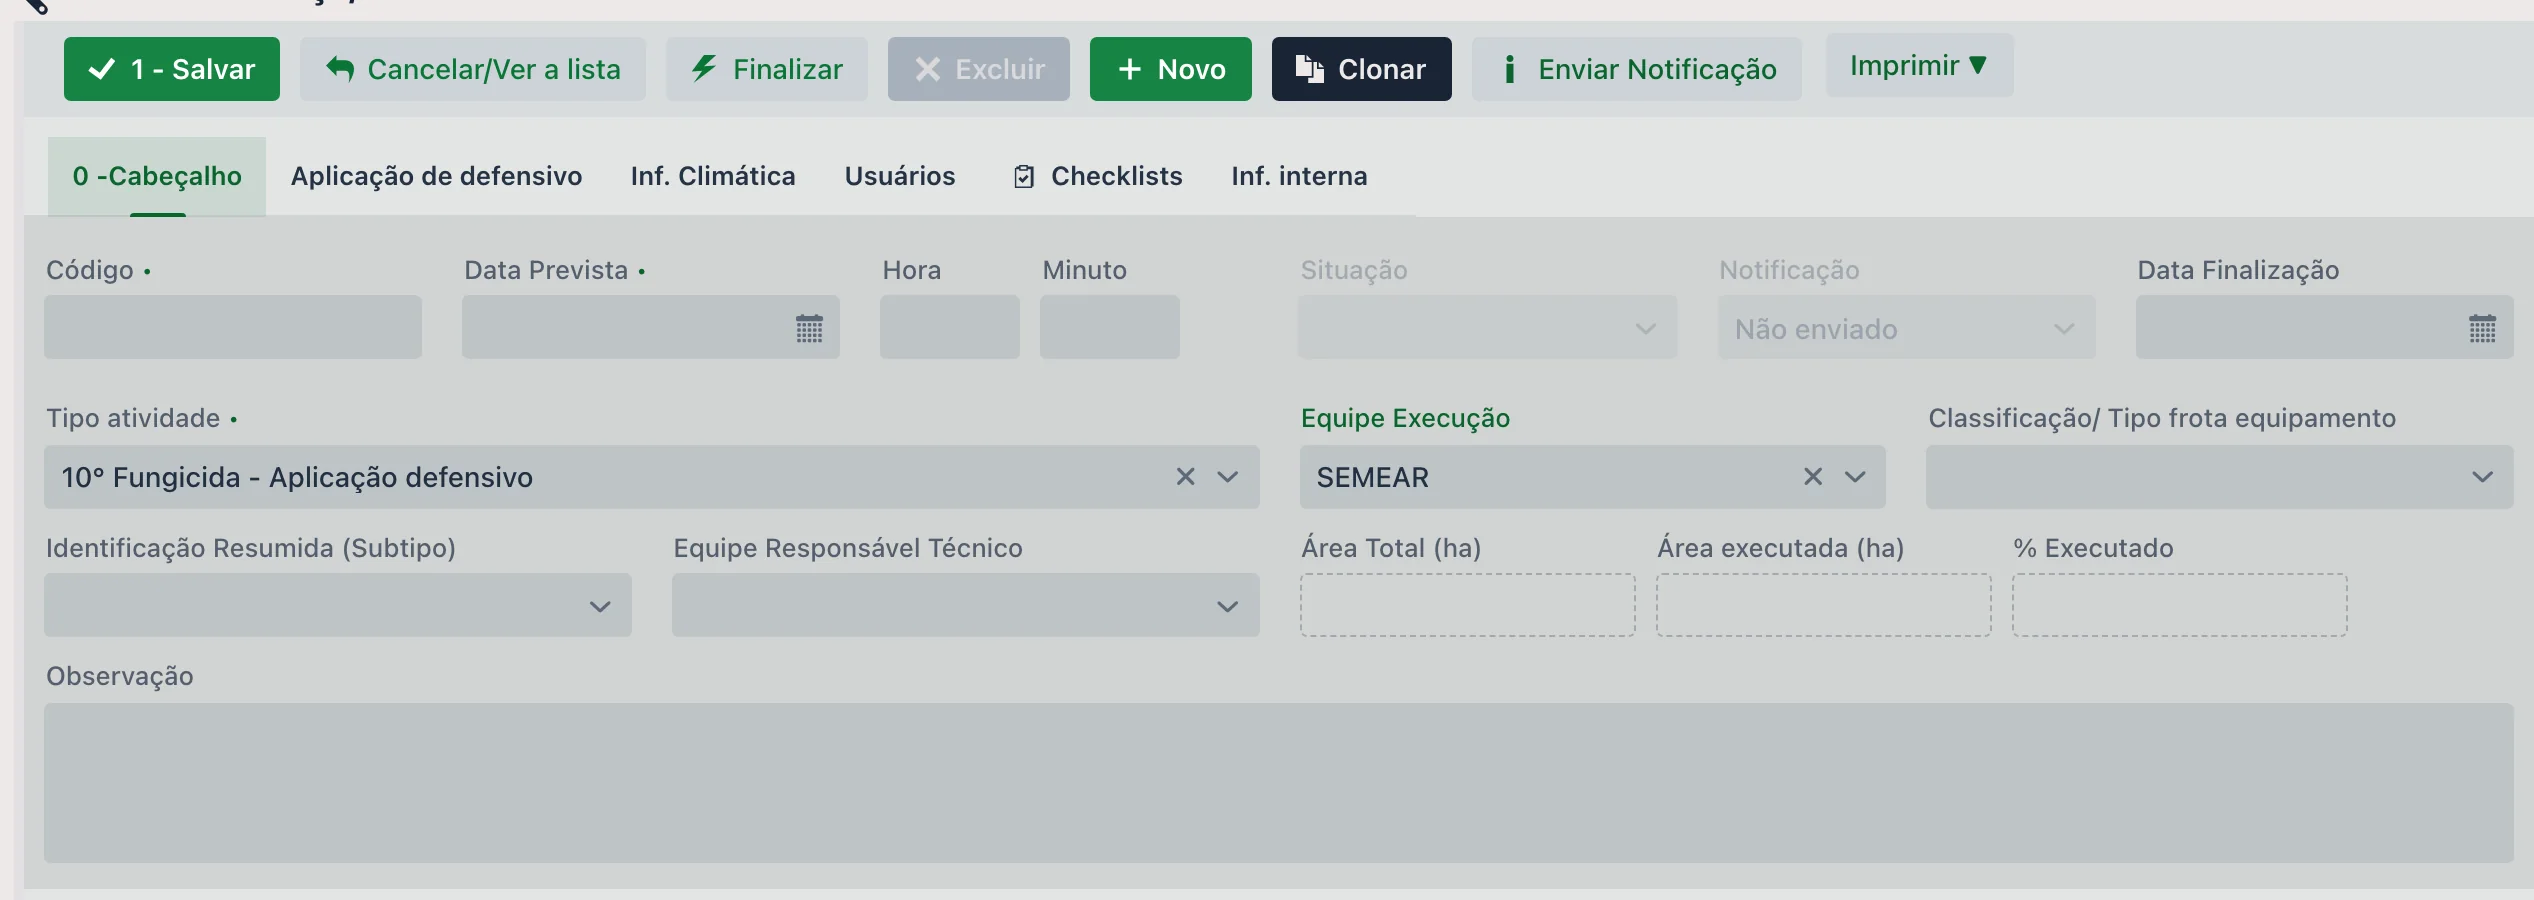
| Execution Team | The team that does the work. |
| Technical Lead Team | The team technically responsible for the activity. Only appears if some team is marked to show in Tech. Lead in the Team setup. |
| Short Identification (Subtype) | The subgroup of the activity type. |
| Classification/ Fleet equipment type | Indicates which type of equipment the activity should be done with — for example, "use the drone". |
| Total Area (ha), Executed area (ha), and % Executed | The planned area, the area actually worked, and the percentage completed. |
| Notes | Free field for notes. |
Header tabs
- Crop protection spraying — application parameters and conditions, filled in with the activity type's defaults
- Weather Info — weather conditions during the application, together with the Crop protection spraying tab
- Users — users linked to the work order
- Checklists — the work order's checklists
- Internal Info — internal control information
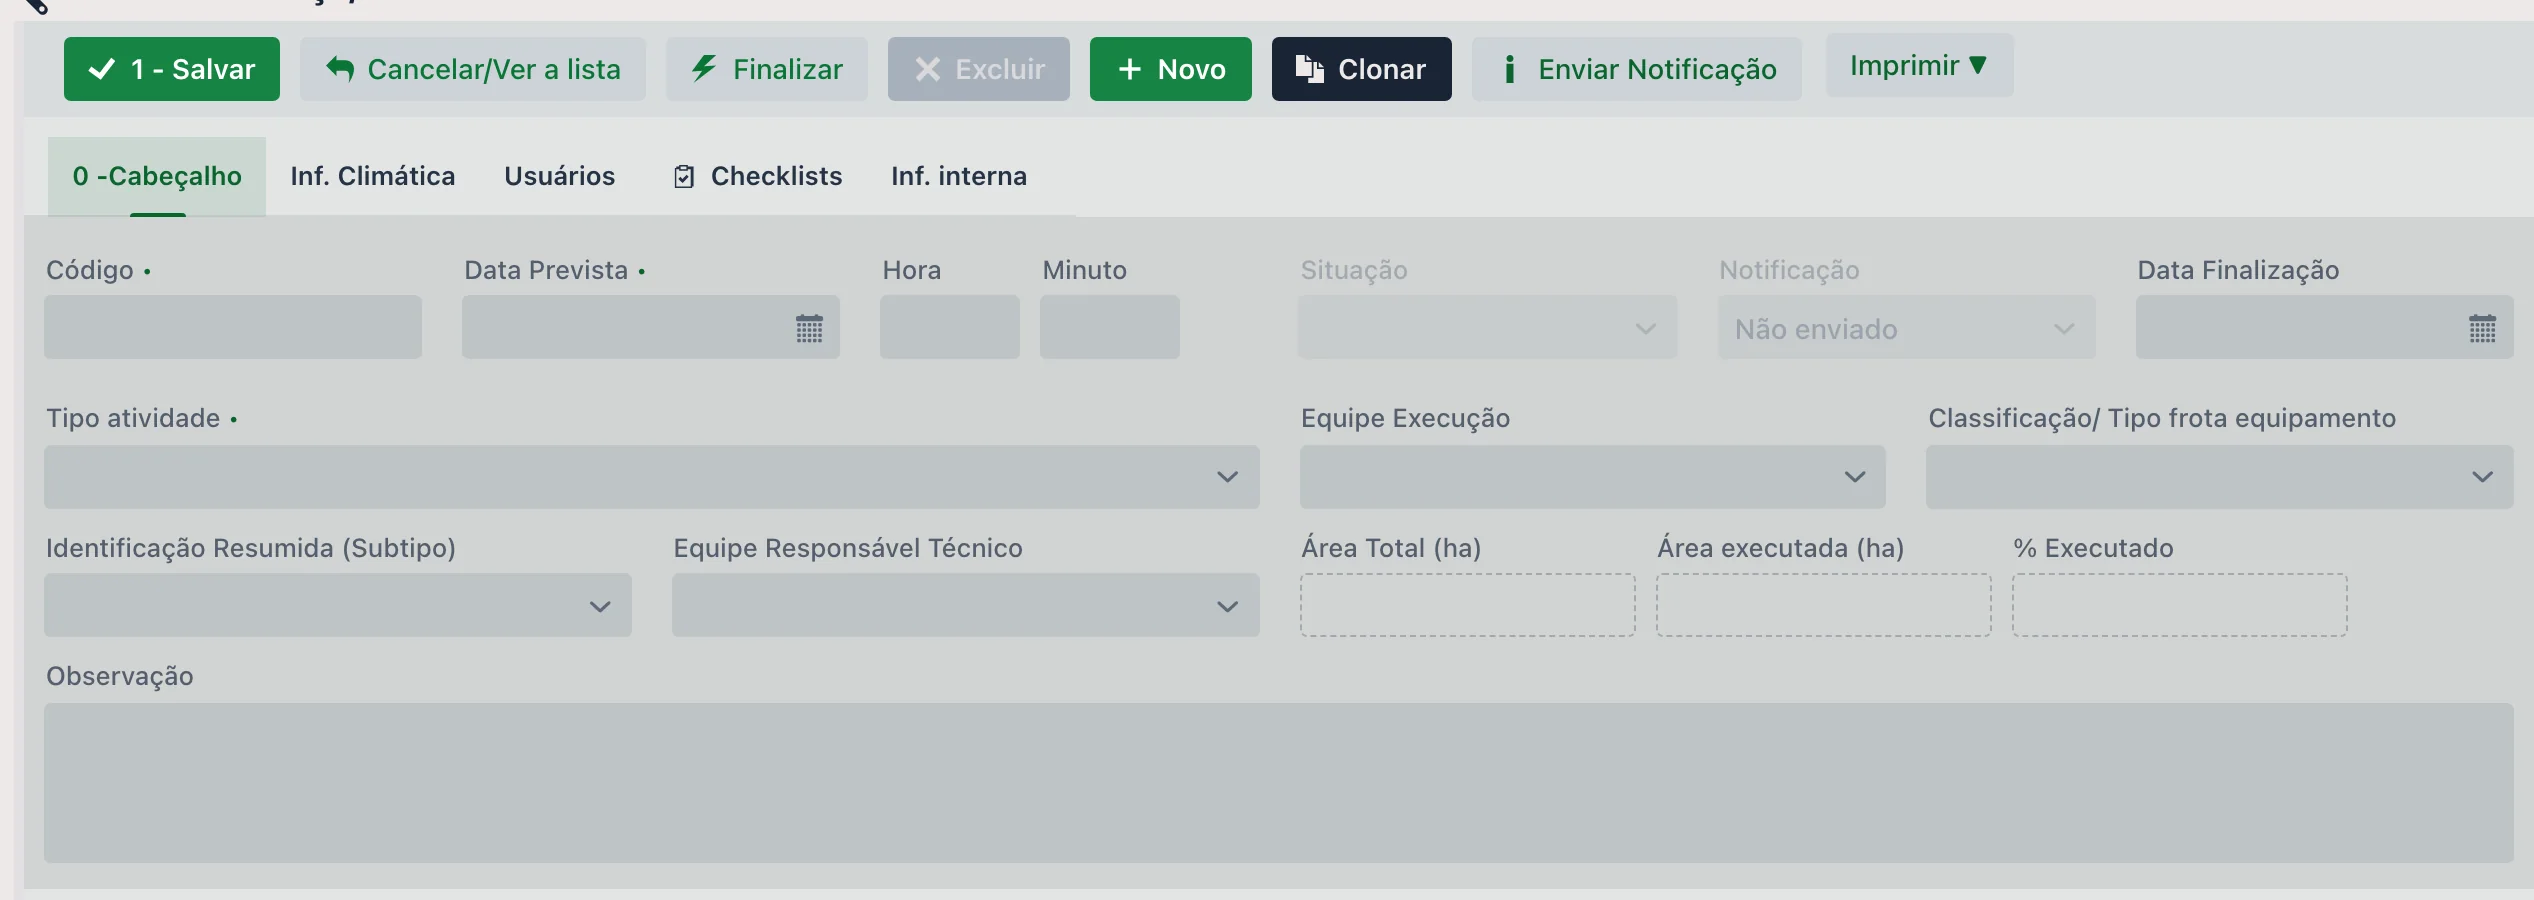
Creating a work order, step by step
- In the list, click New. The header opens empty, and the Code is generated automatically.
- Open the Activity type field and choose the type. It defines the work order's behavior: when you choose a crop protection spraying, for example, the Crop protection spraying tab appears in the header.
- Fill in the Planned Date and choose the Execution Team.
- Click 1 - Save to save the header and continue through the detail tabs, in numbered order.
🗂 The detail tabs
Below the header there are four numbered tabs, which follow the natural order of data entry.
1 - Field
Where the work was done. You enter Sector, Field, Area, and Variety/Cultivar. The list shows Field, Sector, Crop, Variety/Cultivar, Area, Executed Area, and Season.
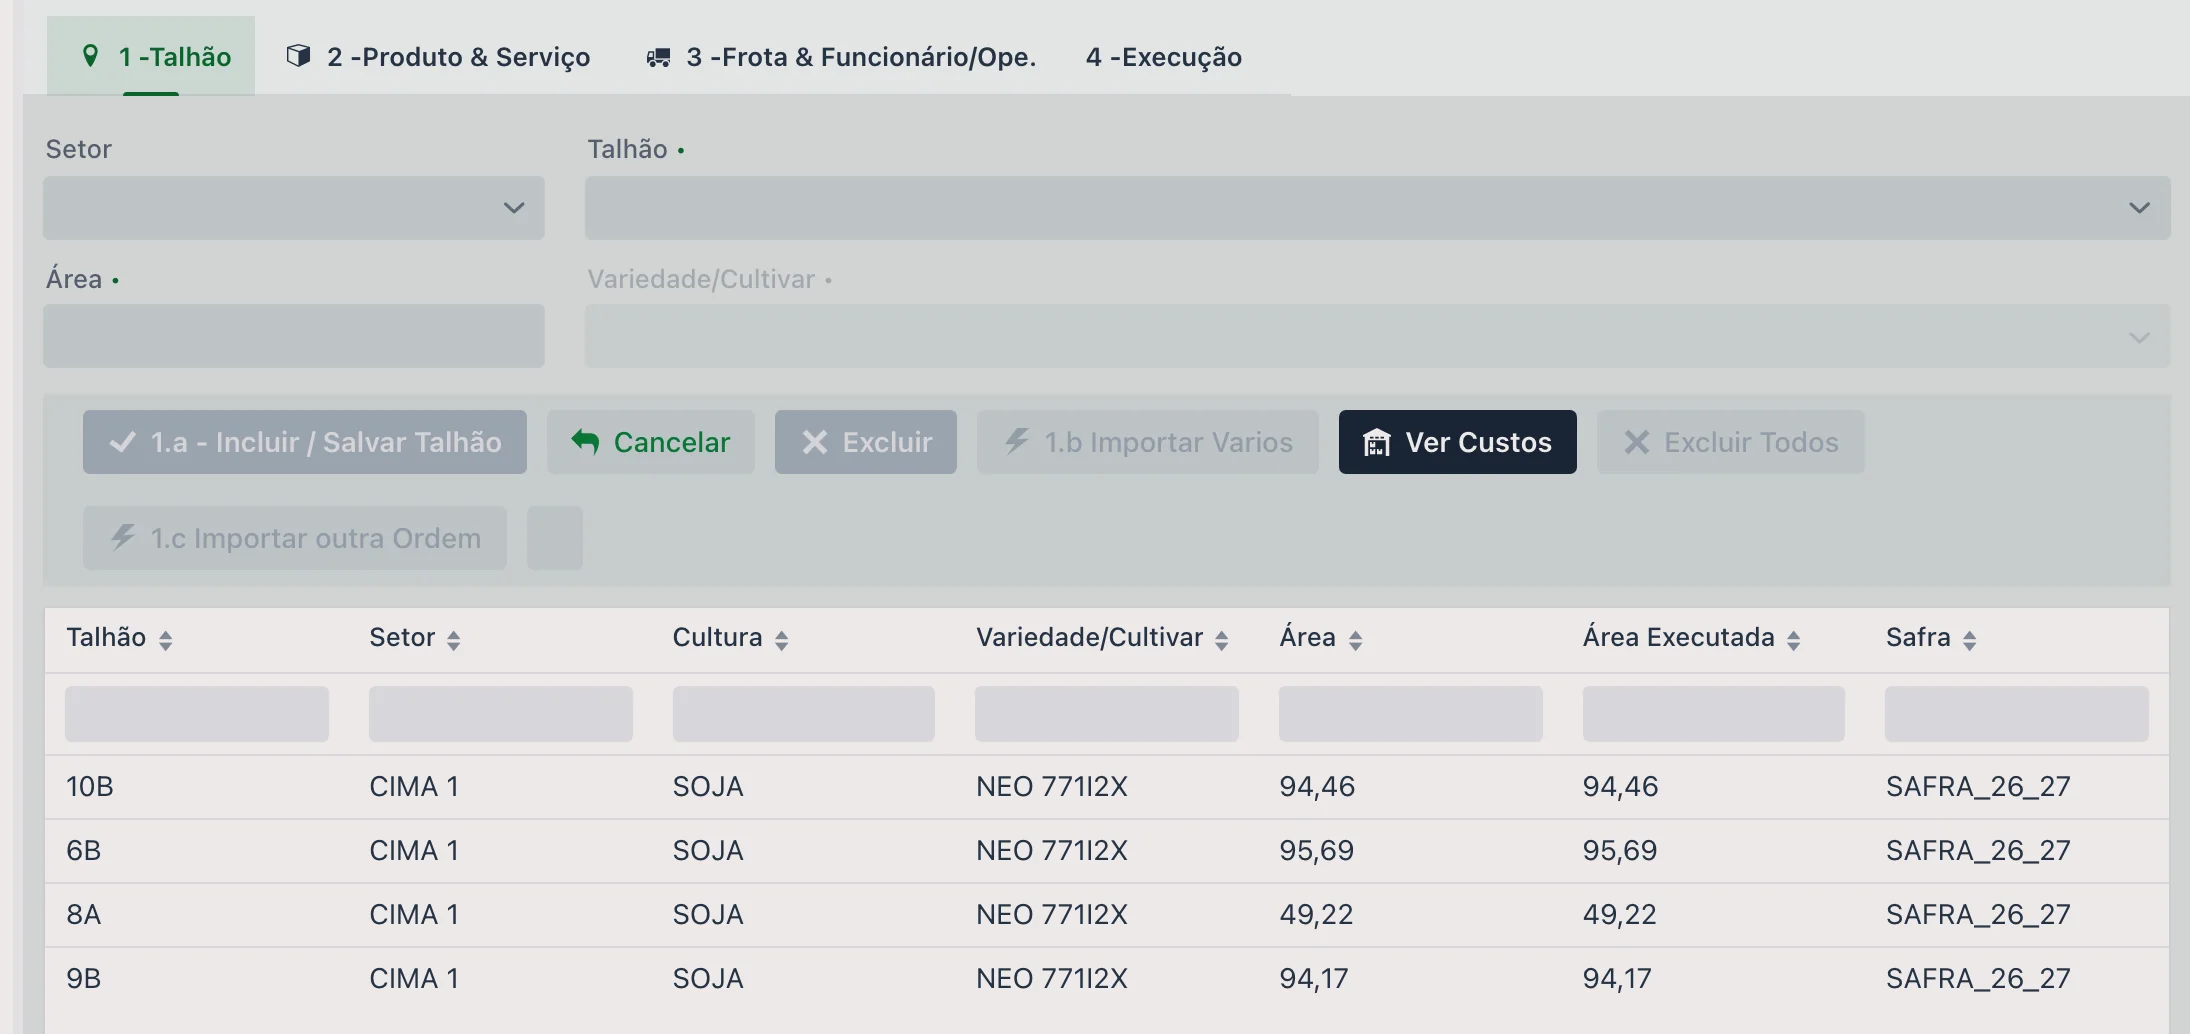
Which fields are available to choose: only those that meet all three conditions at the same time:
- they are in Season Planting
- they are active
- their harvest has not been finished yet
That's why a newly set-up field doesn't appear until it is linked to the planting, and why fields already harvested drop off the list.
Besides adding them one by one, the tab offers:
- Import Several — brings in several fields at once
- Import another Work Order — copies the fields from an existing work order
- Delete All — clears the list
- View Costs — shows the costs by field
2 - Product & Service
What was applied. The main fields are:
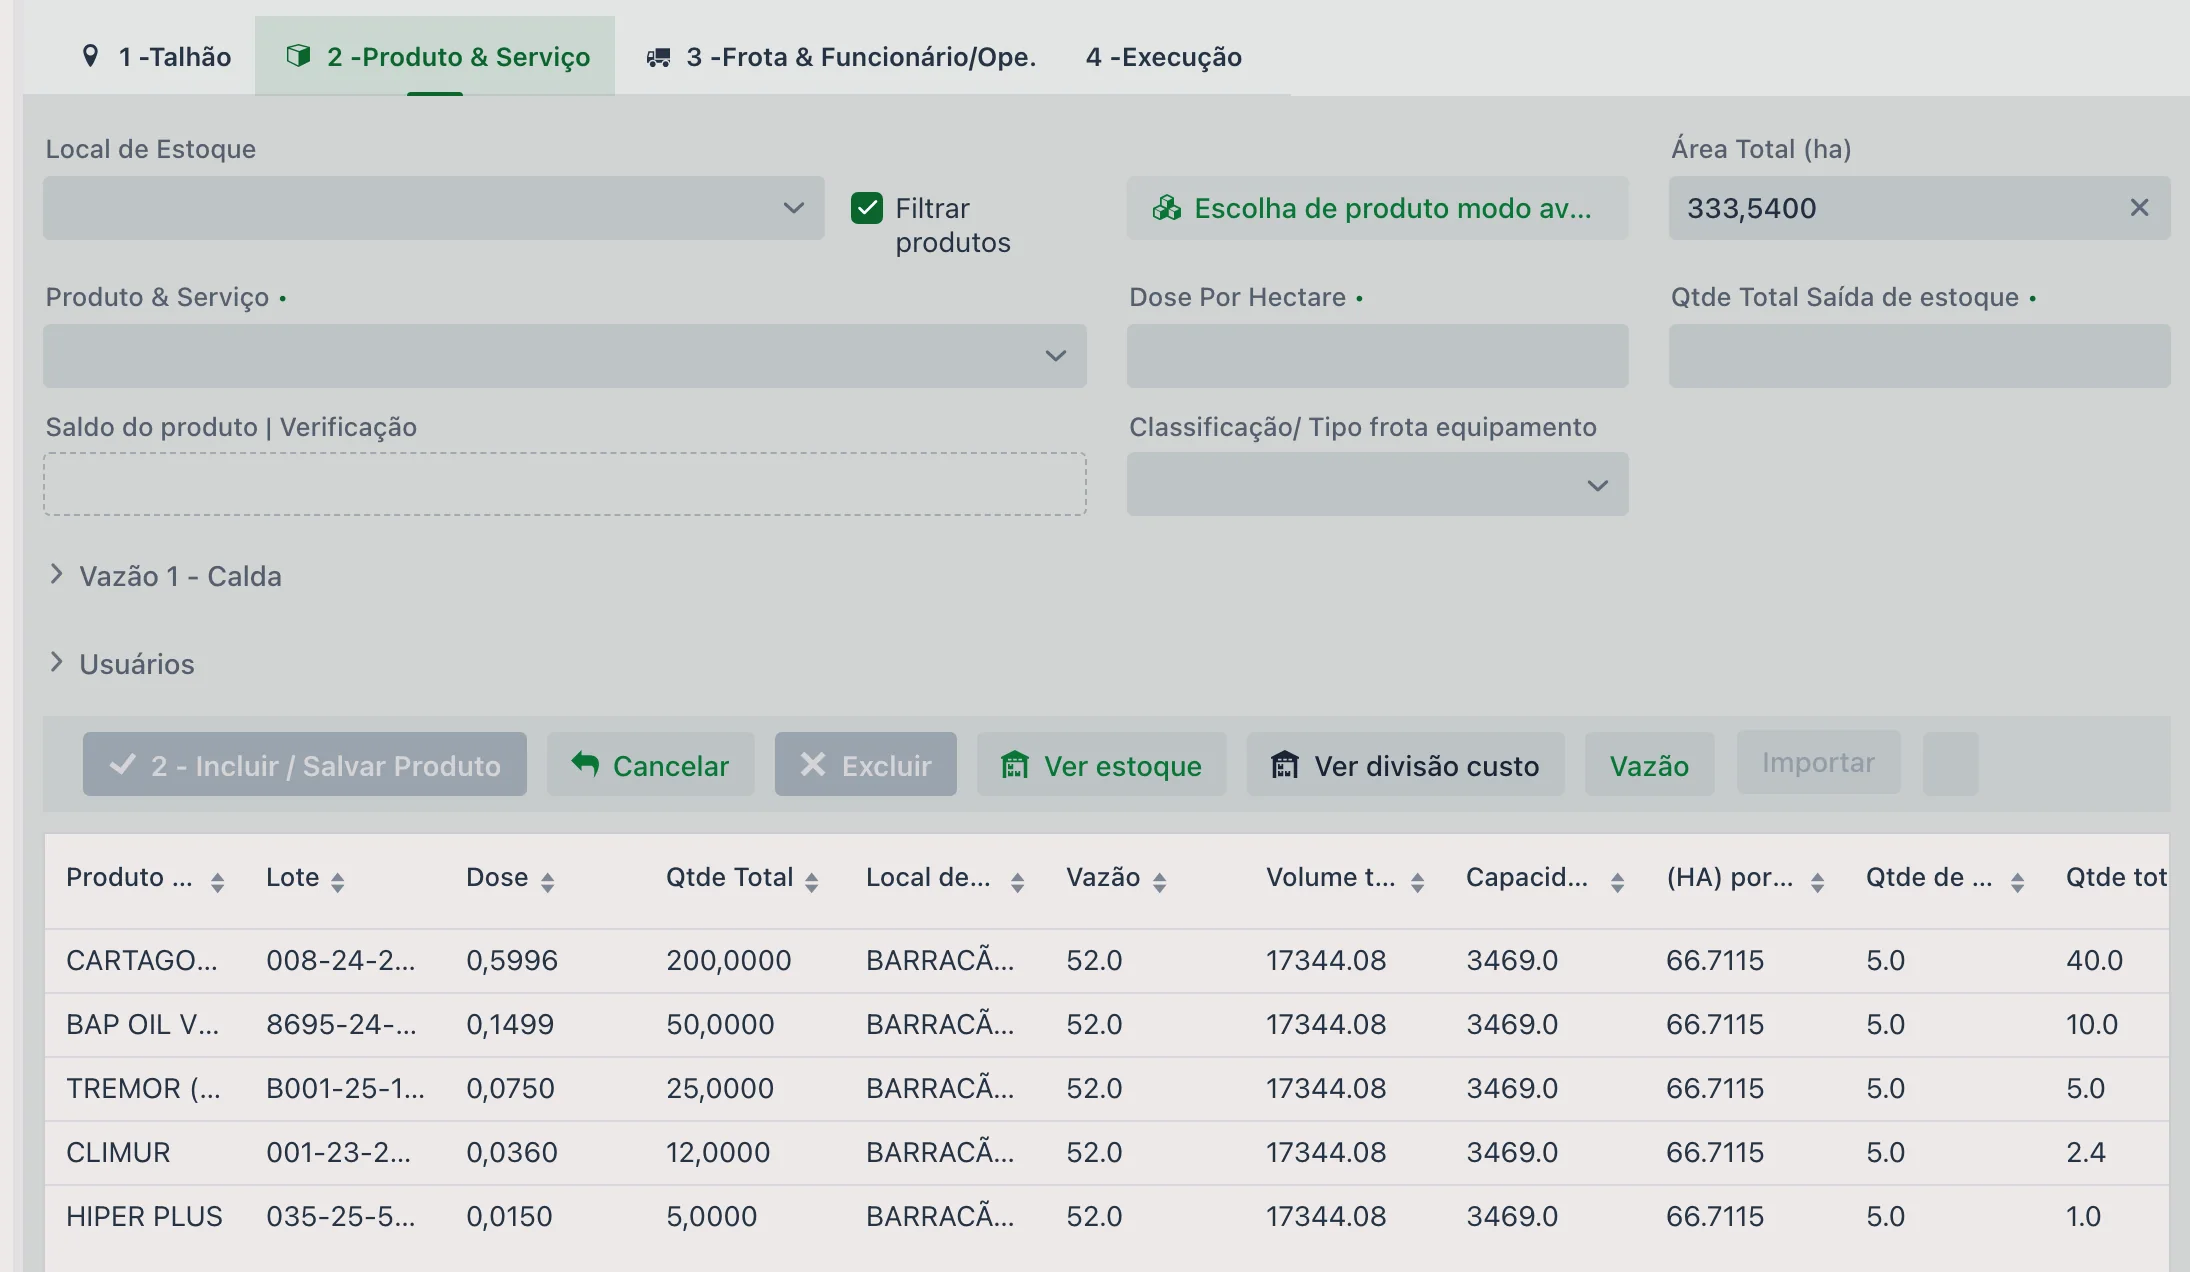
| Field | Description |
|---|---|
| Storage Location | Where the product is being taken from. |
| Filter products | Limits the list to the products in that location. With the Show only products with balance option turned on in the company settings, the list shows only products with a balance — in the chosen location or, before choosing one, in any storage location — plus services. |
| Product & Service | The product or service applied. |
| Rate Per Hectare | Rate applied per hectare. |
| Total Qty Out of Inventory | Total quantity that leaves inventory. |
| Product balance | Check | Shows the available balance and the result of the product's agronomic checks — the rate and interval limits set up in the Rate x Farm x Crop tab of the Product & Service. See below. |
There is also the Advanced product selection and the collapsible sections Volume 1 - Spray Mix and Users. The Import button is the way to bring in the items of an Agronomic Treatment.
Besides the product and the lot, the product list shows the rate, the total quantity, the storage location, the spray volume, the tank volume and capacity, the hectares per tank, and the unit and total amounts.
How upCampo calculates quantity and cost
You enter the rate per hectare; the system builds the rest from the area of the work order's fields.
A soybean burndown on 120 ha, at 2.5 L/ha of a product costing R$ 18.50 per liter:
| Step | Calculation | Result |
|---|---|---|
| Total Qty Out of Inventory | 2.5 L/ha × 120 ha | 300 L |
| Total amount | R$ 18.50 × 300 L | R$ 5,550.00 |
| Cost per hectare | R$ 5,550.00 ÷ 120 ha | R$ 46.25/ha |
How the cost is split across the work order's fields
A work order is almost never for a single field. The product is entered once, for the whole work order, and the system allocates by area: each field gets the share of the total that matches its portion of the work order's area.
Two fields, one of 300 ha and another of 150 ha, at 2.5 L/ha of a product costing R$ 18.50:
| Field | Area | Share | Quantity | Cost | Cost/ha |
|---|---|---|---|---|---|
| Field A | 300 ha | 300 ÷ 450 = 66.67% | 750.0 L | R$ 13,875.00 | R$ 46.25 |
| Field B | 150 ha | 150 ÷ 450 = 33.33% | 375.0 L | R$ 6,937.50 | R$ 46.25 |
| Work order | 450 ha | 100% | 1,125.0 L | R$ 20,812.50 | R$ 46.25 |
Notice that the cost per hectare comes out the same for both — the rate is the same, and the allocation is exactly what ensures that. What changes is how much each field carries of the total: the 300 ha field accounts for two-thirds of the bill for that application.
This allocation is what makes the cost appear by field in Season Planting and in the season's cost reports. The View cost split button, described below, shows exactly this calculation for the open work order.
Suggested rate and checks
If the product has the Rate x Farm x Crop tab filled in in its setup, the system takes it into account when you choose the product on the work order: it suggests the rate defined for that farm and crop.
Besides the rate, the limits set up there are checked and the result appears in the Check field:
- maximum number of applications
- minimum interval in days between applications
- minimum and maximum rate
This is what prevents applying above the recommendation or repeating the application before the planned interval — without relying on whoever enters the data to remember the label.
View cost split
Opens the Product split window, which shows how the cost is distributed: field, variety, field area, final area, product, cost, cost per hectare, and quantity.
What it shows depends on where you are: with no field or product selected, it shows everything; with a product or a field in focus, it shows only the item in focus.
The Force change of modification date and Edit Reference/Integration ID buttons serve farms that exchange data with other systems — they only make sense when an integration is in use.
Spray volume and spray mix type
The Volume 1 - Spray Mix section is where the system calculates the spray mix. The Spray Mix Type field defines how it is calculated, and each option asks for different data:
| Spray Mix Type | When to use it and what you enter |
|---|---|
| None | No spray mix calculation. |
| Tank by tank | When the application is planned tank by tank. You enter maximum capacity, spray volume, tank capacity, hectares per tank, number of tanks, and total product quantity per tank, plus a description and usage instructions. |
| Single mix | When you work with a single spray mix: you enter the spray volume and the total spray mix volume. |
| Volume | Usually for backpack sprayers. You enter the label volume and rate and the desired sprayer volume, and the system calculates the rate, the number of sprayer loads, and the final quantity per load. |
| Perennial Crop | For perennial crops: rate per tank and rate per treated hectare. |
How upCampo calculates tank by tank
In tank by tank, you enter the tank's Max capacity (L) and the Spray volume (liters of spray mix per hectare). The Tank capacity (L) starts equal to the maximum and can be adjusted. From there, the system does the math with the product's Total Area (ha) and the Total Qty Out of Inventory (rate × area):
Illustrative example — the same 120 ha at 2.5 L/ha (300 L of product), with a 3,000 L sprayer and a spray volume of 80 L/ha:
| Field | Calculation | Result |
|---|---|---|
| (ha) per tank | 3,000 L ÷ 80 L/ha | 37.5 ha |
| Number of tanks | 120 ha ÷ 37.5 ha | 3.2 tanks |
| Total product qty per tank | 300 L ÷ 3.2 | 93.75 L |
| Total spray mix volume | 80 L/ha × 120 ha | 9,600 L |
The Usage instructions are written automatically from these numbers, separating the full tanks from the last one, which takes only what's left: "3 tank (37.5 ha) with 93.75 of the product and 1 tank (7.5 ha) with 18.75 of the product." The 7.5 ha are the 0.2 × 37.5 ha fraction, and the 18.75 L are what's missing to reach the 300 L (300 − 3 × 93.75).
Changed the rate, the total quantity, the spray volume, or the tank capacity? The calculation is redone right away. If you type the Number of tanks by hand, the system recalculates only the product quantity per tank (total ÷ tanks). Volume 2 and Volume 3 (the + Volume button) do the same calculation, each with its own spray volume and tank, over the same area and the same total product quantity.
Rounding (in tank by tank)
In the example above the calculation gave 3.2 tanks — and nobody mixes 0.2 of a tank. The Round button adjusts the numbers to values that work in the field. The options are:
| Option | What the system does | In the example (3.2 tanks) |
|---|---|---|
| 1 — Round 'Number of tanks' DOWN, then 'Total qty' and 'Rate' | Brings the number of tanks to a whole number, splits the product evenly among them (with the quantity per tank as a whole number), and recalculates the total quantity and the rate. | 3 tanks with 100 L each; the total stays at 300 L and the rate at 2.5 L/ha |
| 2 — Round 'Number of tanks' UP, then 'Total qty' and 'Rate' | ||
| 3 — Apply 'Total qty' and 'Rate' from 'Total product qty per tank' X 'Number of tanks' | Keeps the product quantity per tank, drops the tank fraction, and recalculates the total and the rate from that. | 3 tanks × 93.75 L = 281.25 L; a rate of about 2.34 L/ha |
| 4 — Recalculate tank max capacity (when the number of tanks is less than 1) | Keeps the spray volume and splits the area into equal tanks: raises the number of tanks to the next whole number and reduces the load of each. New capacity = Max capacity (L) × (calculated tanks ÷ rounded tanks). With less than 1 tank, the capacity becomes the exact spray mix volume (spray volume × area). | 4 tanks of 2,400 L (3,000 × 3.2 ÷ 4), 30 ha and 75 L of product in each |
Single mix and Volume (backpack sprayer)
In Single mix, there is just one calculation and it doesn't change the product quantity:
In Volume, designed for backpack sprayers, the rate comes from the label — which is usually given as "so many ml per so many liters of water" — and is converted to the size of your sprayer:
Illustrative example: the label calls for 50 ml per 10 L of water, the sprayer holds 20 L, and there will be 15 loads. The Calculated Rate is 20 × 50 ÷ 10 = 100 ml per load; the Final Quantity, 100 × 15 = 1,500 ml; and, with the Inventory Output Unit set to Liters or Kilos, 1.5 L leave inventory. The work order's rate per hectare is recalculated from that total (total ÷ area). If the number of sprayer loads is not filled in, the calculation assumes one load.
The + Volume button adds another spray volume to the product.
3 - Fleet & Employee/Operator
Optional. The screen itself warns: when you specify one or more fleet units here, the execution will only offer the fleet units listed in this tab — this is how you restrict what the operator can choose later.
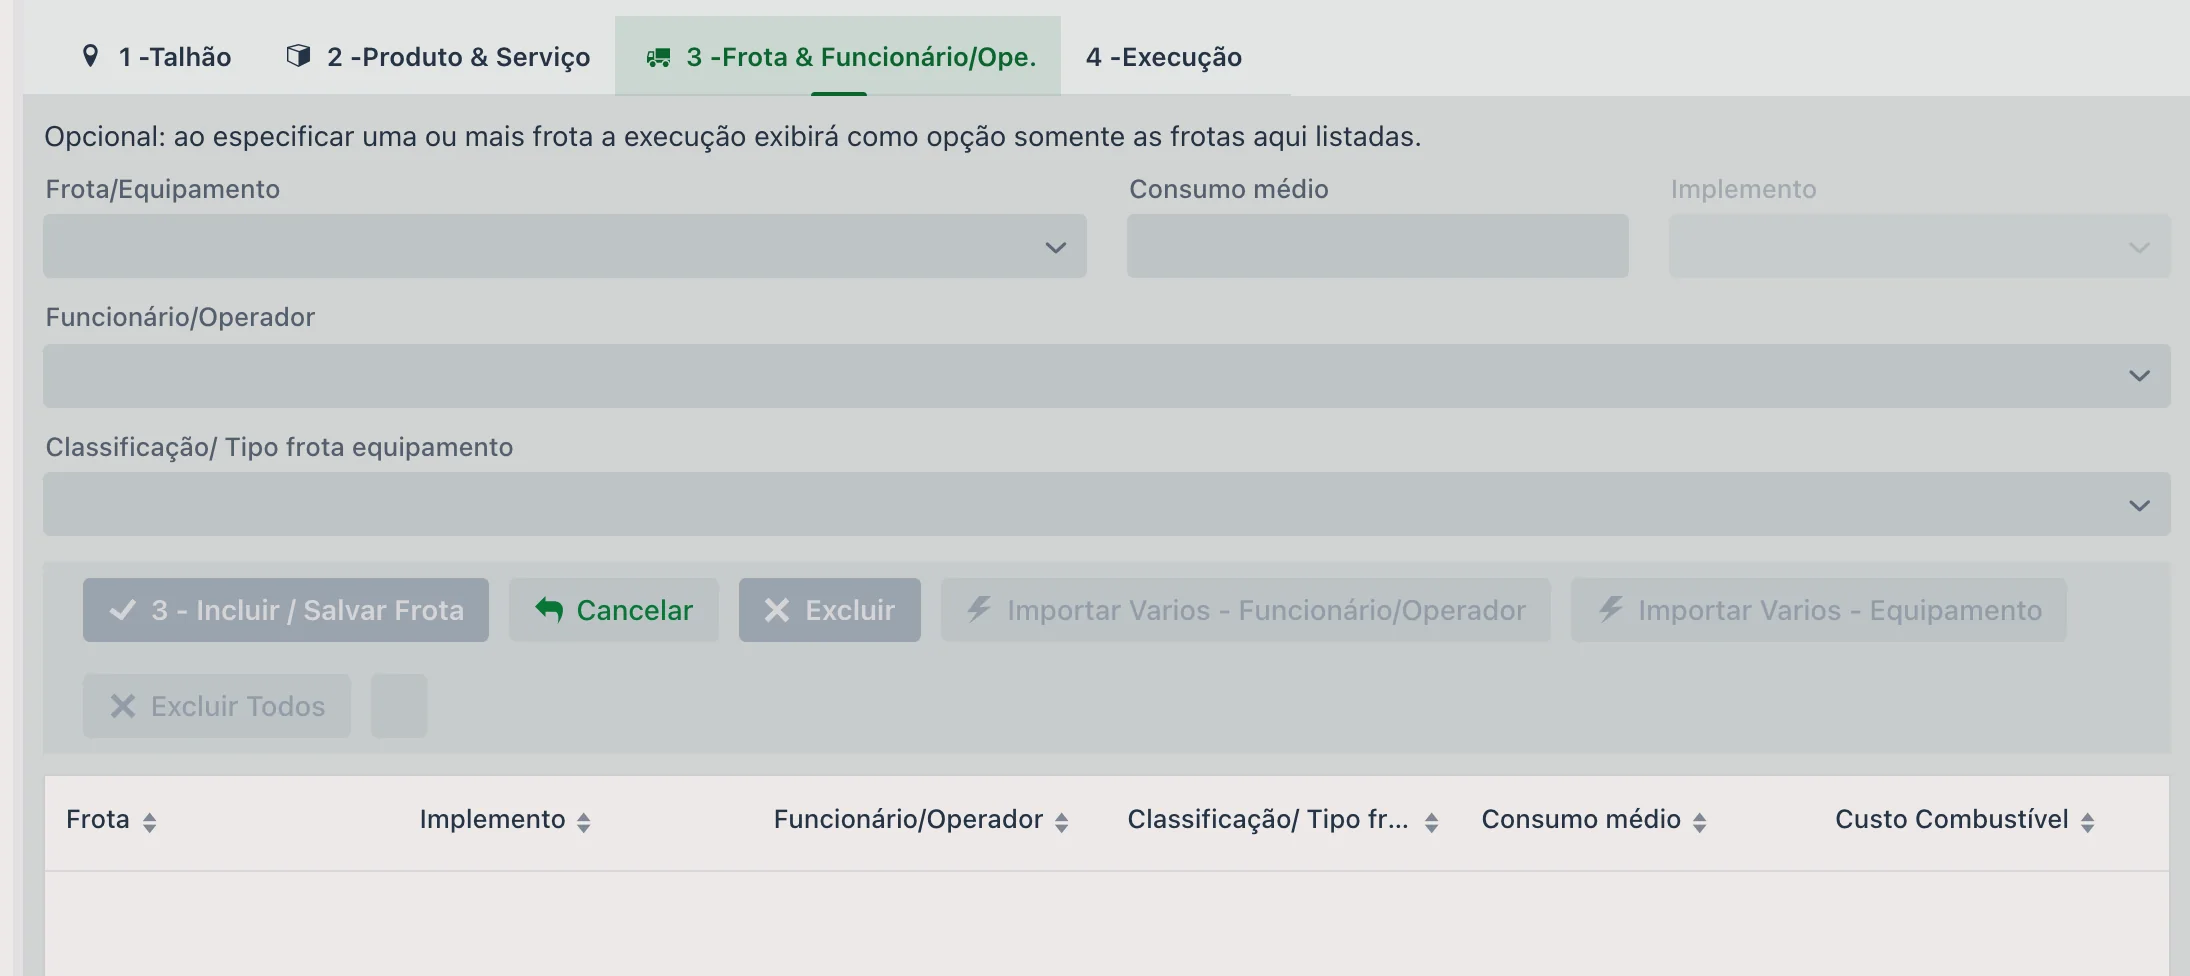
The fields are Fleet/Equipment, Average consumption, Implement, Employee/Operator, and Classification/Fleet equipment type. The list also shows the Fuel Cost.
To speed things up, there are Import Several - Employee/Operator and Import Several - Equipment.
4 - Execution
What actually happened. This tab turns the planned into the actual:
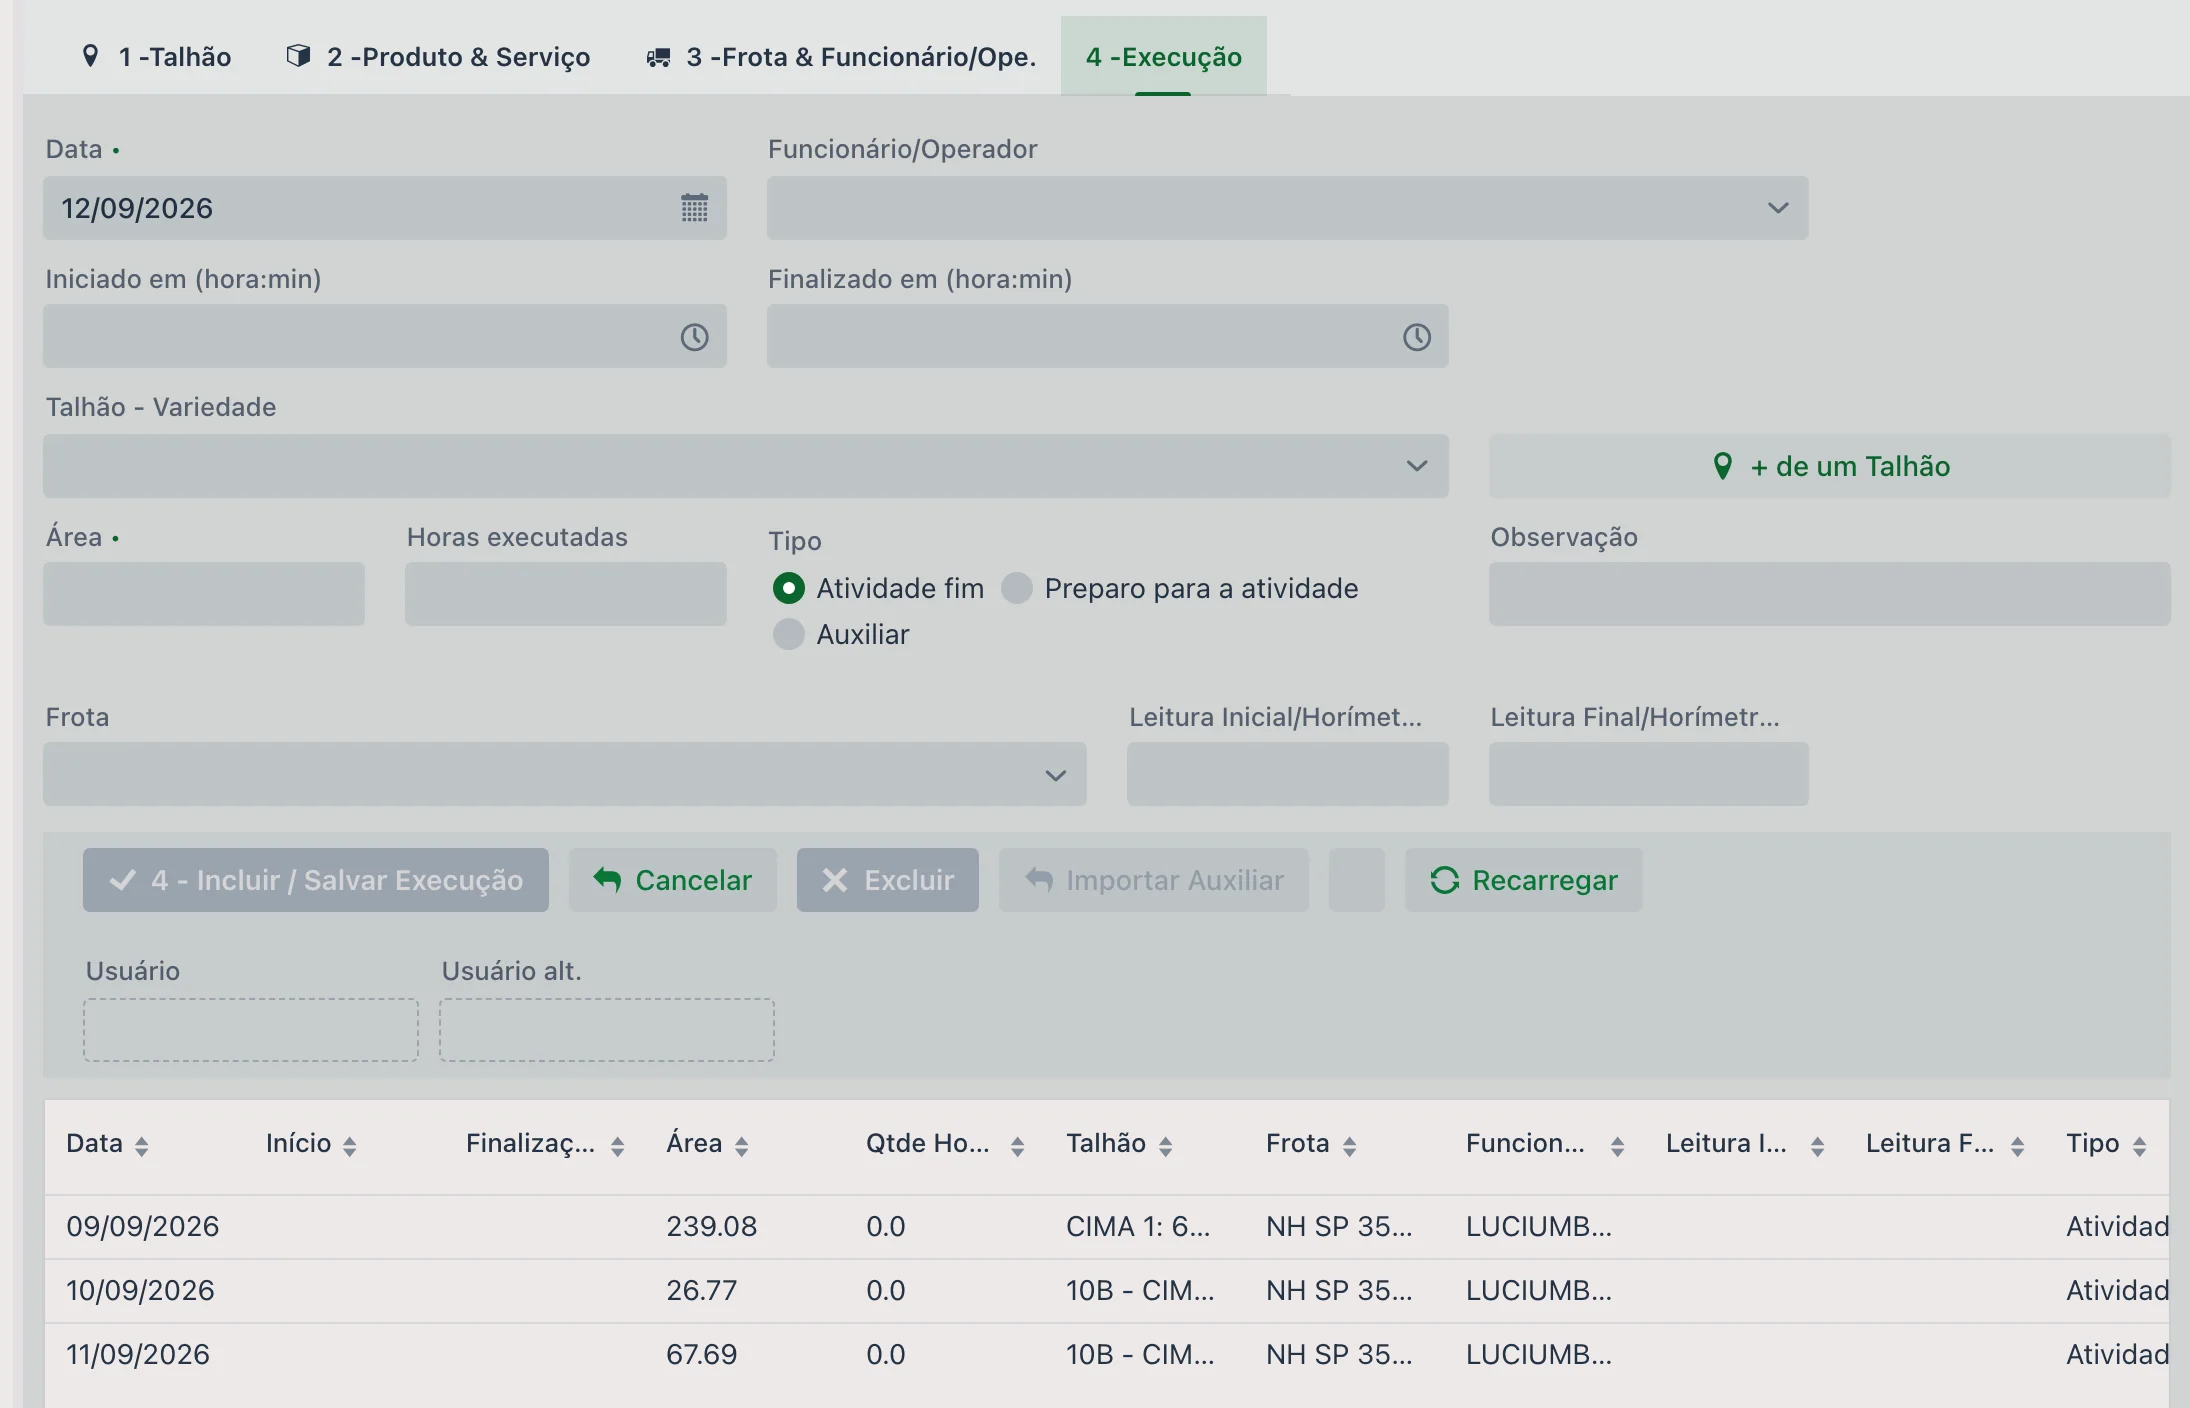
| Field | Description |
|---|---|
| Date | Day of the execution. |
| Employee/Operator | Who did it. |
| Started at / Finished at (hour:min) | Start and end time. |
| Field - Variety | Where it was done. The + than one Field button lets you enter the execution for several fields at once. |
| Area and Hours executed | How much was done. |
| Type | Core activity, Preparation for the activity, or Support — separates the main work from the support work. |
| Fleet | Machine used. |
| Start and End Reading / Hour meter / KM | Equipment readings at the start and the end. |
| Notes | Note about the execution. |
The list records the user who added and the user who changed each entry.
When the activity type has a Checklist Template associated with it, the Fill in Checklist button appears when entering the execution. In the grid, a column flags the status by color: green when the checklist has been answered and red when it is still missing. Answered checklists are kept in Completed Checklists.
5 - Integration - Execution
This tab only exists when the farm has the John Deere integration. While tab 4 - Execution records the area of the whole operation — with a generic integration fleet unit, not the machine that did the work —, here you see the detail: one row per machine per day.
| Column | What it shows |
|---|---|
| Date | That machine's working day. |
| Area | The hectares that machine covered that day. |
| Hours Qty | The hours of effective work, in decimal. |
| Field | The field worked. |
| Fleet | The real machine, recognized by its chassis or serial number. |
| Integration ID | The operation's code in the John Deere Operations Center. |
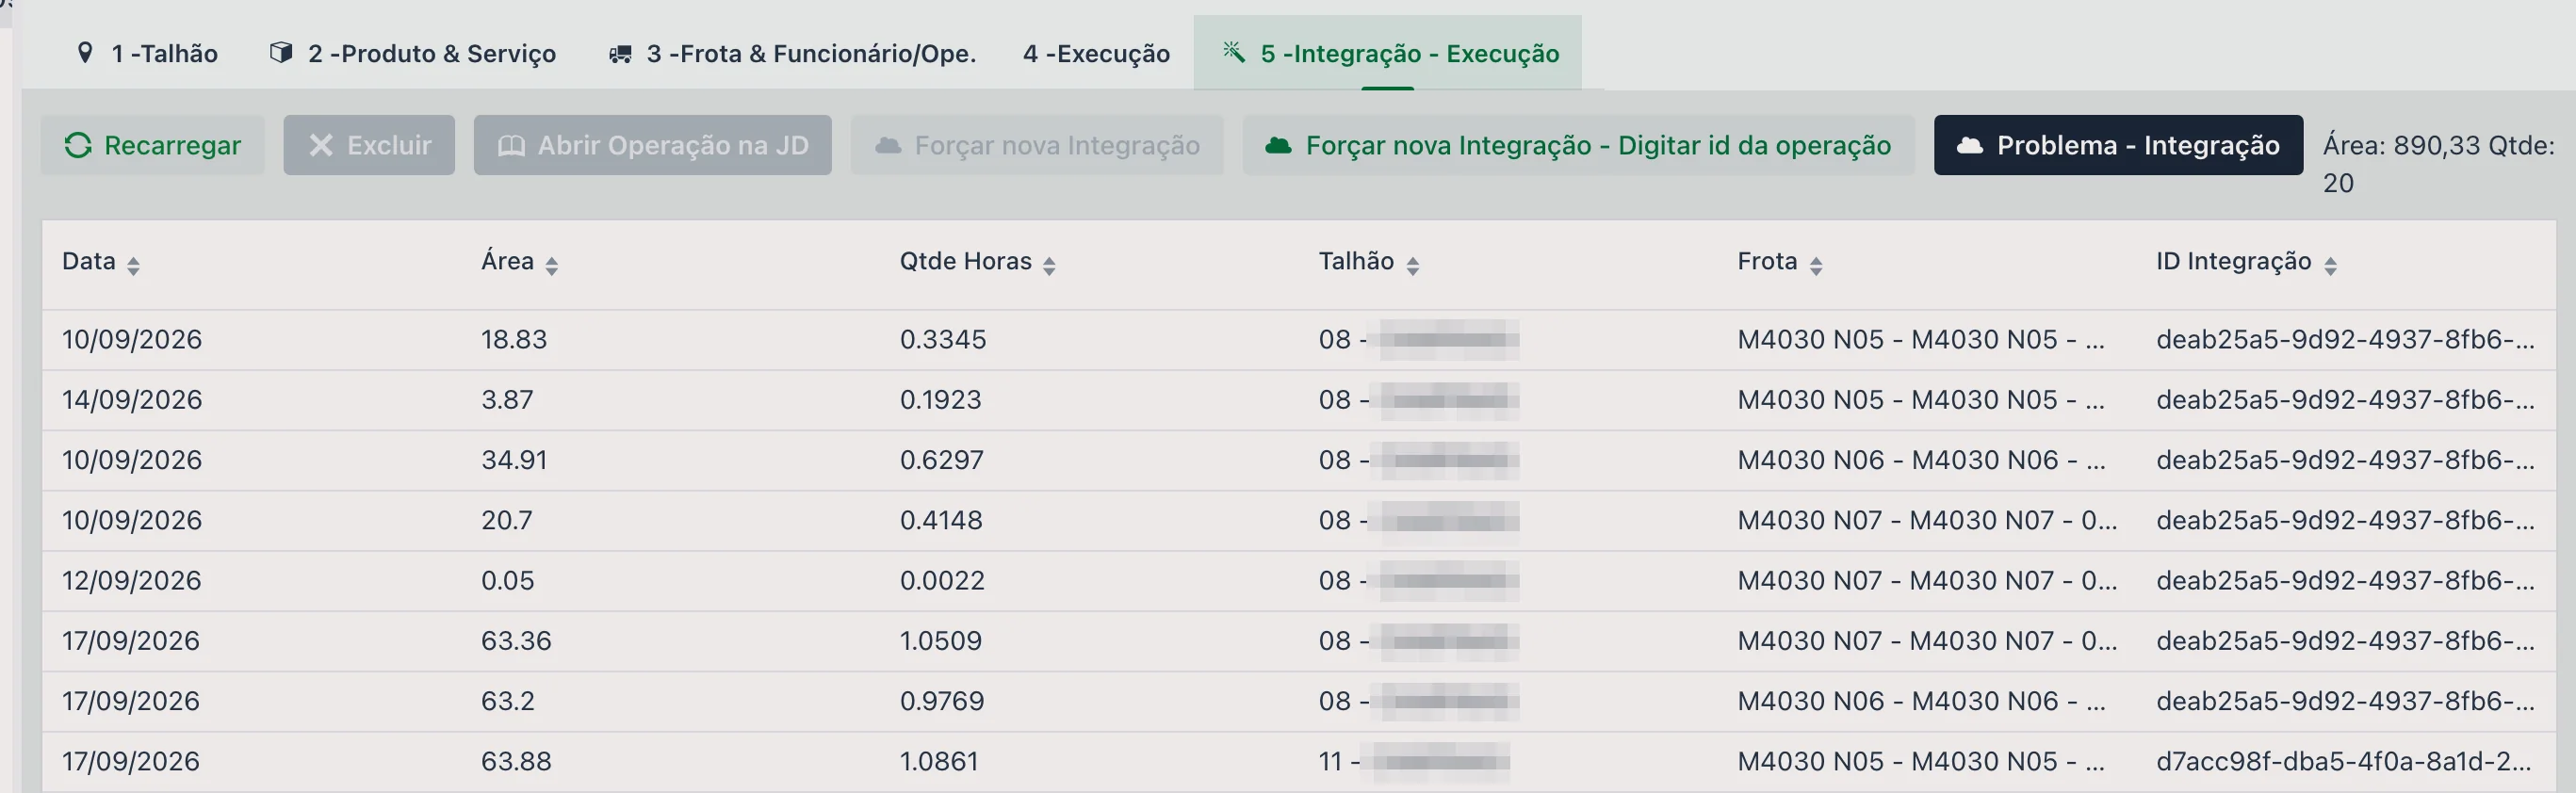
Above the list, a label totals the Area and the Qty of rows shown. The bar buttons: Reload, Delete, Open Operation in JD (opens the operation inside the Operations Center, to check the number at the source), Force new Integration — with or without typing the operation code — and Problem - Integration, which opens the Integration Problems screen without leaving the work order.
📦 How inventory is deducted
There are three ways to deduct the work order's products from inventory, and the farm chooses the one that fits its routine:
- At entry — by entering the storage location right in the Product & Service tab. The deduction happens immediately.
- At finishing — by entering the storage location in the finishing window, or correcting there any difference between what was planned and what actually went out.
- On its own screen — in Crop Work Order Inventory Deduction, designed for the warehouse keeper to deduct work orders without having to open each one.
Which way applies on your farm is not up to whoever enters the data: it is a setting, made
in the customizations under File > Company/Crop Settings. There you define whether the
storage location becomes required when entering the product or
when finishing the work order.
In the list, the Inventory filter (All / Pending / Posted) shows where each work order stands.
🔒 Finishing the work order
Finishing is more than closing: it is the moment the work order is checked and inventory is settled. When you click Finish, a confirmation window opens with:
| Field or action | What it's for |
|---|---|
| Completion Date | Date the work order is closed. |
| Storage location | Where the products come out of. The Apply storage location to all rows button repeats the choice for all items at once. |
| Total Area, Executed area, and Number of executions | Summary of what was planned and what was done. |
| Change quantity | Keep original quantity or Change according to executed area — this is where you decide whether the deduction follows the plan or adjusts to the area actually worked. |
| Cancel the Work Order/Activity | Instead of finishing, marks the work order as canceled. |
The window also lists, product by product, the rate and the actual rate, the quantity and the actual quantity, the lot, the storage location, the available balance, and the amounts — so you can check everything before confirming.
Once finished, the work order is locked; to change it you need to use RE-OPEN. Keep in mind that the cost does not depend on finishing: it is already counted before.
🔧 Approving and notifying
- Approve — approval step, which only exists when it is enabled in the company settings.
- Notification — sends to the WhatsApp number set up in the team the alert that the work order was created.
📱 The work order in the app
The same work orders appear in the upCampo app (in the store, "Pragueiro - upCampo"), which is where the field team checks what needs to be done and enters what they executed. Some field names are abbreviated on the phone — Activ. Type/Work Order, short identif., Exec. Area —, but they are the same fields as in the web portal.
List and open work order
The list has filters for Status, Sector, Field, Type, Short ID, Team, and Fleet and, right below, the number of work orders, the pending area, and the total area. Each card shows the code, the type, the fields, the team, the status, and the percentage executed. Tapping the card opens the work order with the header in read-only mode — the fields are locked, and the EDIT, PRINT, and FINISH buttons are at the top.
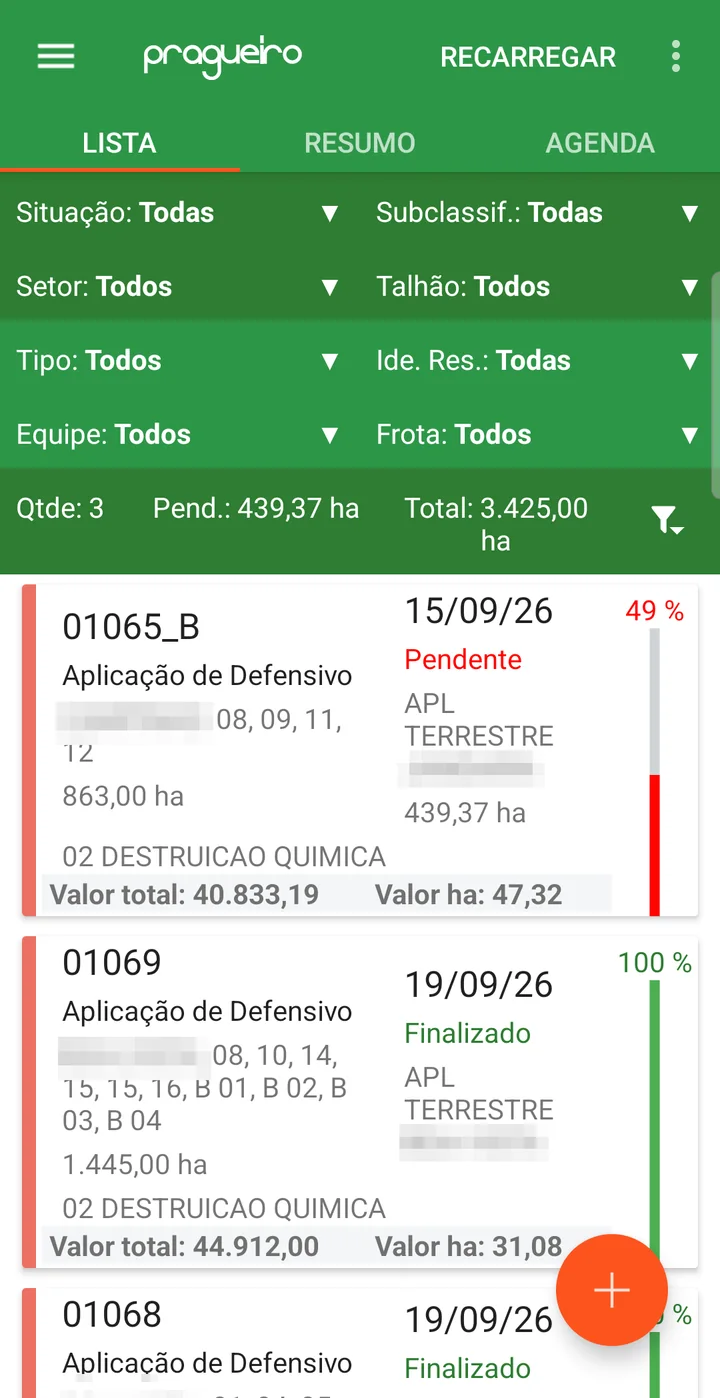
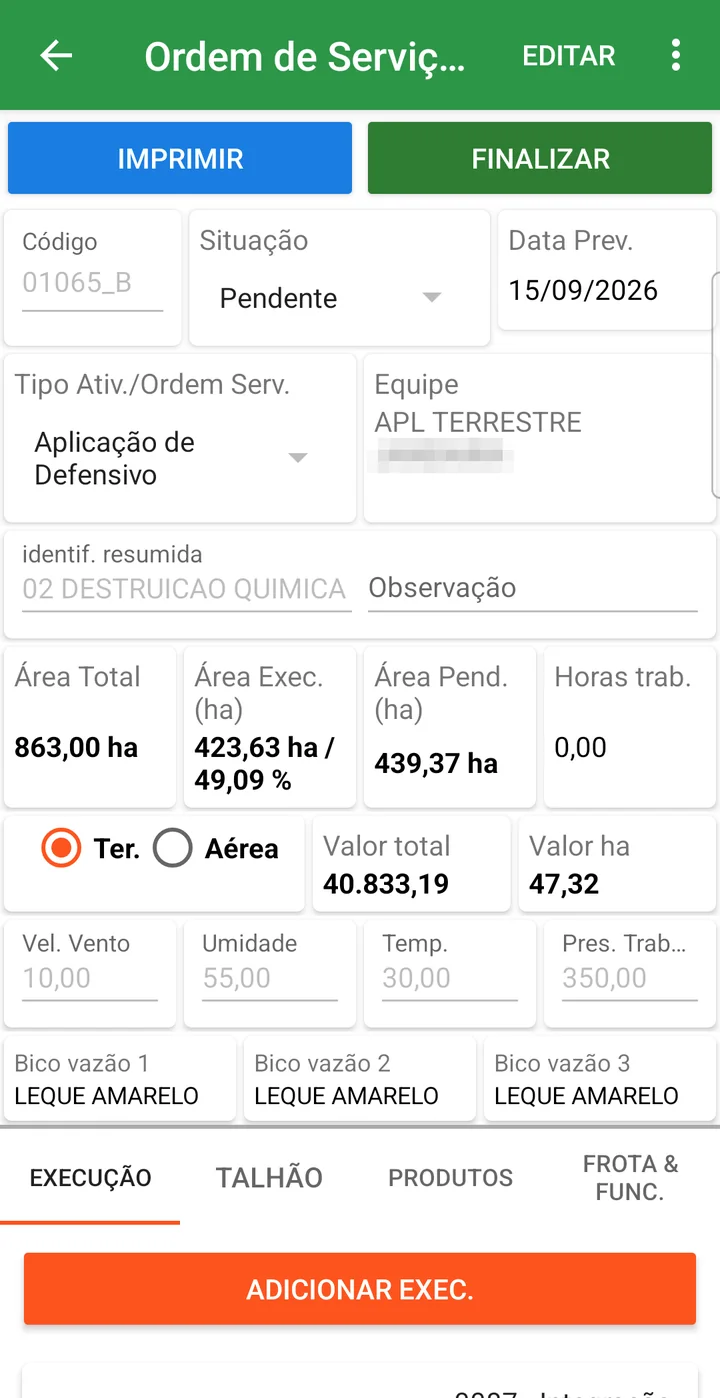
Work order tabs
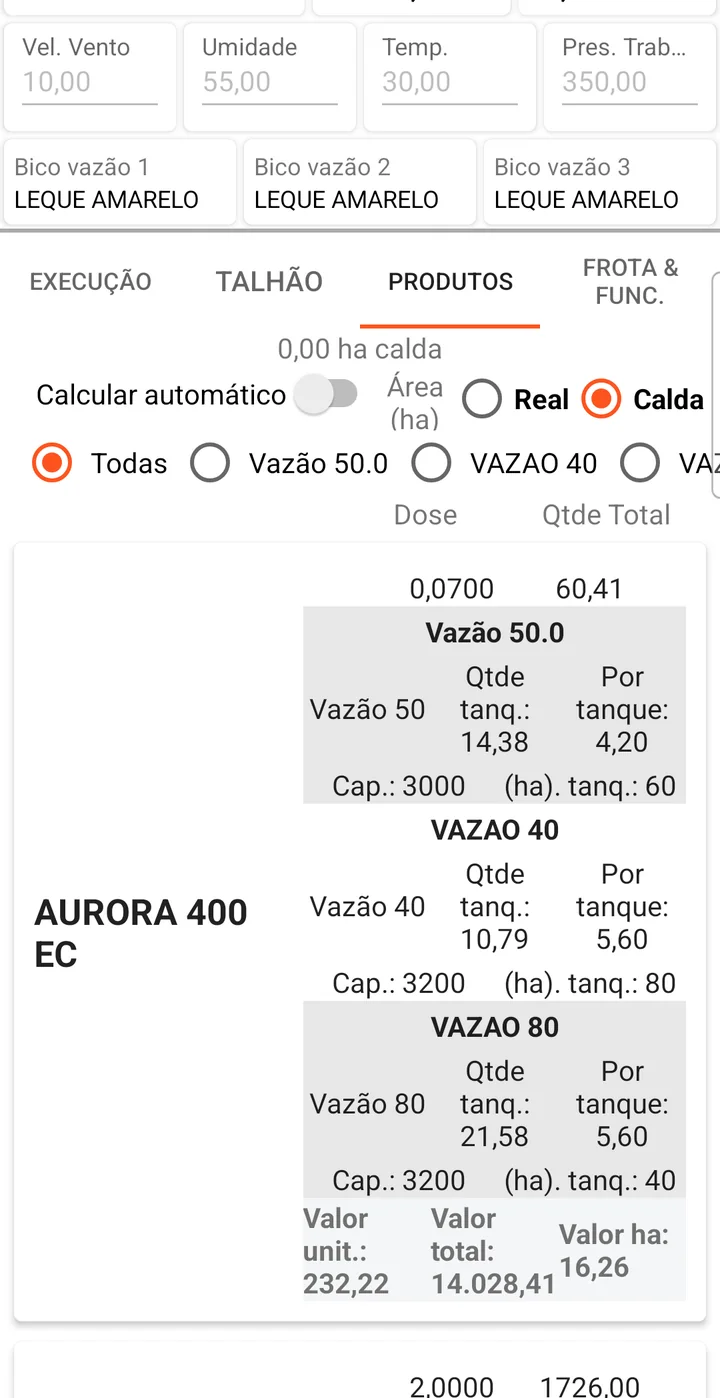
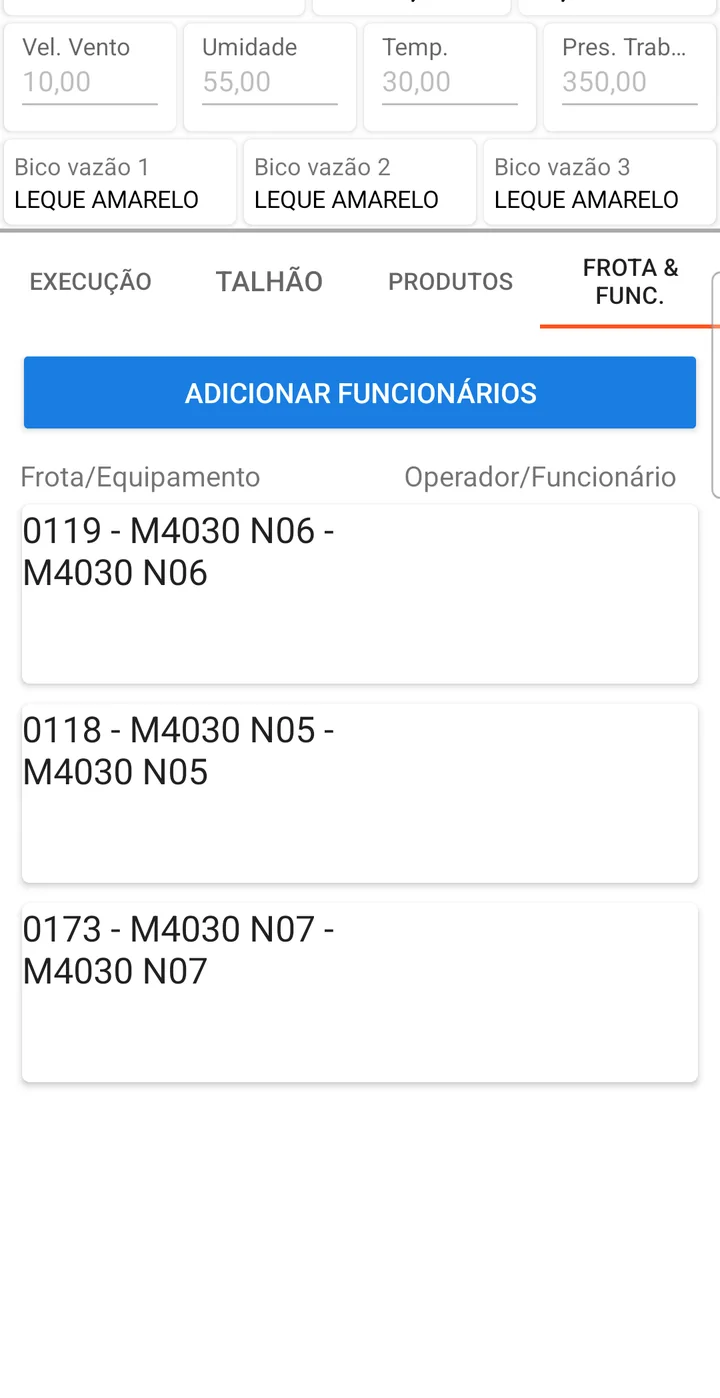
Below the header there are four tabs: EXECUTION (what has already been entered, with date, field, and area, and the ADD EXEC. button), FIELD (the work order's fields and the area of each), PRODUCTS (rate, total quantity, and the per-tank calculation for each spray volume), and FLEET & EMPL. (the work order's machines and operators).
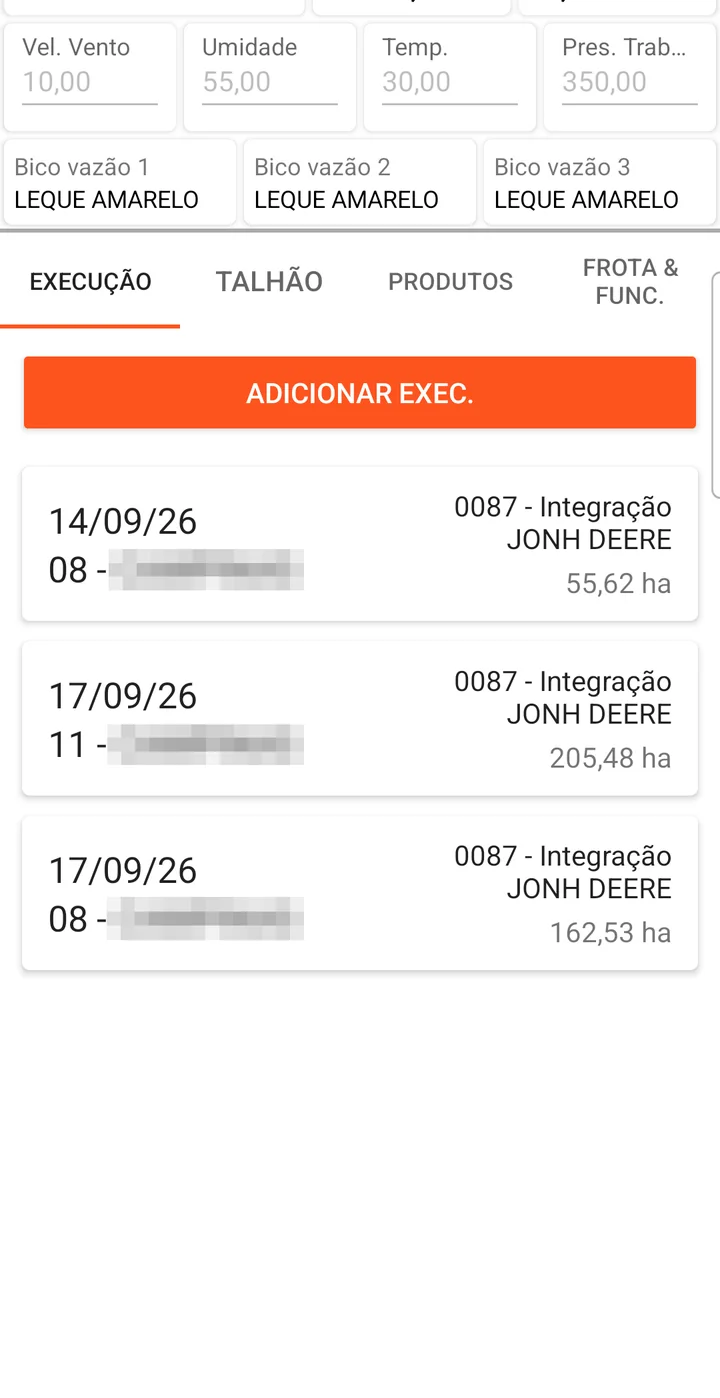
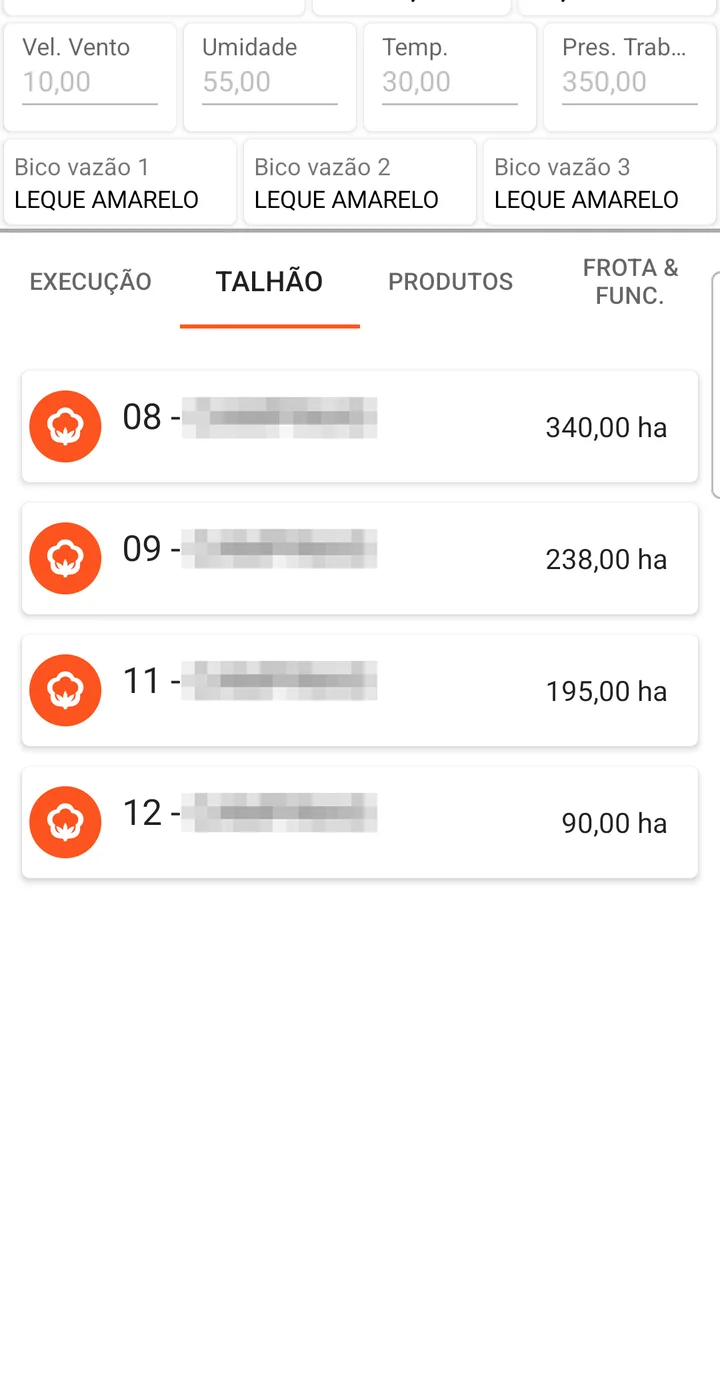
Entering an execution
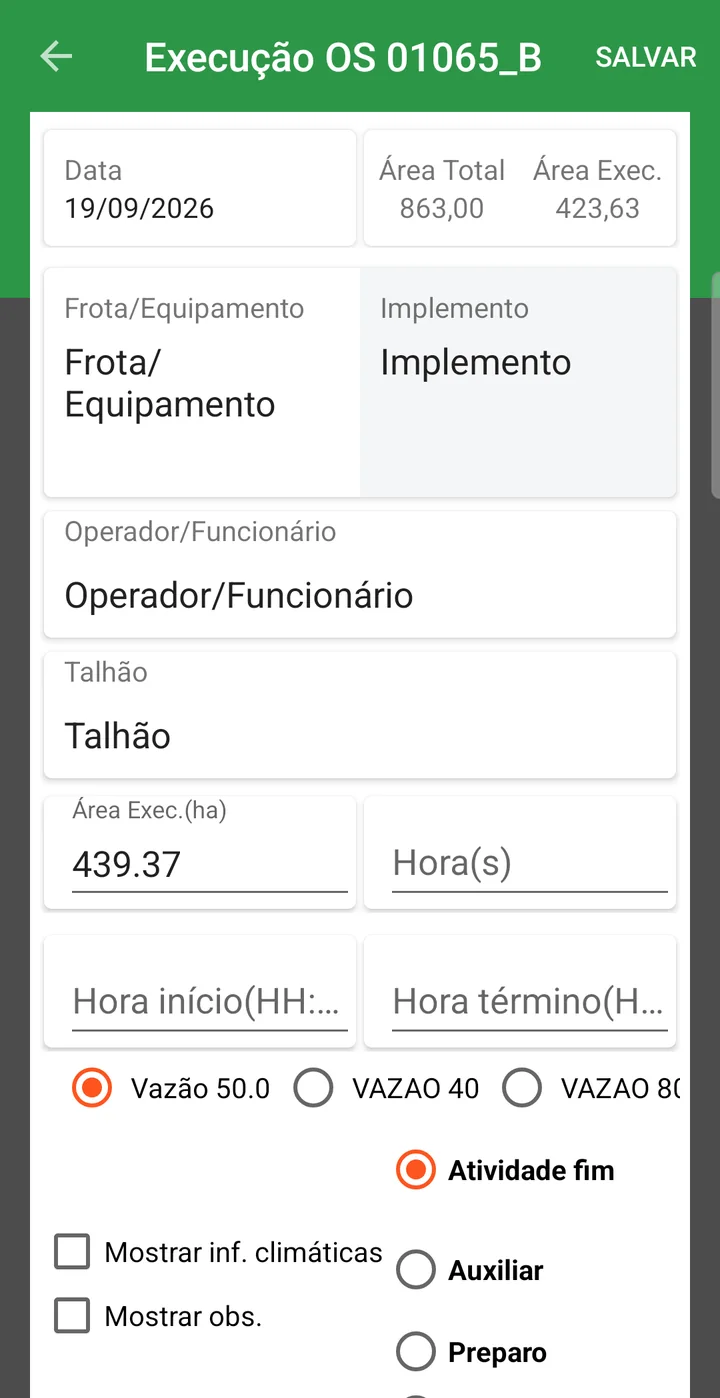
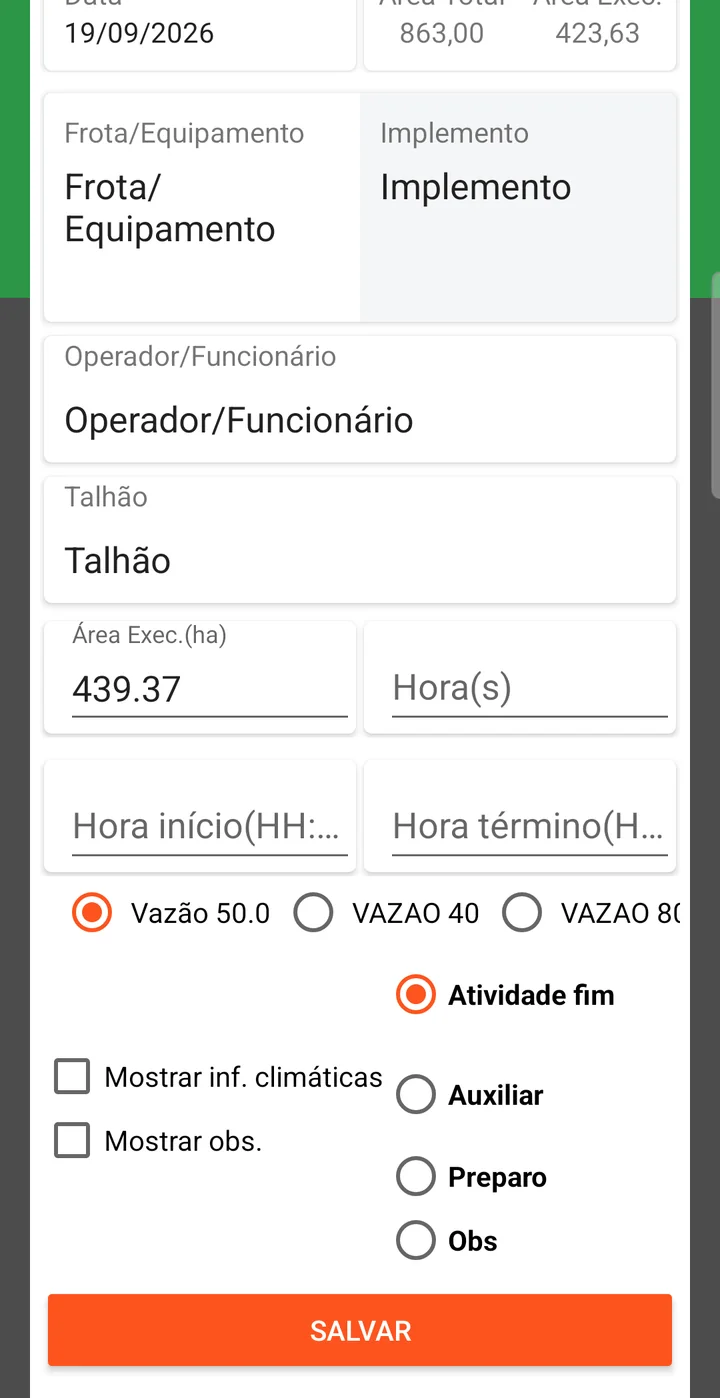
- On the EXECUTION tab, tap ADD EXEC.
- Choose the Fleet/Equipment, the Implement, the Operator/Employee, and the Field — each field opens a list to choose from.
- Check the Exec. Area (ha) and enter the hours, the spray volume used, and the entry type (Core activity, Support, Preparation, or Note).
- Tap SAVE.
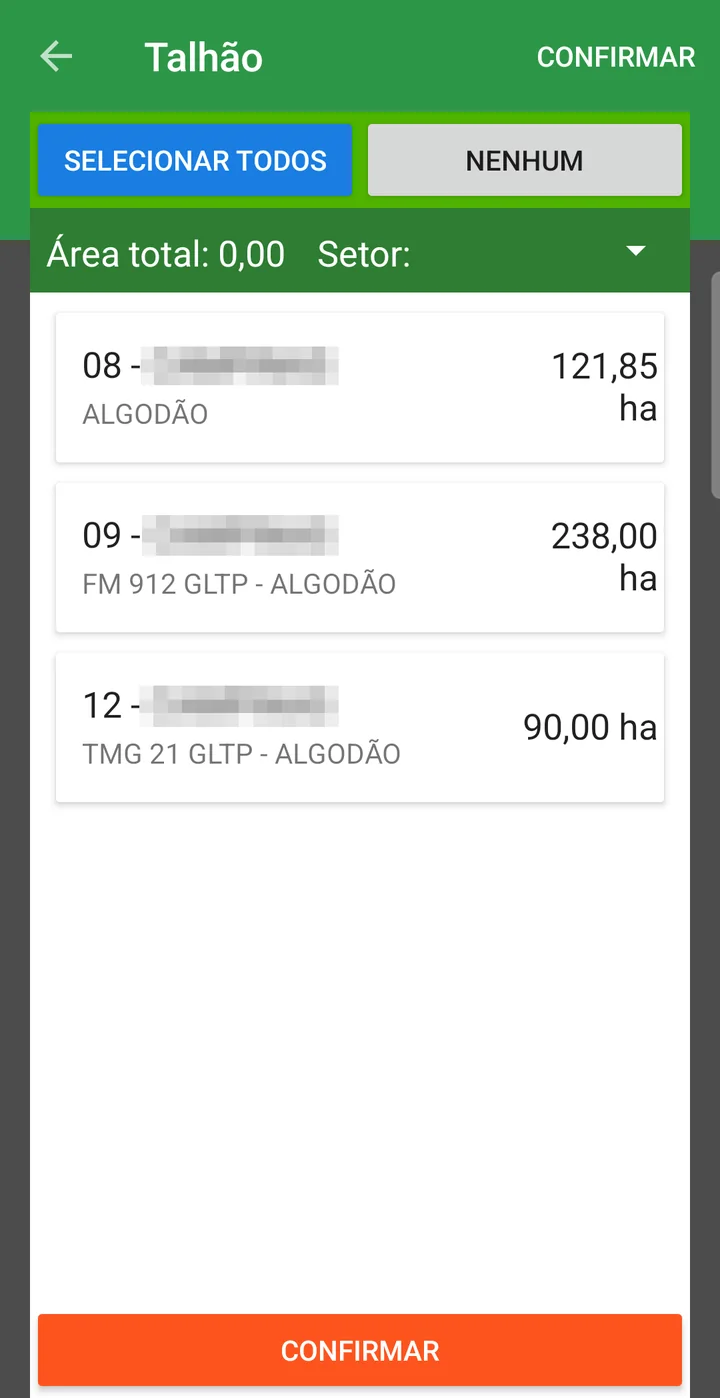
Tapping Field opens the list of the work order's fields so you can mark which one the execution was done in, with the SELECT ALL and NONE buttons, the Sector filter, the total area marked, and the CONFIRM button.
- You know what was done in each field, with which products, which machine, and which employee
- The cost reaches the field and the season, so you can work out the cost per hectare
- What was executed can be compared with what was planned
- The management history of each area is recorded for the following seasons
❓ Frequently asked questions
I can't find a work order I entered. What should I do?
It's almost always the period: the screen opens showing only 7 days before and 7 days after today's date. Widen the Start Date (from) and the End date (to). Also check the Season and Status filters.
What do the colors on the planned date mean?
Dark green: finished work order. Bright red: late work order. Light red: pending work order with a deadline coming up, within 7 days. It lets you see the status without opening each work order.
The work order is finished and I can't change it. What do I do?
Use the RE-OPEN button at the top of the work order. While it is finished, the editing buttons are disabled — finishing is meant precisely to lock the record. Reopening requires a permission that is usually given to only a few users.
The finish or delete buttons are grayed out. Why?
Most likely a missing permission. Saving, deleting, finishing, and reopening are controlled per user, and it's common for the field crew to have only add and change, with finish and reopen kept by a few people. Whoever manages the company's users can grant it.
How do I see the costs for each field in the work order?
With the View Costs button. Since the product is entered for the whole work order, the system allocates the amount across the fields and shows how much went to each.
The Technical Lead Team field doesn't appear. Why?
Because it only shows when some team is marked to appear in Tech. Lead. That setting is under Show in, in the Team setup.
How do I know whether the work order's checklist has been filled in?
By the color of the checklist column in the grid: green when it has been answered, red when it is still missing. To answer it, use the Fill in Checklist button when entering the execution.
Only one template shows up when I print the work order. Is that normal?
The Print menu shows the print reports enabled for your user — there may be more than one template, for different situations. If one is missing, it's a matter of access permission.
Do I need to finish the work order for the cost to show up?
No. The cost is already counted without finishing. Finish is used to lock the work order, record the completion date, and settle the inventory deduction.
When does the product leave inventory?
It depends on how the farm works. There are three ways: entering the
storage location right when entering the product
(immediate deduction); entering the location in the finishing window; or through the
Inventory > Crop Work Order Inventory Deduction screen, used by the warehouse keeper to deduct several work orders.
When the location becomes required is defined in the customizations, under
File > Company/Crop Settings.
The system is requiring the storage location. Can I change that?
Yes, it's a company setting, under File > Company/Crop Settings. There
you define whether the storage location is required when entering the product or
when finishing the work order — depending on the farm's routine.
I executed less area than planned. Does the inventory deduction follow?
You decide when finishing, in the Change quantity field: Keep original quantity deducts what was planned; Change according to executed area recalculates the quantity based on the area actually worked.
How do I cancel a work order?
In the window that opens when you click Finish, use Cancel the Work Order/Activity. The work order changes to the Canceled status.
All products come out of the same storage location. Do I need to enter it one by one?
No. In the finishing window, choose the location and use Apply storage location to all rows, which repeats the choice for all items.
I need to create the same work order several times. Is there a faster way?
Yes, two ways. The Clone button copies the whole work order — fields, products, and fleet — without bringing the inventory deduction, so the copy is ready to be executed. And the Automated Ops menu has Generate several work orders (individual), plus adding products and changing work orders in batch.
The field doesn't show up for selection on the work order. Why?
Only fields that are in Season Planting, that are active, and whose harvest has not been finished appear. If the field is new, it probably still needs to be linked to the planting; if it disappeared, check whether the harvest was closed or the setup was deactivated.
How do I reuse the same fields from another work order?
On tab 1 - Field, use Import another Work Order, which brings in the fields from an existing work order. To add several fields at once without copying from another work order, use Import Several.
How do I limit the machines that appear in the execution?
Enter the fleet units on tab 3 - Fleet & Employee/Operator. When you specify one or more fleet units there, the execution only offers those — if the tab is left empty, all of them are available.
How do I calculate the application tank by tank?
On tab 2 - Product & Service, in the Volume 1 - Spray Mix section, choose the Spray Mix Type Tank by tank. You enter the tank capacity, the spray volume, and the hectares per tank, and the system calculates the number of tanks and the product needed in each.
How do I do the calculation for a backpack sprayer?
Choose the Spray Mix Type Volume. Enter the label volume and rate and the desired sprayer volume — the system calculates the rate, the number of sprayer loads, and the final quantity per load.
The number of tanks came out as a fraction. How do I adjust it?
Use the Round button, in tank by tank mode. Options 1 and 2 bring the number of tanks to the nearest whole number and split the product among them; option 3 keeps the product per tank and drops the fraction; option 4 keeps the spray volume and splits the area into equal tanks, one more and a little less full (3.2 tanks of 3,000 L become 4 of 2,400 L). If you want to make sure you get one extra tank, the right option is 4.
View cost split shows only one product. Why?
Because the window follows what is in focus: with a product or a field selected, it shows only the item in focus. With nothing selected, it shows the work order's full split.
Where does the rate the system suggests come from?
From the Rate x Farm x Crop tab of the product setup. When it is filled in for that farm and crop, the default rate is suggested automatically when you choose the product on the work order.
What shows up in the Check field?
The result of checking the limits set up in the product for that farm and crop: maximum number of applications, interval in days between applications, and minimum and maximum rate. It's there to warn whoever is entering the data before the application goes wrong.
How do I know if I have product balance before entering it?
On tab 2 - Product & Service, the Product balance | Check field shows availability. There is also the View inventory button, on the same tab and in the list.
What's the difference between Core activity, Preparation, and Support in the execution?
It's the Type field of the execution entry, which separates the main work (Core activity) from what was done to make it possible (Preparation for the activity) and from support work (Support).
How do I enter the execution for several fields at once?
On tab 4 - Execution, use the + than one Field button, next to the Field - Variety field.
I always enter the same products and rates. Can I avoid typing everything again?
Yes. Set up an Agronomic Treatment with the list of products and rates and use Import on the Product & Service tab.
The work order is asking for fields I don't use. How do I remove them?
In the Work Order/Activity Type setup. It defines, field by field, what the work order shows, hides, or requires.
How do I record an aerial application?
With the Application type field, choosing Aerial. It's also common to create a specific aerial application team, or a dedicated activity type. If you want to account for the cost of the contracted application, enter it as a service on the Product & Service tab.
The checklist didn't show up to be filled in. Why?
The checklist appears when you enter the execution, and only when there is a Checklist Template associated with that work order's activity type.
The team didn't get the work order alert on WhatsApp. What should I check?
Three things: the Notification field in the work order header, whether the contact is filled in
in the team setup, and whether the company is
enabled in the customizations under File > Company/Crop Settings.
How do I add more columns to the work order list?
Through the grid's options menu, to the right of the titles. There you can check columns that are not shown by default, such as Approval, Responsible, and Equipment.
Can I see the work orders on a calendar?
Yes. In the View field, at the top of the screen, choose Calendar. There is also the Dashboard view, besides the Standard list.