🧩 Screen: Season Planting
The season planting is the record of what was planted in each field: which crop, which variety, on how many hectares and on what date. In upCampo, it's the intersection of field, season, crop, variety and area — and it's what makes the field exist in that cycle. With no planting entered, the field isn't available for work orders, scouting or load tickets.
It's also where the results come back: as harvest load tickets and bales come in, the field's total harvested and average yield are updated automatically, with no one typing them.
📍 Location in the system
Menu: Crops > Season Planting
🧩 Main function
Registering the season planting is essential so that:
- Fields show up in the mobile app
- Entries are linked to a specific season
- Reports and dashboards can correctly separate information by season and by variety
👁 The four views
At the top of the screen, the View selector completely changes what you see:
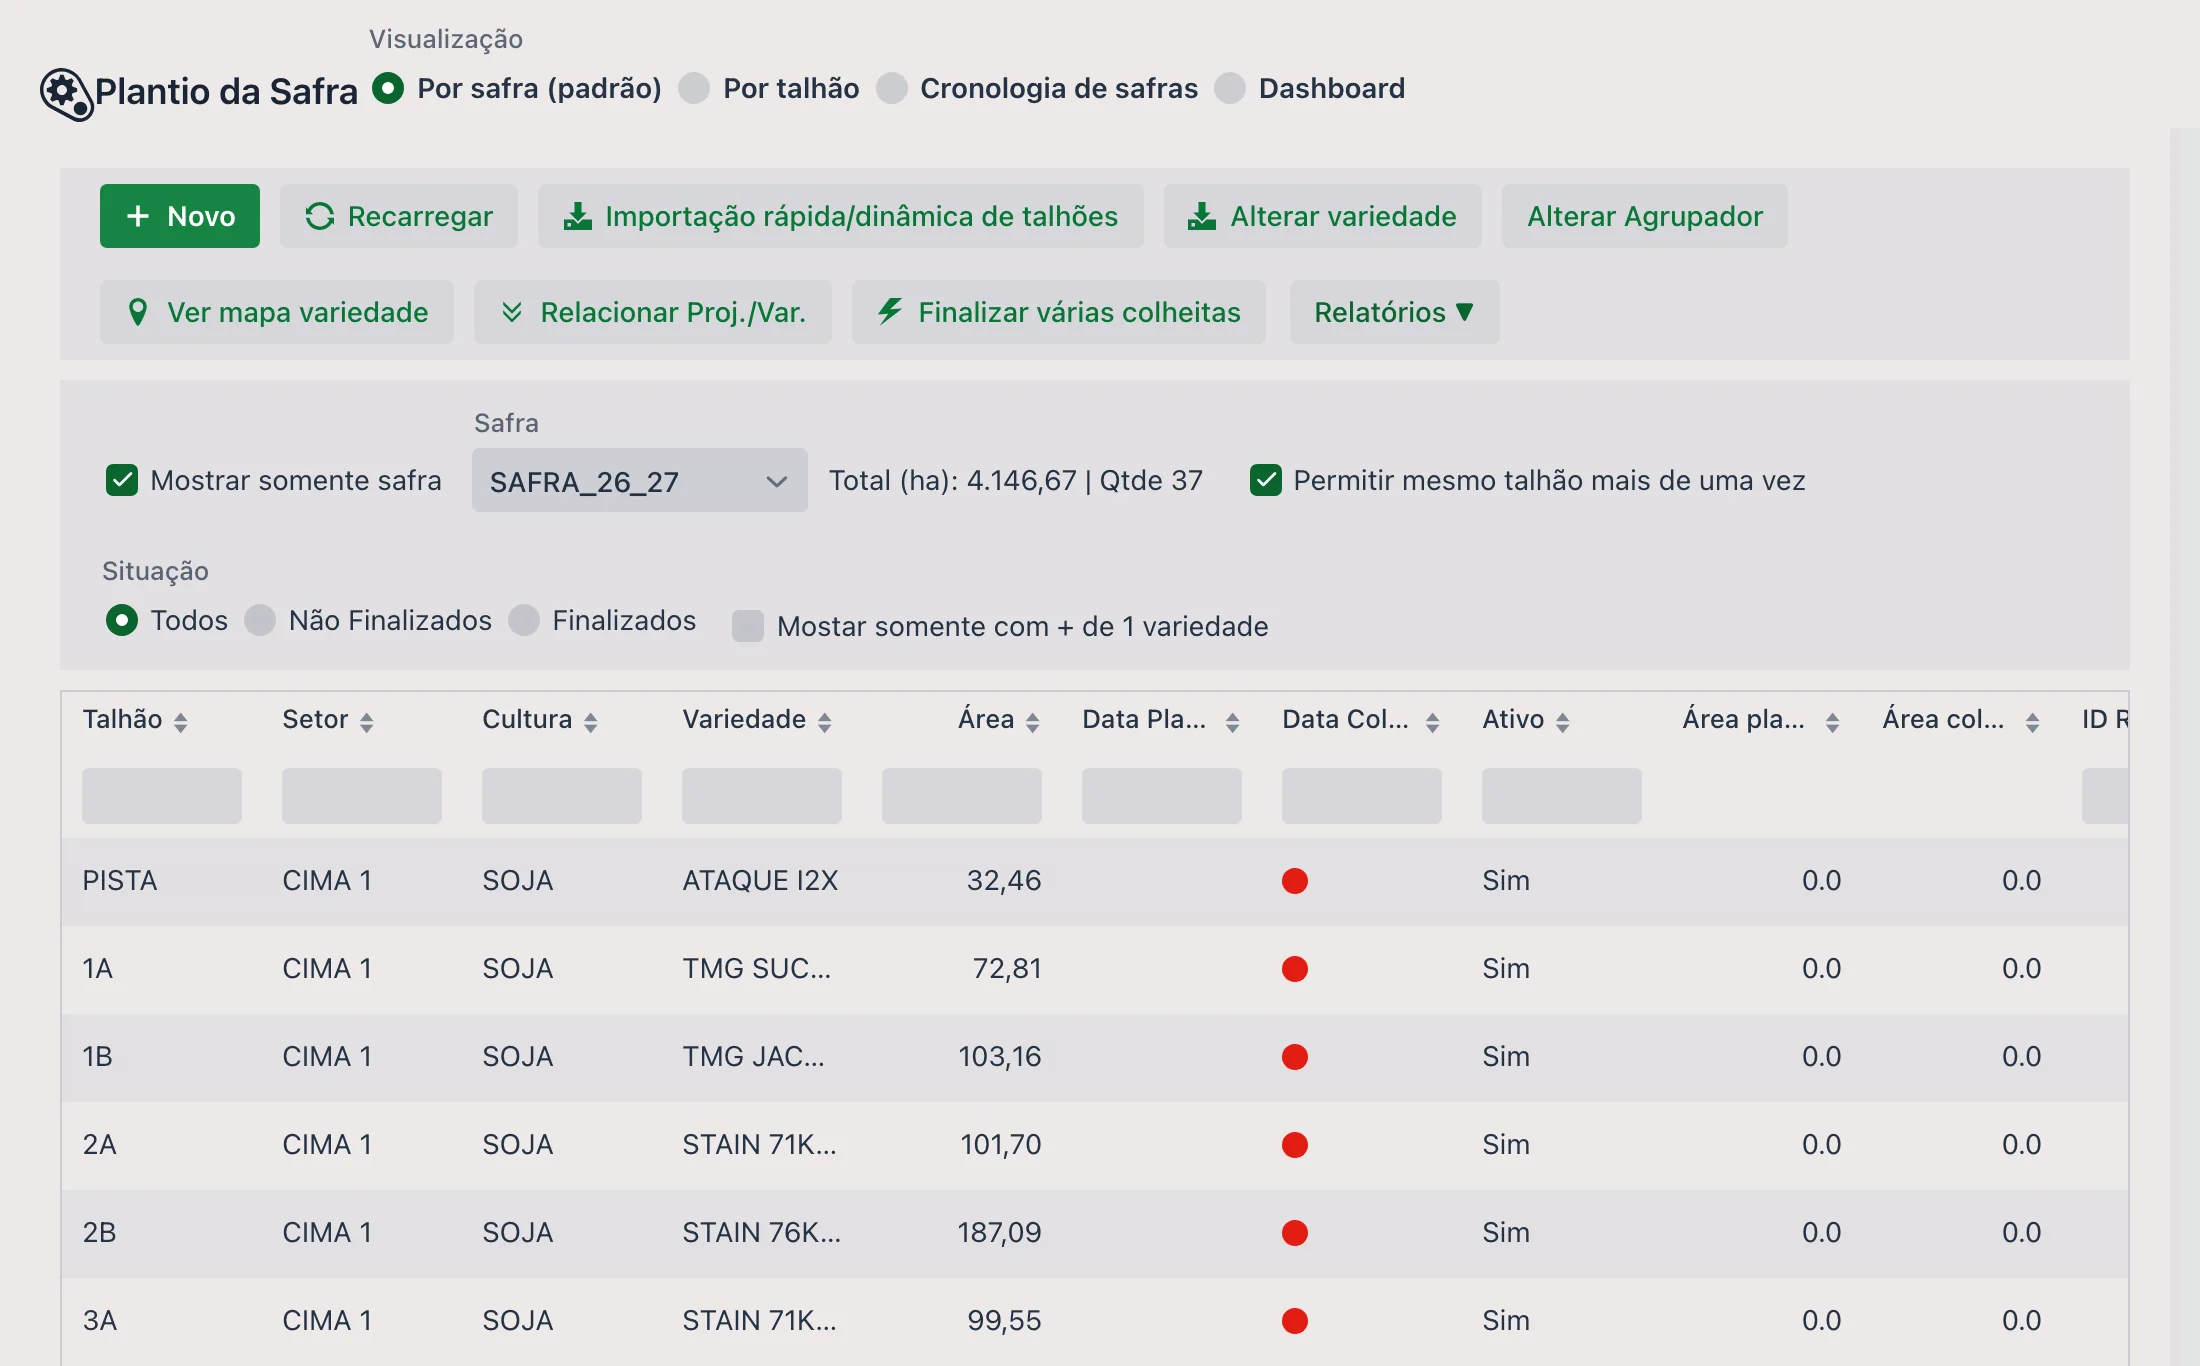
- By season (default): the list of fields in the current season with the record beside it — this is the mode described in this article
- By field: flips the axis, starting from the field
- Season timeline: shows the succession of seasons, useful for seeing what came before and after in the same field
- Dashboard: swaps the screen for a panel of indicators
🔎 The left panel
Besides the list of fields, the left column holds the filters and bulk actions:
- The Season dropdown and the Show season only option
- The Total (ha) and Qty totalizer, which adds up what is being displayed
- Allow the same field more than once: lets you register the same field in two plantings in the same season — for growers who plant two crops back to back
- Status: All, Not Finished or Finished
- Show only with more than 1 variety: isolates fields with more than one cultivar
📝 Header (main information)
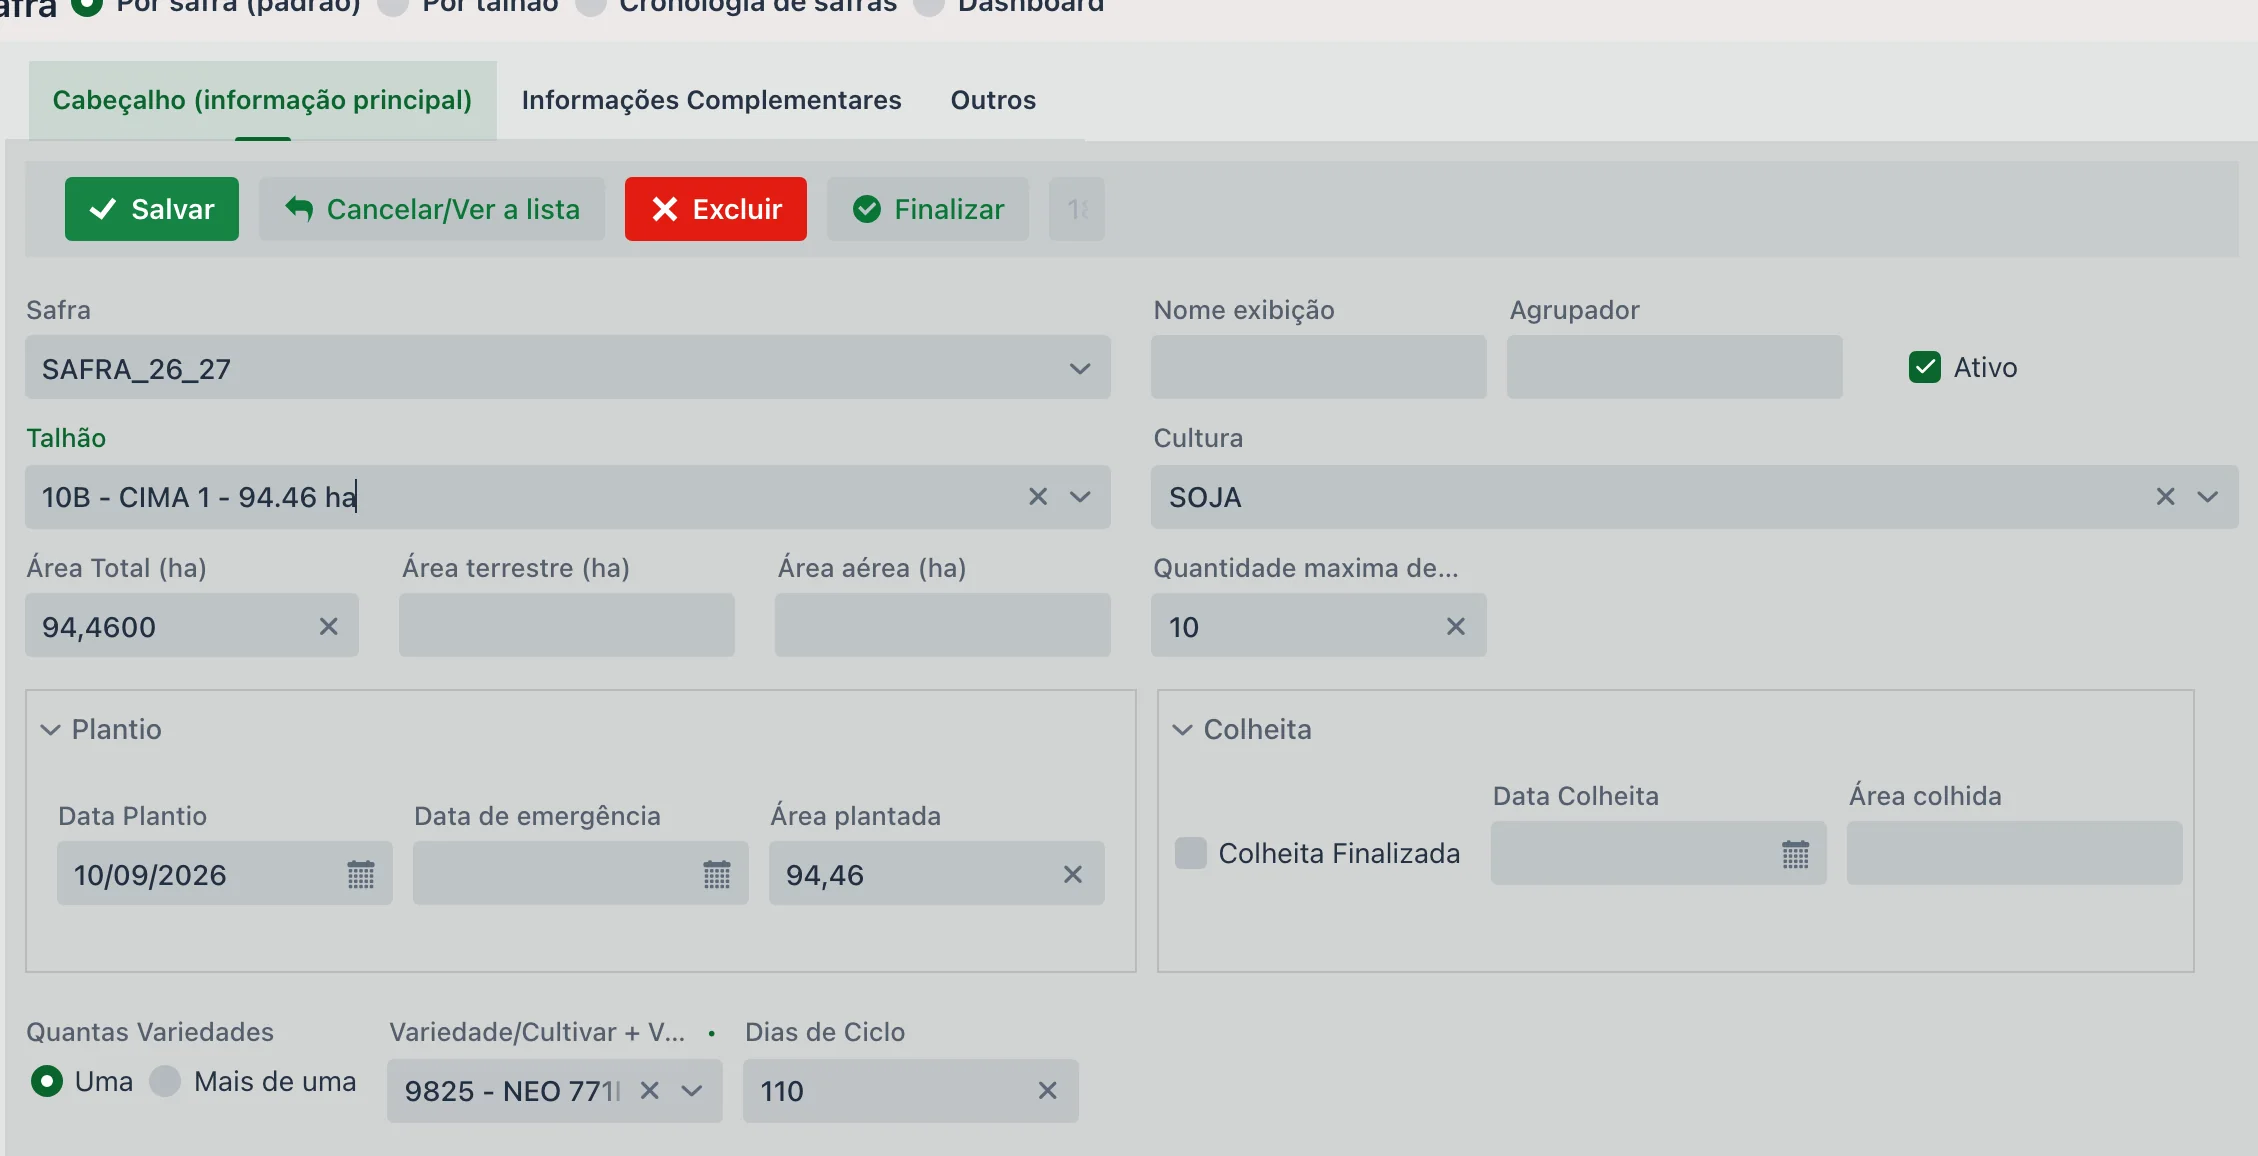
The form is split into three tabs at the top — Header (main information), Additional Information and Others. The header is what ties everything together:
| Field | Description |
|---|---|
| Season | The planting's season. |
| Field | The field, which already brings its registered area. |
| Crop | The crop planted. |
| Display name | Simplifies the name used in work orders and in the app — especially useful in trial plots. |
| Grouping | Free label for grouping plantings. Used to filter work orders, and it becomes a column in the field import when filled in. |
| Active | Keeps the planting in use. |
| Total Area (ha) | Area planted in that field in this season. |
| Ground area (ha), Aerial area (ha), Border area (ha) and Exclusion area (ha) | Optional. Each one is used in the work order when it belongs to that category — the aerial area in an aerial application, for example. |
| Maximum number of varieties | Optional. Limits how many cultivars can be entered in this planting. |
The header also has two sections that open and close, Planting and Harvest, with summarized dates and areas.
🌿 One variety or several
The How many varieties field decides the format of the record:
- One: pick the variety and the cycle days right there, in the header
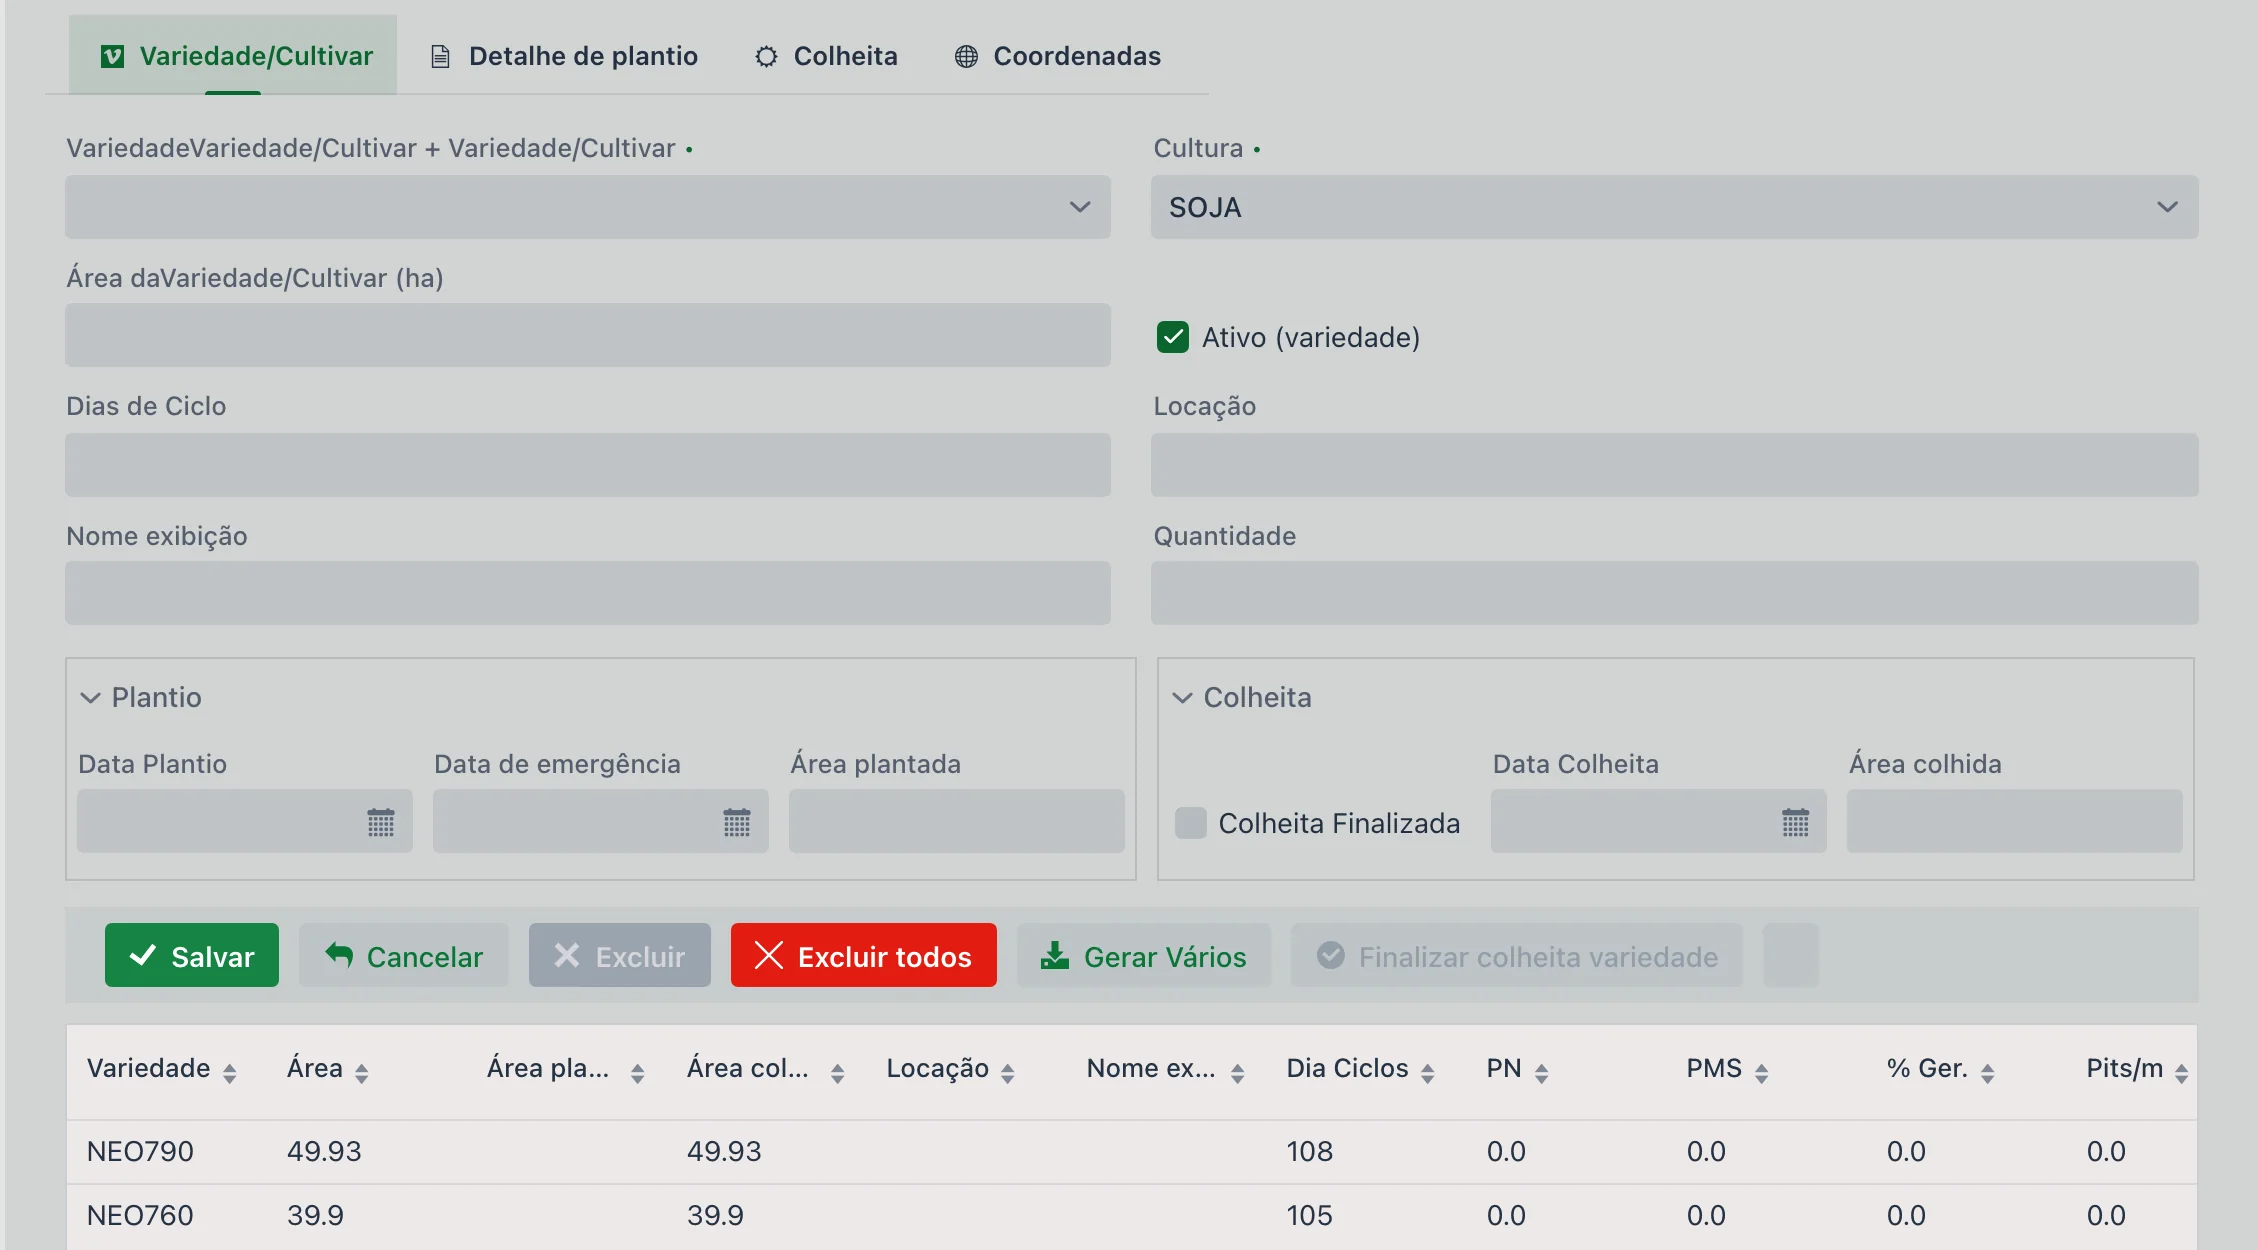
- More than one: the entry moves to the Variety/Cultivar tab, one row per cultivar, each with its own area
The sum of the variety areas can't exceed the planting area.
Variety/Cultivar tab
Each cultivar gets Variety/Cultivar Area (ha), Cycle Days, Location, Display name, Quantity and Active (variety), plus the subsections:
- Planting: Planting Date, Emergence date and Planted area
- Harvest: Harvest Date, Harvested area and Harvest Finished
The grid below shows what has already been entered and pulls in the variety's technical data — PN, PMS, % Ger., Pits/m, Stes/m, KG/ha and Qde KG. The tab's buttons include Generate Several, to create several rows at once, Delete all and Finish variety harvest.
🧪 Separate by variety
When enabled, scouting and work order records are separated by variety in the app and in reports.
The separation is chosen per entry type, not all at once — there are ten independent options: In scouting (MIP), In Planting W.O., In Seed Treatment W.O., In Fertilization W.O., In Crop Protection Application W.O., In Soil Prep W.O., In Harvest W.O., In 'Other' W.O., In Evaluation W.O. and Manual. That way you can separate by variety in scouting and harvest but keep soil preparation unified — which is how most growers work.
- Field "TH 01"
- Varieties: "98YRR" and "99YRR"
- The app will show:
- TH 01 - 98YRR
- TH 01 - 99YRR
📋 Tab: Additional Information
The form's second tab, organized in blocks that open and close:
| Block | What it contains |
|---|---|
| Harvest | Final harvest average, Total harvested KG, Total harvested cotton kg, Estimated weight (KG) and Estimated yield — the actual result for that field. |
| Planned/Budget | Planned harvest average, Cost, Planned cost per ha, Planned exchange rate, Operating cost, Chemicals cost, Planned sale value and Planned by-product sale value. This is where the plan sits alongside the actuals. |
| Display mode | Six options that control where the planting appears: Show in planting dashboard, harvest, application and soil prep, plus Show in MIP and Show in Crop Work Order |
| Third-Party Owner | Third-Party Entity, Receiving Disc. % and Storage Location (default for receipts) — for third-party land, with a discount on receiving. |
| Planting details | Spacing (meters), Planting speed (km/h), Plants per meter, Plants per hectare, Total plants and Planting type. |
This tab also holds Reference/Integration ID, Cycle Reference ID and the trail of who touched the record: Created by, Changed by and Finished by, each with date and time.
🧭 Quick actions on the Season Planting screen
The left column offers important shortcuts for bulk actions. They all open a window with two lists — available on the left, added on the right — and arrows to move fields between them:
- Quick/dynamic field import: choose a crop, optionally a variety and the planting date, and apply them to several fields at once. The Show only unused fields option — checked by default — hides fields that already have a planting in that season, so the list shows only what's missing. At the bottom, the Show in MIP and Show in Crop Work Order options come checked on the records created.
- Change variety: changes the crop and variety of several existing plantings. The list shows what each field has today — crop, variety, area and planting date — so you can check before changing.
- Change grouping: changes the grouping of several plantings at once.
- View variety map: shows a map with the fields and the colors assigned to the varieties, making it easy to see the geographic distribution of varieties.
- Link Proj./Var.: links projects and varieties, used in trial areas.
- Finish multiple harvests: closes the harvest of several fields at once (see below).
- Reports ▼: opens the reports linked to the screen.
How upCampo calculates field yield
The Total harvested KG and Final harvest average fields aren't typed: each load entered updates them automatically, the moment it's saved. What changes is the source of the load and the unit divisor.
The divisor is the unit that production is traded in: 60 kg is the bag and 15 kg is the arroba — neither one is configurable.
| Field | Area | Total harvested | Math | Final harvest average |
|---|---|---|---|---|
| Soybeans — 40 load tickets | 120 ha | 792,000 kg | (792,000 ÷ 60) ÷ 120 | 110.0 bags/ha |
| Cotton — the field's bales | 90 ha | 337,500 kg | (337,500 ÷ 15) ÷ 90 | 250.0 @/ha |
Since the area is the divisor, a wrong area on the planting means a wrong yield — and the error doesn't show up right away, only when someone questions the average at the end of the season.
What "finishing the harvest" does — and what it doesn't
The window itself warns you, and it's worth repeating:
- The Harvest Date entered in the window is saved on the selected fields. To not change the date already there, leave the box empty.
- Generate new record (e.g., fallow): automatically creates a new planting right after — this is how you record fallow or the next crop in the same field.
- Show all (including finished): also shows what has already been closed, useful for checking or correcting.
You can also finish one planting at a time, with the Finish button at the top of the form, or a specific variety, with Finish variety harvest on the Variety/Cultivar tab.
📊 Related reports
The Season Planting screen is the basis for many reports on the platform. The two main ones are:
Shows the whole planting setup with summaries by crop, variety, planted area, planting dates and expected harvest (based on the variety's cycle days).
Lists the season's fields with crop, variety, total cost, cost per hectare and average yield.
These reports help with strategic analysis and with technical and financial tracking of the season.
- The field becomes available in the app
- All season management is centralized (cost, yield, applications, scouting, etc.)
- Data is organized by season, giving you a reliable history
❓ Frequently asked questions
Why is the Season Planting required?
Because it's what makes the fields show up in the app, links each entry to a specific season and lets reports and dashboards separate information by season and by variety.
Do the planting and harvest dates have to be typed in?
Not necessarily. The Planting and Harvest groups are filled automatically by Planting or Harvest work orders — but they can also be entered manually on this screen.
How do I close the harvest of a field?
Check Harvest Finished, use the form's Finish button or, for several fields at once, Finish multiple harvests. Finishing sets the harvested area to 100% and blocks new load tickets — but it does not recalculate the averages already calculated.
I finished the harvest and the date came out wrong. Why?
Because the Harvest Date entered in the finish window is saved on all the selected fields, overwriting what was there. If you don't want to change dates already recorded, leave that box empty before finishing.
How do I record fallow after the harvest?
In the Finish multiple harvests window, check Generate new record (e.g., fallow). When you finish, the system creates the next planting in that field, with no need to register them one by one.
Can I have more than one variety in the same field?
Yes. In the How many varieties field, choose More than one: the entry moves to the Variety/Cultivar tab, with one row per cultivar and its area. The sum of the areas can't exceed the planting area.
Do I have to separate by variety everywhere, or can I choose?
You can choose. The Separate by variety block has ten independent options — one for scouting (MIP), one for each work order type and the manual one. It's common to separate in harvest and scouting and keep soil preparation unified.
How do I enter the same field twice in the same season?
Check Allow the same field more than once, in the left panel. That's for growers who plant two crops back to back in the same field within the same cycle.
How do I register the planting of several fields at once?
With the Quick/dynamic field import: choose the crop, optionally the variety and the planting date, move the fields to the list on the right and confirm. The Show only unused fields option leaves in the list only what doesn't have a planting in that season yet.